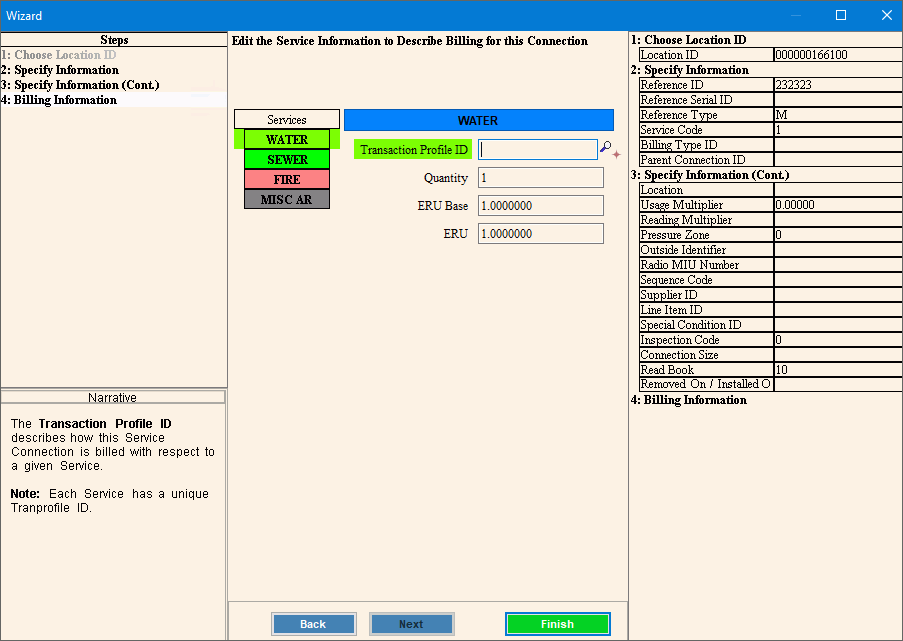
Create Customer Service Connection Step 4 Window
Use the Create Customer Service Connection Step 4 Window to enter a Transaction Profile ID for each of the services delivered by the service connection. A Transaction Profile ID determines how the service connection charges should be generated and which billing rates to use.
Notes:
If your company bills multiple services, enter a separate Transaction Profile ID and Quantity for each service delivered to the service connection in order to generate individual charges using the appropriate billing rates.
For more information about Transaction Profiles, see Billing Transaction Profile Maintenance.
For general information about using wizards, see the Wizard - Introduction.
To display the Create Customer Service Connection Step 4 window:
1. From the Inquiry, click Tools and then, click Wizards.
2. In the Create section, click Customer.
3. To navigate
to the step that you want to maintain click Next
![]() or click Back
or click Back ![]() until
the data that you want to maintain displays in the Data Entry Panel.
until
the data that you want to maintain displays in the Data Entry Panel.
Create Customer Service Connection Step 4 Window Example:

Data Entry Panel - Create Customer Service Connection Step 4 Prompts
|
|
|
The service currently being maintained is highlighted for your reference. |
Enter the Transaction Profile ID used to bill the transactions for the service delivered by the Service Connection. (up to 12 characters) Notes:
|
|
To accept the default value of 1, press [TAB]. Or, if there is more than 1 element at the location AND the elements are not |
|
If this connection uses ERU base values to calculate billing amounts, enter the ERU base if applicable. Otherwise, leave blank. For more information see Transaction Code Calculation Types - Location ERU Base. |
|
If this connection uses ERU values to calculate billing amounts, enter the ERU value if applicable. Otherwise, leave blank. For more information see Transaction Code Calculation Types - Location ERU. |
|
|
To complete the entries for the service connection after you verify your entries in the Inquiry Panel, click Finish. Keyboard shortcut: [ALT + s] Or, to return to the previous window,
click Back Keyboard shortcut: [ALT + b] For directions to the previous step, click here. |
|
|