on individual reports so that you can quickly
see previous snapshots of the report.
on individual reports so that you can quickly
see previous snapshots of the report. Report History
EDIFICE
report history (formerly known as the Executive Console) allows you to
go paperless with reporting, by saving and archiving electronic copies
of a report each time it is run. When you need the information you
can retrieve the report and view it. It can even be reprinted. In
addition, there is a report history button on individual reports so that you can quickly
see previous snapshots of the report.
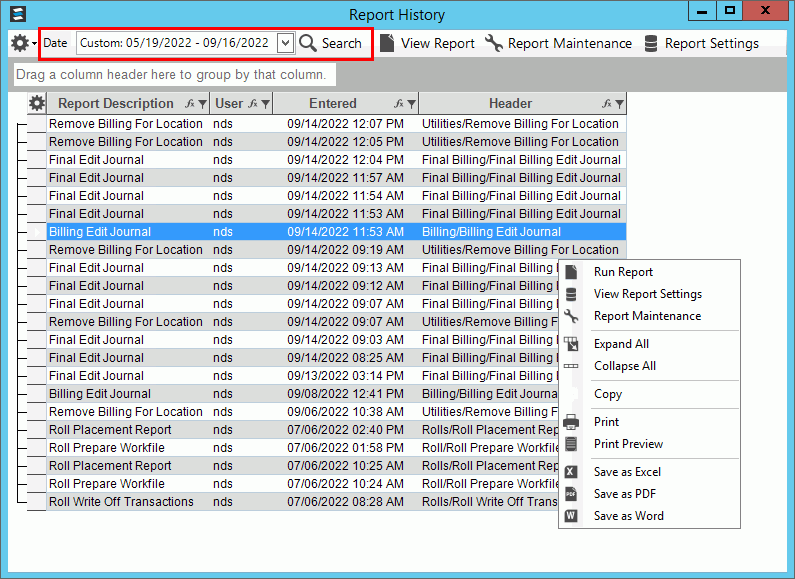
Use the date range function to zero in on the reports for the time period you want. You can even pinpoint a specific day. The resulting list of reports displays in a grid, showing the name of the report, the user who ran the report and the date and time it was run. The report list can be sorted, filtered and grouped so that you only see the desired reports/printouts, making it easy to find what you need. There are options on the toolbar and on a right-click menu for displaying the report and for viewing the setting that were chosen when the report was run.
Report History allows you to:
View previously run reports quickly and easily
Have information at your fingertips when you need it
Track audit details of who called for the report and when
Electronically stored reports reduces the need for paper and physical storage space
Keep data secure by having a copy of the report in history
Have an electronic copy if the report printer stops while printing
Notes:
Individual
reports are set to automatically archive to the Reports table in the
database. (Create Report option
in Function
Maintenance  is set to Yes).
When a report is archived in the Report History, it only saves the data. Any special formatting done while viewing the report during Print View is not saved.
Directions:
To see all history for all reports, click Report
History on the EDIFICE
Toolbar.
Or, to see history for an individual report go to the report screen
and click Report History .
Report History Window Example:
Report History Prompts |
|
Creating a Report List
To create a list of reports: 1.
Choose the date range and click Search 2. Reports are listed with the run date, run time and ID of the user who called for the report. 3. The list can be sorted, filtered and grouped as explained below. |
|
Sort |
To sort the list, simply click any column heading. To sort in reverse order, click the column heading a second time. For example, you can sort the list by Report Description or Entered Date. |
Filters |
To
limit the reports to those that meet certain criteria, click Filter Note: Advanced filtering options are available by clicking Text Filters. |
Viewing/Printing a Report |
Double-click a report to display it in the Print View window or click to highlight the report and then
click View
Report |
Viewing Report Settings |
If you want to see the settings that were used to
run the report originally, from the report list right-click the
desired report and select View
Report Settings or click Report Settings |
|
To view the certain functions related to running and storing the report, click Report Maintenance. Note: For more information, please contact NDS Support at 800-640-7754. |
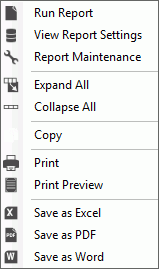
Right-click Menu
|
The report grid offers right-click options for the highlighted report as well as options for printing and exporting the report list.
Report List Printing & Exporting right-click options:
|
![]()

 .
. next
to the desired column heading. For example, filter user
to limit the reports to a specific user. The available filter
choices display. Click to check the desired box or boxes
and then, click
next
to the desired column heading. For example, filter user
to limit the reports to a specific user. The available filter
choices display. Click to check the desired box or boxes
and then, click  .
It can also be printed from the Print View screen.
.
It can also be printed from the Print View screen.