Past Due Create Workfile
Use the Past Due Create Workfile routine to create a Workfile containing the customer detail that is needed to print past due notices alerting customers about the overdue status of their account. During the Create Workfile routine you can determine the customers to consider in the past due process by choosing the services, the companies, the finance periods, and the Age Balances to include. There are also options to create the Past Due workfile for open item customers only and for customers with payment plans.
Notes:
The Past Due Create Workfile is the first step in creating customer past due notices. For the sequence and timing of the past due steps, see Past Due Process.
The Past Due Service Parameter record can limit the customer services that are considered during the Past Due Create Workfile routine.
To open:
1. Click Processes from the menu.
2. Click Past Due.
3. Click Create
Workfile.
Or, use the keyboard
shortcut: [ALT] [p] [p] [c].
Past Due Create Workfile Window Example:
Past Due Create Workfile Prompts
|
|
To select the services to consider, click to check the appropriate services listed. Tip:
To quickly select or de-select
all services listed,
click Check All |
|
To select the companies to consider, click to check the appropriate companies listed. Tip:
To quickly select or de-select all
companies listed, click Check
All |
|
To select the customer statuses to consider, click to check the appropriate statuses listed. Tip:
To quickly select or de-select all
statuses listed, click Check
All |
|
To select the Finance Period to consider, click to check the appropriate Finance Periods listed. Tip:
To quickly select or de-select all
Finance Periods listed, click Check
All |
|
To select the rate classes to consider, click to check the appropriate rate classes listed. Tip:
To quickly select or de-select all
rate classes listed,click Check
All |
|
To select the customer credit ratings to consider, click to check the appropriate customer credit ratings listed. Tip:
To quickly select or de-select all
credit ratings listed, click Check
All |
|
To select the customer Age Balances to consider, click to check the appropriate Ages listed. Tip:
To quickly select or de-select all
Ages listed, click Check All
|
|
To include lien amounts on the report, click to select this box. To omit customer lien amounts on the report, leave this box unchecked. |
|
To include customer lien costs on the report, click to select this box. To omit customer lien costs from the report, leave this box unchecked. |
|
To include customer lien interest amounts on the report, click to select this box. To omit customer lien interest amounts from the report, leave this box unchecked. |
|
To include customer roll principal amounts on the report, click to select this box. To omit customer roll principal amounts from the report, leave this box unchecked. |
|
To include customer roll cost amounts on the report, click to select this box. To omit customer roll cost amounts from the report, leave this box unchecked. |
|
To include customer roll interest amounts on the report, click to select this box. To omit customer roll interest amounts from the report, leave this box unchecked. |
|
Enter the Minimum Balance a customer must have to be included in the past due process. (7.2 numeric) |
|
The system date displays for the Notice Date, but you can enter another date as the date to print on the Past Due Notices. (mmddccyy, slashes and century are optional) |
|
The due date displays, but you enter another date for which the overdue payment is due. (mmddccyy, slashes and century are optional) |
|
Open Item Accounts Only |
To create the Past Due workfile for open item customers, click to select Open Item Accounts Only. Otherwise, please leave blank. Note: The Open Item Accounts Only option only pertains to Open Item customers. |
Customers |
Entry Options:
|
Payment Plans |
To specify if customers with payment plans should be included in the past due workfile, click to select a choice from the drop-down list. Entry Options:
|
|
To start the Create Workfile, click Proceed. Keyboard shortcut: [ALT + p] To escape without creating the Workfile,
click Cancel Keyboard shortcut: [ALT +c] |
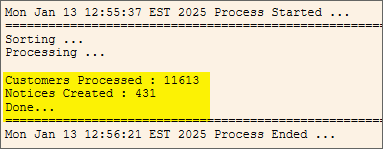
Processing Messages |
Processing messages display during processing:
To close the Create Workfile routine when the routine is complete, click close. Keyboard shortcut: [Ctrl + x] Note: The number of customers processed and the number of past due notices generated during the Create Workfile routine displays for your reference. |
![]()