Group Mortgage Payment Entry - Detail Area
The Detail Area provides space to enter or change transaction detail, so you can distribute the Check Amount entered in the Header Detail Area among the appropriate Tax Accounts. The list of pending (unposted) transactions appears below the entry fields. The table following the window example describes the fields in the Detail Area for Group Mortgage Payment Entry.
Note: To see descriptions of the buttons associated with the Detail Area, refer to Group Mortgage Payment Entry - Button Bar Area.
Example:
Example: In the following example, enter $768.00 for Tax Account Number H3554R to bring the proof amount to zero.
|
Detail Area Prompts Tip: To see more information about a field, click the hyperlink for the field name. |
|
|
It is easy to accidentally overlay a pending transaction. If you want to add a transaction to the list, be sure to click the New button in the Button Bar Area before entering the data for every new transaction. | |
|
Enter the Map, Lot, Sub (subdivision), and Type for the Property ID. (up to 3 characters for each sub-field) Notes:
| |
|
Enter the Tax Account Number. (up to 6 characters) Note: Either Property ID or Account # is required. Tip:
Click the
magnifying glass | |
|
To avoid losing data, you must save new or changed transactions. Click Save in the Button Bar Area. | |
|
|
Click the magnifying glass Keyboard shortcut: [CTRL + f] |
|
The primary Owner Name displays when you tab out of the Account # field. You can override the Owner Name if necessary. | |
|
Status |
Displays one of the following values describing the Tax Account status:
|
|
Enter the Distributed Amount, which is the portion of the payment to be applied to the Tax Account. (8.2) Required. | |
|
Proof |
Displays the remaining amount to be distributed, which is the Check Amount (entered in the Header Detail Area) minus the calculated total of the Distributed Amounts. Note:
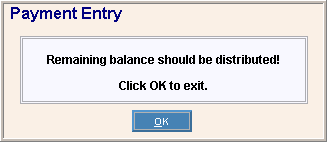
If you
click Done before the Proof Amount
is zero, you will see the following message.
|
|
|
To change the font size of the data in the window, click Cycle Font Size. Click the button repeatedly to cycle through three font sizes. |
![]()
 CAUTION
 to search for existing Tax Account Numbers.