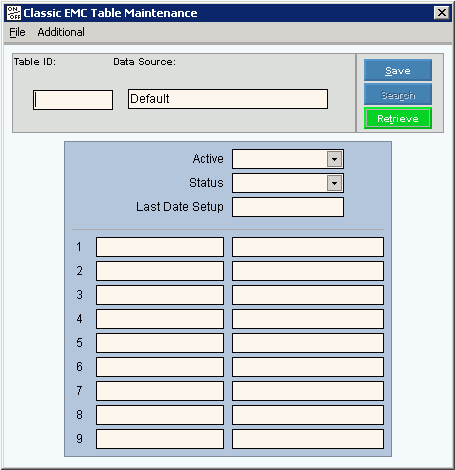
Opening Classic EMC Table Maintenance, click More.
1. Click Billing Functions from the Menu Bar.
2. Click Communications.
3. Click File Maintenance.
4. Click Classic
EMC Table Maintenance.
Advanced
Methods:
Click the following sequence:
Billing Functions from the
Menu Bar; Menu
Panel; File Maintenance
on the Menu Bar; and Classic
EMC Table Maintenance.
Classic EMC Table Maintenance Window Example:

Creating a New Classic EMC Table, click More.
To create a new record choose one of these methods:
Enter the new Table ID and click Retrieve
 ,
or press [ENTER].
Keyboard shortcut: [ALT + t]Or, enter the new Table ID and click File from the Menu Bar; next click New.
Keyboard shortcut: [ALT] [f] [n]
Tip: To indicate
that you are building a new Classic EMC
Table, New ![]() displays near the Table ID. Default entries
display and the first field is highlighted
to let you know you can begin entering information.
displays near the Table ID. Default entries
display and the first field is highlighted
to let you know you can begin entering information.
Classic EMC Table Maintenance Prompts Tip: To see more information about a field, click the hyperlink for the field name. |
|
Enter the Table ID assigned to the EMC Table. (up to 9 characters) Note: The Table ID for each carrier is assigned by NDS and is included in the script that runs the electronic billing submission. |
|
|
To update the new or changed information, click Save or press [ENTER]. Keyboard shortcut: [ALT + s] |
To avoid losing data, you must save new or changed records. |
|
|
Note: Search is not active during this maintenance. |
|
To display an existing Classic EMC Table, enter the Table ID and click Retrieve, or press [ENTER]. Keyboard shortcut: [ALT + t] |
Data Source |
To select a data source that identifies the data bases for electronic billing, click a choice in the drop-down list. Data Source Options:
|
Active |
Active identifies the state of the electronic billing setup/installation and is assigned by INSight. Valid Active Codes:
|
Status |
Status describes the current electronic billing process and is maintained by INSight. Valid Statuses:
|
Last Date Setup |
The date of the last electronic billing setup is maintained by INSight and displays for your reference. |
Line 1 Column 1 |
Enter the Submitter Identification as specified by 1000A NM109. (up to 12 characters) |
Line 1, Column 2 |
Enter the Submitter ID which is assigned by the Carrier as specified by ISA06 GS02. (up to 12 characters) |
Line 2, Column 1 |
There are two types of entries for this field. One for submitting professional claims and another type for submitting institutional claims. To maintain the field for professional billing, enter the following: The following flags determine the minimum length for certain fields in the transmission file.
Note: The default value for each flag is 2, although you can maintain 0-9 as the minimum length for each field. For example, if the minimum length is set to 9, then INSight checks to see if the specified field has 9 or more characters. To maintain the field for institutional billing, enter the following: If the Ticket Message Code (UXYZZ, where x=TypeofAdmission, Y = SourceOfAdmission, ZZ = AdmissionHour) is blank, then look to line 2, column 1 of the EMC table for ABCD, where:
Notes:
|
Line 2, Column 2 |
Enter the following flags:
|
Line 3, Column 1 |
Enter the Set Transmit Number as specified by ST01. (up to 12 characters) |
Line 3, Column 2 |
Enter the Group Control Number as specified by GS02 or GE02. (up to 15 characters) |
Line 4, Column 1 |
Enter the Interchange Receiver ID that is information the carrier wants to show in the header record of the electronic billing file as specified by ISA08. (up to 12 characters) Note: The carrier will provide the required information. |
Line 4, Column 2 |
Enter the Application Receivers Code as specified by GS03. (up to 15 characters) |
Line 5, Column 1 |
Enter the Identification Code as specified by 1000B or NM109. (up to 12 characters) |
Line 5, Column 2 |
Enter the Organization Name as specified by 1000B or NM103. (up to 15 characters) |
Line 6, Column 1 |
Note: Please leave this field blank. This field is no longer required because the provider NPI number has been implemented. |
Line 6, Column 2 |
Enter the Patient Account Number that contains the contact information for the person in charge of electronic billing. (up to 6 characters) Note: The contact person Patient Account only contains the demographic contact information including the contact person's name, phone number, extension and location. |
Line 7, Column 1 |
Enter the Interchange ID as specified ISA07. (up to 12 characters) |
Line 7, Column 2 |
Enter the Reference Identification or provider specialty as specified by 2000A PRV03. (up to 15 characters) |
Line 8, Column 1 |
To identify items that are discontinued and to be able to shut off certain ref segments in all loops at once, maintain the following flags: Entry options:
Note: Generally, this is set to NYN for a group or NNY for a single provider. |
Line 8, Column 2 |
To specify who to pay the check to, enter a provider code, group code or a location code. (up to 12 characters) Tip: The Pay By can be different than the Bill By field. For example, you can bill the claims by group or location and have the check payment made to a provider. In addition, the provider, group or location code provides the address and phone number for the entity receiving the check. |
Line 9, Column 1 |
Note: This field is reserved for future use. Please leave blank. |
Line 9, Column 2 |
Enter the version of electronic billing software used. For example, 004010X098A1 is the electronic billing version that runs the 837 format. |
Editing an Existing Classic EMC Table, click More.
![]() CAUTION: To
avoid losing data, you must save new or changed records.
CAUTION: To
avoid losing data, you must save new or changed records.
1. To display the record to
be changed, enter the Table ID and click Retrieve
![]() , or
press [ENTER].
, or
press [ENTER].
Keyboard shortcut: [ALT
+ t]
2. To position the pointer to the information that you want to change, press [TAB] or click the field using the mouse.
3. Enter the data changes.
4. To complete the edit process,
click Save ![]() , or press [ENTER].
, or press [ENTER].
Keyboard shortcut: [ALT
+ s]
Deleting an Existing Classic EMC Table, click More.
1. To display the record to
be deleted, enter the Table ID and click Retrieve
![]() , or
press [ENTER].
, or
press [ENTER].
Keyboard shortcut: [ALT
+ t]
2. Click File
from the Menu Bar,
and next click Delete.
Keyboard shortcut: [ALT]
[f] [d]
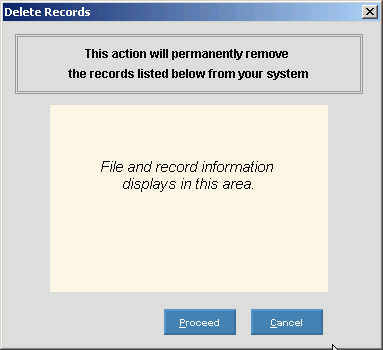
3. At the Delete Records prompt, click Proceed to delete the record, or click Cancel to escape from the delete routine.
Example:

Note: After you
click Proceed, you will
see the following message on the Status
Bar.
![]()