Opening the Print View window for a specific report, click More.
1. Run a report.
Tip: For a list of specific report instructions see
the Reports Overview.
2. Fill in the options at the prompts.
3. Enter the Printer Number for Print View (usually 5) at the printing options window.
4. Click Print
View  .
.
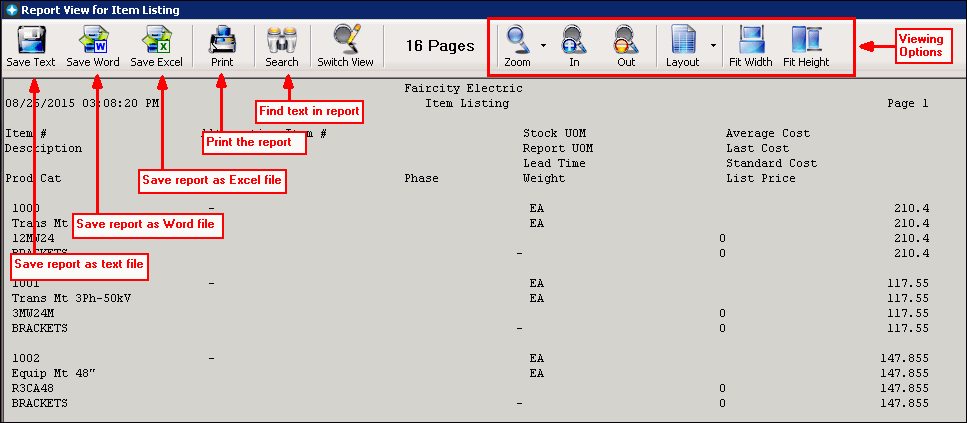
Print View Window Example:

Using basic Print View report functions, click More.
The following table describes the basic Print View Report functions.
Basic Print View Report Functions |
|
To send a displayed report to a printer, use one of the following methods:
You will then see the Windows™ Print dialog window for your default printer.
Tips:
|
|
You can "zoom in" to get a close-up view of your report or zoom out to see more of the page at a reduced size. You can fit the report into the entire page or select multiple pages to view within the window. Tips:
|
|
To
close the Print View window, click Close
Tip: To cancel a report (without sending it to a printer), simply close the Print View window.. |
|
Using advanced Print View report functions, click More.
The following table describes the advanced Print View Report functions.
Advanced Print View Report Functions |
|
Locate Data |
To
search for text in the report, click Find
Text in the Report |
You can freeze the data on a report by saving it to a file. This function is useful when archiving important data or when exporting the data to another program. Directions: 1. Click Save As Text. 2. Follow the normal Windows™ save procedure:
|
|
Save Word |
To create a Microsoft Word document from the report: 1. From the Menu
Bar, click Save Word
2. Follow the normal Windows® save procedure:
Tip: This can be handy if you want to change the heading or print a financial report on letterhead. |
Save Excel |
To create an Microsoft Excel spreadsheet from the report: 1. From the Menu
Bar, click Save Excel
2. Follow the normal Windows® save procedure:
Tip: This can be handy if you want to further manipulate the report data. |
Navigating within a displayed report, click More.
The following table describes the instructions for navigating within a report.
Navigating in a Report |
|
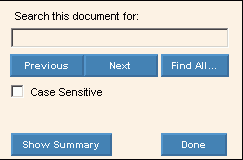
You can use the Find function to locate and highlight specific data in a report. To locate data in the report: 1. Click 2. Enter the data you want to find. 3. If you want the Find routine to be case-sensitive, click the Match Case box so a check mark appears. 4. To find data beyond the current pointer position, click the Next button. To find data before the pointer position, click the Previous button. 5. To cancel the search function, click the window Done button. Example:
Tip: The Find feature is useful for reprinting data stored in archived reports (reports saved to a file). For example, you can search for a name in some archived laser bills. Then you can highlight the bill in the file and reprint your selection. |
|
To quickly move the pointer to the bottom of the report, press [CTRL + END]. |
|
To quickly move the pointer to the top of the report, press [CTRL + HOME]. |
|
To move around within a report, you can use the Scroll bars. Tip: You can also move vertically by pressing [PAGE UP] and [PAGE DOWN]. |
|
 .
. .
This is handy if you want to find specific information
quickly and accurately. Enter the text to search
and click
  .
.

