Management Reports Designer - Line Design Tab
Use the Management Reports Designer - Line Design Tab to create or edit the lines that make up a report. You can specify for each line, the General Ledger accounts to include, the account balances to add or subtract to produce financial totals, the descriptions to use, and how much detail to print on the report. You can add lines, edit lines, delete lines and re-arrange the order of lines.
![]() Important:
When you change a Line Design format that is used by other reports,
the changes are made to the other reports as well.
Important:
When you change a Line Design format that is used by other reports,
the changes are made to the other reports as well.
Directions:
To display the Management Reports Designer - Line Design Tab, from the
Management Reports Designer,
click Line Design ![]() .
.
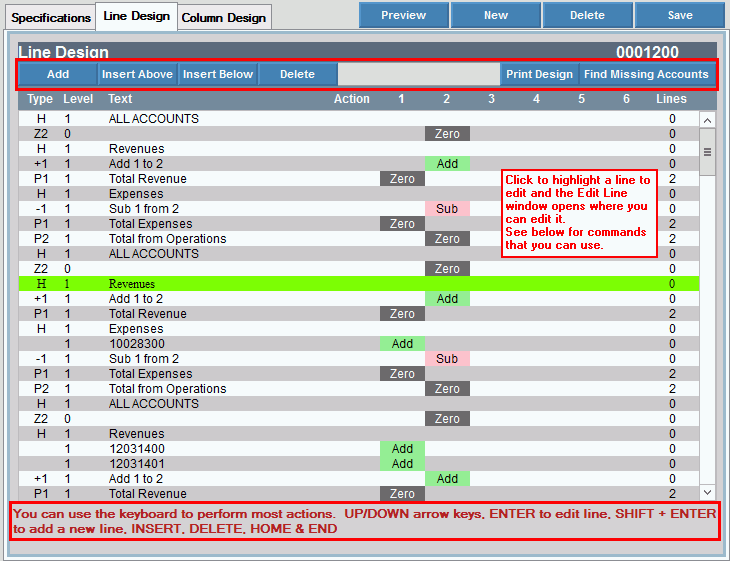
Line Design Tab of Management Reports Designer Window Example:

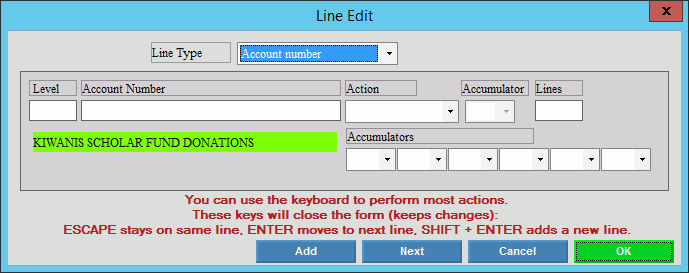
Line Design Line Edit Window Example:

Management Reports – Line Design Prompts
|
|
Viewing Lines Below are explanations of the line information. There are 8 types of lines available. For directions on adding specific types of lines, see Adding Lines Step. |
|
Type |
Describes the type of line for the report. There are 8 line types available:
The following line types perform a function:
|
Level |
Displays the summary level for this line. Summary levels control the amount of detail that prints on a report. Financial statements can be constructed so lines, such as totals and subtotals, have a higher summary level than detail lines. In this way, it is possible to print a report of totals only, simply by specifying that only lines of a certain level and higher be printed. |
Text |
A description of the line displays related to the type of line it is. If an account number is assigned to the line, the account description is assigned. |
Action |
Describes how to display the GL account balance.
Note: If you select % Percent, you must specify the Accumulator to use for the percent comparison. |
Accumulator 1-6 |
The columns 1-6 represent the six accumulators available for report calculations. It is helpful to think of accumulators as calculators with memory. For example, add a set of line figures and store them in accumulator 1. Another set of line figures can be stored in accumulator 2. If the totals of accumulators 1 and 2 need to be added together for any reason, the grand total can be stored in accumulator 3. Accumulators 1 and 2 then can be cleared (zeroed) so they can be used for another set of figures. |
Lines |
Displays the number of lines to skip before the next line is printed. Enter 99 to specify a page break. |
Line Design Actions
|
|
Save
|
When you finish adding or entering the changes to the line designs, click Save located at the top. Important:
|
Keyboard Functions |
The following keyboard entries will:
|
Edit |
To edit an existing line: 1. Double-click to highlight the line to be edited and the detail displays in the Line Design Edit window. 2. Click the field that needs to be changed and edit it. 3. Click OK to save the line. To save all report changes when all line design changes are entered, click SAVE located at the top. |
|
To add a new line to the end of the existing lines, click Add located above and the Add Line Design area displays. For directions, see Add Line Step. |
|
If you accidentally add a line or you have a line that is not needed, you can delete it by doing: 1. Click to highlight the line to be deleted. 2. Click Delete under the LINE DESIGN heading and the line is deleted. Or, press the [Delete] key to delete the line. Important: Do not click Delete located near the top of the window. That Delete will delete the entire Management Report. |
|
To insert a new line: 1. Click to highlight the line where you want to add a new line. 2. To insert the new line above the highlighted line, click Insert Above. To insert the new line below the highlighted line, click Insert Below. 3. This will move the other existing lines for the new line. Tips:
|
|
To print the details for each line on the report, click Print Design. |
|
To check if any accounts in the View are missing on the report, click Find Missing Accounts. This feature will check the account numbers in the View and compare them to the ones that are listed on the line design, as well as in the ranges. For directions, see Find Missing Accounts. |
Add new Line Step – GL Account or Range of Account Numbers Line Note: Each line type displays different prompts. For example, if you choose account number for a line type, the prompts are different than if you choose heading. For directions on adding:
|
|
Line Type |
To create a GL account line, click Account Number in the drop-down list and the following prompts display in the Add Line Design area: |
Adding a New Line Step - GL Account or Range of Account Number Line Click Add or Insert Below and the following screen displays.
To create a line for a range of accounts, click Range of Accounts and the prompts below display.
|
|
Level |
Enter the summary level for this line. The level determines whether or not the line will print on the report or simply be included in the accumulations. |
Enter a valid General Ledger account number for the line. The account description displays below the account number for your reference. |
|
From/To Fund Dept Account Sub-Account |
To specify the range of General Ledger accounts for this line:
Example: If you want 1 line for all labor accounts and you know that the accounts fall between 700 and 708, enter that range for the From and To fields for accounts. |
Action |
To determine how the GL Account balance should display, click a choice in the drop-down list.
|
Accumulator |
If you select % percent action, click an accumulator from the drop-down list to use as a percent comparison with the account balance. |
Lines |
Enter the number of lines to skip before printing the next line. Enter 99 to indicate a page break. |
Accumulators |
To specify how the GL account balance will update the individual accumulators for this report, enter one of the following:
|
|
To save the line entry, click OK or, press [Enter]. |
Adding a New Line Step - Print Line |
|
Line Type |
To create a print line to print specified report totals, click Print from the drop-down list and the following prompts display in the Add Line Design area:
|

|
|
Accumulator |
To identify the totals to print, click an accumulator from the drop-down list. Notes:
|
Level |
Enter the summary level for the print line. The level determines whether or not the line will print on the report or simply be included in the report accumulations. |
Heading |
Enter a description for the line. |
Action |
To determine how the print balance should display, click a choice in the drop-down list:
Note: If you select % percent, you must specify the accumulator to use for the percent comparison. |
Accum |
If you chose % percent above, click an accumulator from the drop-down list to use as a percent comparison with the print total. |
Lines |
Enter the number of lines to skip before printing the next line. Enter 99 to indicate a page break. |
Accumulators |
To specify how the GL account balance will update the individual accumulators for this report, enter one of the following:
|
|
To save the line entry, click OK or, press [Enter]. |
Adding New Line Step - Add/Subtract Line |
|
Line Type |
Use the add/subtract functions to add or subtract specified accumulators for the report. To add accumulators, click Add from the drop-down list and the following prompts display: Note: The Subtract Line Design looks the same except To is replaced with From.
|
Accumulator |
To identify the accumulator to add, click a choice in the drop-down list. Notes:
|
To Accumulator |
To identify the accumulator to add to, click a choice in the drop-down list. |
Description |
A description based on the math function and accumulators is generated. |
Zero |
To zero the accumulator after performing the calculation, click to select the Zero box. |
Accumulators |
To identify how the calculated balance should update the accumulators, click a choice from the drop-down list. Choices are:
|
|
To save the line entry, click OK or, press [Enter]. |
Adding a New Line Step - a Zero Line Click Add or Insert Below. |
|
Line Type |
To zero out a specified accumulator, click Zero from the drop-down list and the following prompts display:
|
Accumulator |
To identify the accumulator to zero, click a choice from the drop-down list. |
Adding a New Line – a Header Line Click Add or Insert Above or Insert Below. |
|
Line Type |
To add a heading to the report, click Header from the drop-down list and the following prompts display:
|
Level |
Enter the summary level for the line. The level determines whether or not the line will print on the report or simply be included in the accumulations. |
Heading |
Enter the text for the heading for the line. |
Lines |
Enter the number of lines to skip before printing the next line. Enter 99 to indicate a page break. |
|
To save the line entry, click OK or, press [Enter]. |
Adding a New Line - a Separator Line Click Add or Insert Above or Insert Below. |
|
Line Type |
To print a designated character across a line, click Separator from the drop-down list and the following prompts display:
|
Character |
Enter the character to print as a separator. Example: – or = for double underline |
Level |
Enter the summary level for the separator line. The level determines whether or not the line will print on the report. |
Lines |
Enter the number of lines to skip before printing the next line. Enter 99 to indicate a page break. |
|
To save the line entry, click OK or, press [Enter]. |
|
To find out if any accounts in the current Account View are missing on the report, click Find Missing Accounts. This will check the account numbers in the View and compare them to the ones that are listed on the line design, as well as in the ranges. A window similar to below displays: Note: If there are no accounts missing from the view, the following message displays in the right panel: No Missing Accounts. The right panel displays the accounts missing from the particular fund.
|
|
To add the missing accounts to the line design, click Add Accounts to Report and a window similar to the one below displays. |
|
|
|
1. From the Accounts List, highlight the account that you want to add. 2. Then, in the right panel highlight where the missing account should go. 3. Click Add Selected Accounts to Report and it will be inserted properly. 4. Click Close to return to the Line Design panel where you can edit the inserted line if necessary. Note: If you make a mistake, simply click Close and delete the line that was added incorrectly. |