Create Customer Step 7 Window
Use the Create Customer Step 7 window to enter the general service information that controls billing, taxation and the type of account for the customer.
To display the Create Customer Step 7 window:
1. From the Enhanced Inquiry, click Tools and then, click Wizards.
2. In the Create section, click Customer.
3. To navigate
to the step that you want to maintain click Next
![]() or click Back
or click Back ![]() until
the data that you want to maintain displays in the Data Entry Panel.
until
the data that you want to maintain displays in the Data Entry Panel.
Create Customer Step 7 Window Example:
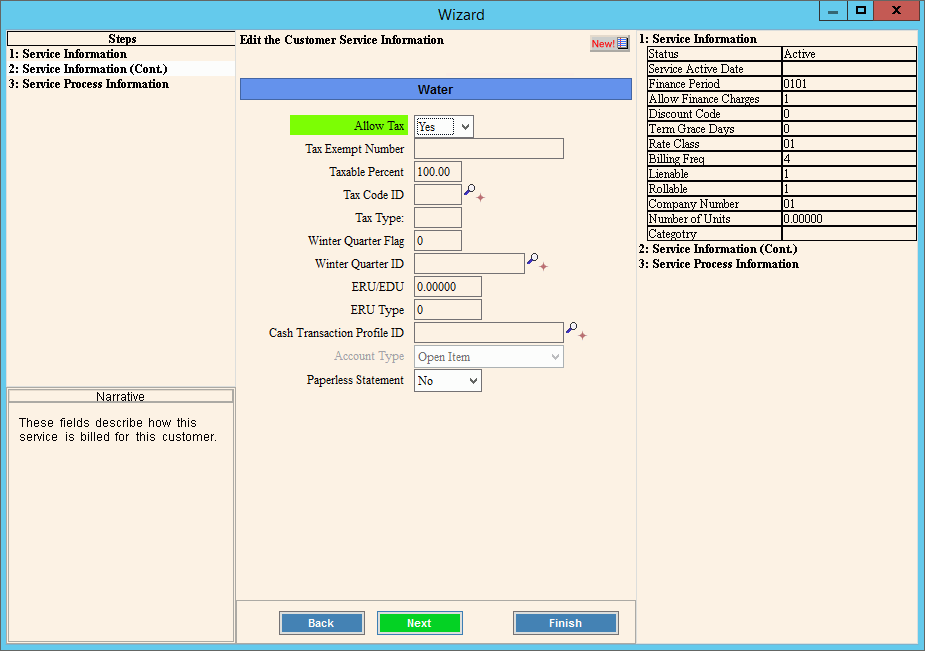
Data Entry Panel - Create Customer Step 7 Prompts
|
|
If the customer
is taxable, click Yes
in the drop-down list. Note: The Allow Tax setting works with the Transaction Code's Tax Code setting to determine taxability. |
|
If the Allow Tax field is set to Yes and only a portion of the account should be taxed, enter the percentage of the charge the customer is liable to be taxed. (2.2 numeric) Note: Generally, leave blank. |
|
If a customer's taxable rate differs from the default tax rate, enter the Tax Table ID that contains the correct tax rate for the customer. (up to 5 characters) Tips:
|
|
Enter the user-defined Tax Type, if applicable. (1 character) |
|
If the customer does not need their sewer bills adjusted for summer outdoor use, maintain the default of 0 for No. If the customer does need their sewer bills adjusted for summer outdoor use, enter 1 to set the Winter Quarter Flag to Yes. Note: For more information, contact NDS Support. |
|
If the customer sewer bills should be adjusted for summer outdoor use with the information contained in the Winter Quarter Tables, enter a valid appropriate Winter Quarter Table ID. |
|
Enter the ERU/EDU amount, if applicable. (9.0 numeric) Note: Generally, please leave this field blank, unless directed by NDS Support. |
|
Note: Generally, please leave this field blank, unless directed by NDS Support. |
|
To use the default Cash Transaction Profile ID when entering customer cash receipts, please leave blank. Or, to assign another Cash Transaction Profile ID as the default for the customer, enter the Cash Transaction Profile ID. (up to 12 characters) Notes:
|
|
To assign an Account Type to the customer, click a choice in the drop-down list. Entry Options:
|
|
To indicate that the customer will receive an paperless type of statement, click Yes in the drop-down list. To indicate that the customer will receive a paper statement, click No in the drop-down list. |
|
|
To continue to the next step that contains the additional service settings, click Next. Keyboard shortcut: [ALT + n] For directions to the next step, click here. |
|
To complete the entries and return to the Create Customer Step 5 window, click Finish or press [Enter]. Keyboard shortcut: [ALT + s] Note: After clicking finish, you can add another service or proceed to Add Location Step. For directions, click here. |
![]()