 .
.
EDIFICE Inquiry - Location History View
Use the Location History view to see all activity for a specific location
including the current owner and tenant information as well as all previous
owners and tenants for the location. You can double-click a specific
history item to drill-down to view additional detail all from a single
screen. In addition, there are handy right-click functions available
that allow you to print and export the information and you can view more
detail by clicking Information Hover
.
From the EDIFICE Inquiry, click View and then click Location History.
EDIFICE Inquiry - Location History View Example:

EDIFICE Inquiry - Location History View Prompts Note:
Each section of the view can be expanded or collapsed to
suit your needs. To collapse a section, click Collapse
|
|
Double-click |
To load a selected item and view additional detail, double-click the desired item. |
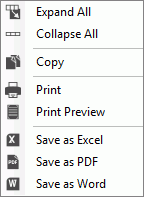
Right-click Options To see additional options, right-click. Below is an example.
|
|
|
To expand all rows in the grid, click Expand All. To collapse all rows in the grid, click Collapse All. |
|
To copy the information highlighted in the selected rows, click Copy. |
Printing & Exporting Functions These functions can be handy for further manipulating or formatting the data or sending copies to coworkers. In addition, Print and Print Preview functions are available.
|
|
|
To begin printing the displayed information to the default Windows printer, click Print. The Print dialog opens. To print to the Print Preview window, click Print Preview. |
|
The Windows Save As steps:
|
 . To expand a collapsed section,
click
. To expand a collapsed section,
click  .
.


 .
.