 on the Toolbar.
Cash Receipts Entry - Cash Receipts Control Window
Use the Cash Receipts Control Window to maintain information for the batch of cash receipts being processed. This information will be the same for all the receipts entered until this control information is changed. Setting the Cash Receipts Control is the first step in entering cash receipts. The Cash Receipts Control window displays each time you start up or open Cash Receipts Entry.
To display the Cash Receipts Entry - Cash Receipts Control window, click
Cash Receipts Entry on the Toolbar.
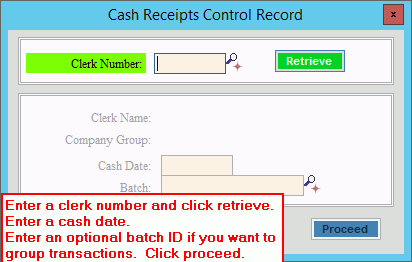
Cash Receipts Entry - Cash Receipts Control Window Example:
Cash Receipts Control Window Prompts
|
|
Enter a
defined Clerk ID to identify the clerk information assigned to
the person entering these cash receipts and click Retrieve
Notes:
The Clerk Name and Company Group assigned to the clerk display for your reference. |
|
The system date displays as the cash date, or you can enter another date for this batch of cash receipt transactions. (mmddccyy, slashes and century optional) Note: The clerk's Last Cash Date is updated with this date. |
|
If you want to track group payment transactions, enter a batch ID. Batches allow you to group the transactions together in a batch and can be used for sorting and selecting specific batches for the cash receipts journals. Notes:
|
|
|
To continue if your entries are correct, click Proceed. Note: After you click Proceed, the Cash Receipts Entry window displays and you are ready to call up the first account. For directions on entering receipts, click here. Or,
to cancel the Cash Receipts Control window and close Cash Receipts
Entry, click Close |
![]()