Email Templates
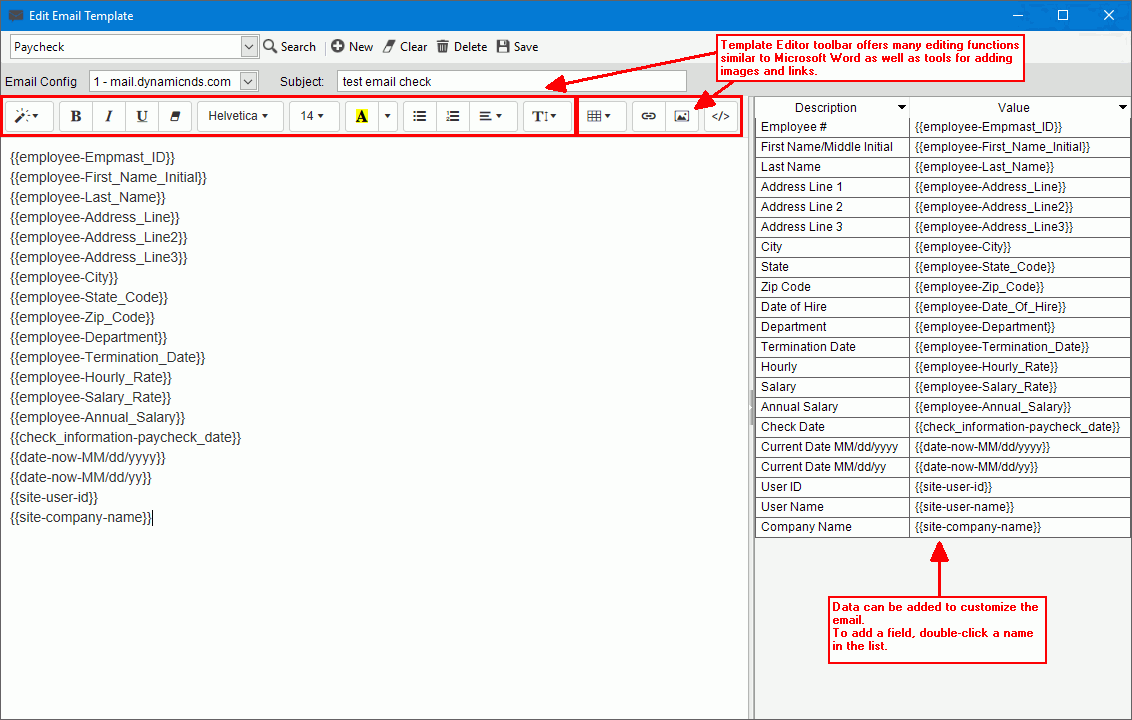
Use the Email Template Editor to maintain email templates used for sending emails from Payroll. You can create as many emails as you need for each type of template with the easy to use Editor. The Editor works similar to Microsoft Word including having styles and formatting functions. The Editor also offers functions for copying and pasting images, inserting tables and links as well as other features. Templates can be customized by inserting fields from a data field list. The inserted fields will fill with customer data when the email is generated.
Note: An empty template can be created if needed. It must have a template type and an email configuration assigned so that the SMTP server is known.
Directions:
To open:
1. Click Payroll from the menu.
2. Click Miscellaneous File Maintenance.
3. Click Email Maintenance.
4. Click Email Templates.
Email Templates Window Example:

Email Templates Prompts
|
|
New
|
To build a new email template, click New. Note: Multiple templates can be created for the selected template type. To build a new template when a template already exists for the template type, click New. The prior template will be maintained and the new one is added after clicking saving. A tracking number is assigned to each template and can be seen in the Search screen. Or, look for a template click Search |
Template Type |
Select the type of template from the drop-down list. The type of template determines where the email is used and the data that can be added to the template. Template Types: Paycheck - used to email paycheck information to employees |
Email Config |
To select the configuration to use for the email, click a choice in the drop-down list. The configuration includes the reply to and cc email addresses that will be included on the email. |
Subject |
Enter a default subject line for the email. The subject line can be left blank and entered later when sending an email. |
Body of Email |
To build the body of the email:
1. To add text begin typing or paste copied text. Formatting tools are available on the toolbar.
2.
The list on the right displays the data fields that you
can include in the email. When emails are generated, the
inserted fields will fill with the customers' information. 3.
To insert an image, click Picture 4.
To insert a hyperlink, click Hyperlink |
Save
|
To finish the email, click Save. The message email successfully saved displays. |
|
|
Delete
|
Email templates can be deleted, if needed. To delete, select the desired template and then, click Delete. At the delete prompt, click Yes to delete. |