Opening Carrier Code Maintenance, click More.
1. Click Billing Functions from the Menu Bar.
2. Click Communications.
3. Click File Maintenance.
4. Click Carrier
Codes.
Advanced Methods:
Click the following sequence:
Billing Functions from the
Menu Bar; Menu Panel; File
Maintenance on the Menu
Bar; and Carrier
Code Maintenance.
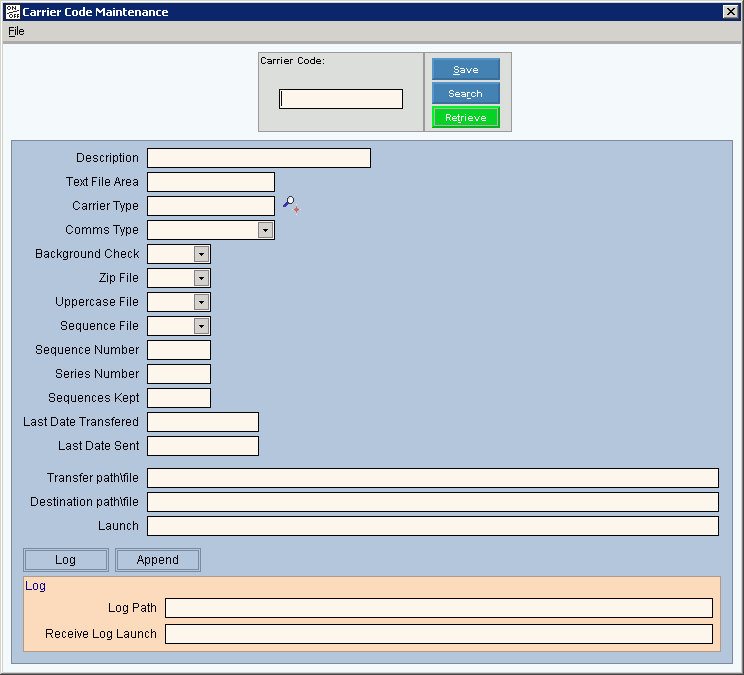
Carrier Code Maintenance Window Example:

Creating a New Carrier Code, click More.
Carrier Code Maintenance Prompts Tip: To see more information about a field, click the hyperlink for the field name. |
|
Enter the unique code that identifies the carrier information. (up to 10 characters) Notes:
|
|
|
To update the new or changed information, click Save or press [ENTER]. Keyboard shortcut: [ALT + s] |
To avoid losing data, you must save new or changed records. |
|
|
To view all of the existing Carrier Codes, click Search. From the Search list you can select the record to change or delete. Keyboard shortcut: [ALT + r] |
|
To display an existing Carrier Code, enter the Carrier Code and click Retrieve, or press [ENTER]. Keyboard shortcut: [ALT + t] |
Enter the Description for the carrier code. (up to 20 characters) |
|
Note: This field is reserved for future use. Please maintain the default setting. |
|
Enter the defined Carrier Type for the carrier. (up to 9 characters) Tips:
|
|
To specify the Communications Type, click a choice in the drop-down list. |
|
Note: This field is reserved for future use. Please maintain the default setting. |
|
To specify if the carrier can receive a Zip File, click a choice in the drop-down list. |
|
Note: This field is reserved for future use. Please maintain the default setting. |
|
To set the Sequence File parameter, click a choice in the drop-down list. Tip: Generally this is set to Yes, to maintain each file and not to overwrite it. |
|
The Sequence Number is maintained by INSight and displays for your reference. |
|
The Series Number is maintained by INSight and displays for your reference. |
|
The Sequences Kept is maintained by INSight and displays for your reference. |
|
The Last Date Transferred displays the most recent date the Transfer was run. The Last Date Transferred is maintained by INSight and can not be edited. Tip: When troubleshooting Technical Support may verify that the Last Date Transferred matches the date the Transfer was run. |
|
The Last Date Sent displays the most recent date the Send was run. The Last Date Sent is maintained by INSight and can not be edited. |
|
Enter the name and address of the file generated during the Transfer routine. (up to 80 characters) Notes:
|
|
Enter the name and directory address of the transmission file that is created during the Send routine. (up to 80 characters) |
|
Enter the dos commands for sending the transmission file. (up to 70 characters) |
|
Note: To toggle to the Append or Log fields, click the desired button. |
|
If log files are automatically sent to you when sending the transmission file, enter the address location where the log text files are stored. (up to 80 characters) |
|
If you manually receive log files later, enter the launch commands to pick them up and the address location for the log files. (up to 80 characters) |
|
Notes: Certain carriers allow other carriers' claims to be included and transmitted in the same billing communications file. Use the fields below to maintain up to four additional carriers to be included in the communications transmission file, if applicable. For more information, contact NDS Technical Support. To toggle to the Append or Log fields, click the desired button. |
|
Append EMC Table 1 |
To specify the additional carrier to include in the billing communications transmission file, enter the defined EMC Table ID assigned to the carrier, if applicable. (up to 9 characters) |
Append EMC Table 2 |
To specify the additional carrier to include in the billing communications transmission file, enter the defined EMC Table ID assigned to the carrier, if applicable. (up to 9 characters) |
Append EMC Table 3 |
To specify the additional carrier to include in the billing communications transmission file, enter the defined EMC Table ID assigned to the carrier, if applicable. (up to 9 characters) |
Append EMC Table 4 |
To specify the additional carrier to include in the billing communications transmission file, enter the defined EMC Table ID assigned to the carrier, if applicable. (up to 9 characters) |
Editing an Existing Carrier Code, click More.
![]() CAUTION: To
avoid losing data, you must save new or changed records.
CAUTION: To
avoid losing data, you must save new or changed records.
1. To display the record to
be changed, enter the Carrier Code and click Retrieve
![]() , or press
[ENTER].
, or press
[ENTER].
Keyboard shortcut: [ALT
+ t]
Tip: If you do not know the Carrier Code, you can
click Search ![]() to see a list of Carrier
Codes.
to see a list of Carrier
Codes.
2. To position the pointer to the information that you want to change, press [TAB] or click the field using the mouse.
3. Enter the data changes.
4. To complete the edit process,
click Save ![]() , or press [ENTER].
, or press [ENTER].
Keyboard shortcut: [ALT
+ s]
Deleting an Existing Carrier Code, click More.
1. To display the record to
be deleted, enter the Carrier Code and click Retrieve
![]() , or press
[ENTER].
, or press
[ENTER].
Keyboard shortcut: [ALT
+ t]
Tip: If you do not know the Carrier Code, you can
click Search ![]() to see a list of Carrier
Codes.
to see a list of Carrier
Codes.
2. Click File
from the Menu Bar,
and next click Delete.
Keyboard shortcut: [ALT]
[f] [d]
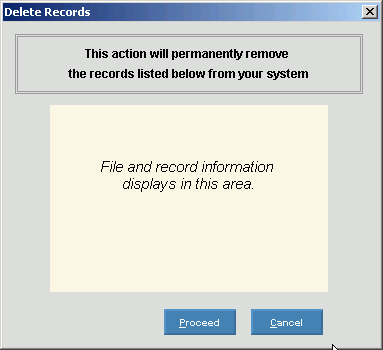
3. At the Delete Records prompt, click Proceed to delete the record, or click Cancel to escape from the delete routine.
Example:

Note:
After you click Proceed,
you will see the following message on the Status
Bar.
![]()