Opening the Mass Medicaid Forms Print Instructions, click More.
1. Click Billing Functions from the Menu Bar.
2. Click Forms Printing.
3. Click Mass
Medicaid Forms.
Or, use the keyboard
shortcut: [ALT] [b]
[f] [ENTER].
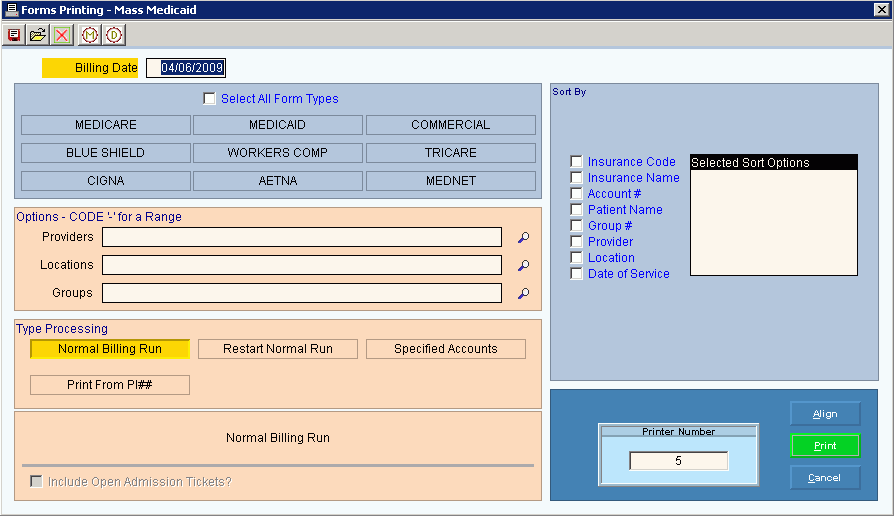
Mass Medicaid Forms Print Window Example:

Choosing the Report Selections, click More.
Mass Medicaid Forms Print Instructions Prompts Tip: To see more information about a field, click the hyperlink for the field name. |
|
To accept the Workfile Build Date as the claim Billing Date, press [TAB] or enter another date as the claim form date. (mmddccyy - slashes and century optional) Tip: You can back-date the billing date if needed. For example, if you normally run claim forms on Monday, but a particular Monday is a holiday, you can run the claim forms on Tuesday instead but enter Monday's date as the billing date. |
|
Claims Parameters |
|
To select specific Form Types to print for claim forms, click the appropriate Form Type name in the list. To select all forms types to print for claim forms, click Select All Form Types. Tip: Generally, you will print Mass medicaid forms for a specific form type. |
|
To limit printing claim forms for specified providers, enter the beginning Provider ID in the range, followed by a dash (-), and then the ending Provider ID in the range. Tip: Generally to include all providers, leave Providers blank. |
|
To limit printing claim forms for specified locations, enter the beginning Location ID in the range, followed by a dash (-), and then the ending Location ID in the range. Tip: Generally to include all locations, leave Locations blank. |
|
To limit printing claim forms for specified groups, enter the beginning Group ID in the range, followed by a dash (-), and then the ending Group ID in the range. Tip: Generally to include all groups, leave groups blank. |
|
Sort By |
To specify the method for sorting and printing the claim forms, click to select the appropriate boxes. Sort By options:
Note: NDS recommends that you select to sort by Insurance Code and second by Account # or Patient Name. By sorting this way the claims print alphabetically or numerically within each insurance. |
Type Processing |
To specify the type of claim form processing, select one of the following:
|
Select Status to Print |
To print claim forms for a specific patient status, click a choice in the drop-down list. Note: This field is only available if you select Normal Billing Run as the Type Processing. |
|
Note: The following field is only available if you choose Restart Normal Billing Run as the Type Processing. |
|
Enter Last Account # That Printed |
If this is a restart run, enter the patient account number of the last good claim form that printed. (up to 6 characters) Notes:
|
|
Note: The following fields are only available if you choose Specified Accounts for Type Processing. |
|
Enter Accounts |
Entry Options:
Note:
To search for the appropriate patient account number,
click Search
|
Include Open Admission Tickets? |
To include open admission tickets on the claim form, click to select the box. To omit open admission tickets from the claim form, make sure the box is de-selected. Note: Select to include open admission tickets if you do hospital billing for charges that have admission dates with no discharge dates and you want to bill them. |
Print From PI## Note: The following field is only available if you choose Print From PI## as the Type Processing. |
|
Enter Print Image Number |
Enter the print insurance number to create a print image for. Notes:
|
|
Displays the default printer number. For more information, see Printing Options. |
|
To print a test pattern to check the alignment of the claim forms in the printer, click Align. Keyboard shortcut: [ALT + a] Notes:
|
|
To generate the report, click Print or press [ENTER]. Keyboard shortcut: [ALT + p] |
|
To escape from the print routine, click Cancel. Keyboard shortcut: [ALT + c] |
Report Sample(s), click More.
