Enter the Patient Account Number in the Patient Reference Panel.
Press [ENTER].
Click Payment Entry in the Menu Tree.
Advanced Methods: To see additional methods for opening the Batch Entry Window, click More
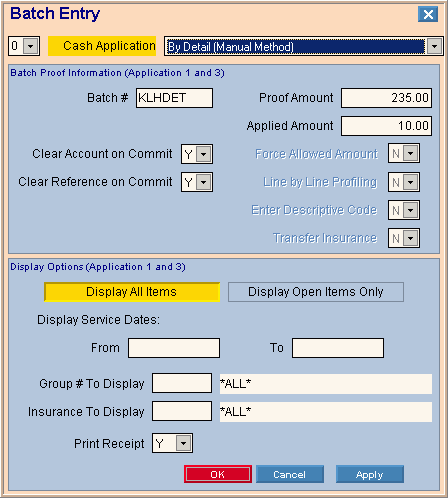
Payment Entry - Batch Entry Window
Use the Batch Entry Window of Payment Entry to view and maintain default codes and information used when entering payment detail transactions. Batch entries simplify entry of like payments and groups payments for reconciliation. During Batch Entry you assign a Batch Number to payment transactions. The Batch Number groups payments for reconciliation. And, if INSight's Batch/Period Posting feature is active, charges and payments are grouped by a period code. The table following the window example describes the Batch Entry Window for Payment Entry.
Directions:
To open the Batch Entry Window:
Basic Method:
Note: If this is the first time of the day that you are opening Payment Entry, the Batch Entry Window displays automatically. However, you can reopen it manually from the Work Window if needed (see Advanced Methods).
Enter the Patient Account Number in the Patient Reference Panel.
Press [ENTER].
Click Payment Entry in the Menu Tree.
Advanced Methods: To see additional methods for opening the Batch Entry Window, click More
Tips:
You must load a patient before using the Menu Tree to start Payment Entry.
To see several methods and shortcuts for entering the Account Number, see Tips for Entering the Patient Account Number.
You are automatically prompted to enter the Batch Window information only once per day. However, you can easily redisplay the window by clicking Batch ![]() in the Batch Information Area of the Work Window.
in the Batch Information Area of the Work Window.
Payment Entry - Batch Entry Window Example:
|
Payment Entry - Batch Entry Window Prompts Tip: To see more information about a field, click the hyperlink for the field name. |
|
|
Select the Payment Entry Batch Sequence Number that contains the parameters you want to use for this batch. (0 - 9) The Batch Sequence Number identifies a set of batch parameters, similar to a template. The Work Window uses the settings and defaults defined here. Each user can define up to ten sets of the batch parameters. You can change and override the settings as required. Examples:
Note: Batch Sequence Number 9 is reserved for applying unapplied credits. |
|
|
Cash Application |
Select the Payment Entry Cash Application option, which determines how payment transactions are applied to tickets during Payment Entry. Press [TAB] to accept the default for this Batch Sequence Number, or click a choice in the drop-down list. Options:
|
|
The Batch Number groups the payment transactions together in a batch and is useful for sorting and selecting the specific batches on the journals. Press [TAB] to accept the default for this Batch Sequence Number, or enter the number to track this group (batch) of payments. (up to 7 characters - XXX or yymmXXX) Required |
|
|
INSight uses the proof amount to confirm that the payment amounts entered for the transactions sum up to the proof amount. (7.2 numeric) Entry Options:
|
|
|
The Applied Amount displays the accumulated amount of the payments already applied. You can see your progress compared to the Proof Amount. (7.2 numeric) Note: The Applied Amount displays only if you entered a Proof Amount. |
|
|
Specify if you want to clear the patient account information when you commit payment transactions. Press [TAB] to accept the default for this Batch Sequence Number, or click one of the following options in the drop-down list.
|
|
|
Specify if you want to clear the Payment Reference value when you commit payment transactions. Press [TAB] to accept the default for this Batch Sequence Number, or click one of the following options in the drop-down list.
|
|
|
Specify if you want to prevent the calculation of the contractual adjustment amount. Press [TAB] to accept the default for this Batch Sequence Number, or click one of the following options in the drop-down list.
Tips:
|
|
|
Line by Line Profiling |
Specify if you want to display tickets one at a time when paying multiple tickets using the profiling technique. Press [TAB] to accept the default for this Batch Sequence Number, or click one of the following options in the drop-down list.
Tip: This field is active only when you select the Cash Application for By Ticket (Auto Transfers & Adjustments by %). |
|
Specify if you can enter a Descriptive Transaction Code when entering transactions. Descriptive transactions do not change the ticket balance and can be used for reporting purposes. Press [TAB] to accept the default for this Batch Sequence Number, or click one of the following options in the drop-down list.
Tip: This field is active only when you select the Cash Application for By Ticket (Auto Transfers & Adjustments by %). |
|
|
Transfer Insurance |
Specify if you want to automatically transfer the ticket balance from the primary insurance to the secondary insurance. For example, if Medicare pays 80% of the balance, you can automatically transfer the remainder to AARP. Press [TAB] to accept the default for this Batch Sequence Number, or click one of the following options in the drop-down list.
Tips:
|
|
To control which tickets display in the Work Window Ticket List Section, press [TAB] to accept the default for this Batch Sequence Number, or select one of the following:
|
|
|
Display Service Dates: |
To limit the list of charges you want to apply cash to during Payment Entry, you can enter a range of Charge Service Dates. Press [TAB] to accept the default for this Batch Sequence Number, or enter the beginning date. (mmddccyy - slashes and century optional) Notes:
|
|
To |
To limit the Service Date range you want to apply cash to during Payment Entry, press [TAB] to accept the default for this Batch Sequence Number, or enter the ending date. (mmddccyy - slashes and century optional) |
|
Group # To Display |
To limit cash application to tickets associated with a specific provider group, press [TAB] to accept the default for this Batch Sequence Number, or enter a Group Number (or Code). (2.0 numeric) Notes:
|
|
Insurance To Display |
To limit cash application to tickets associated with a specific insurance, press [TAB] to accept the default for this Batch Sequence Number, or enter an Insurance Code. (up to 5 characters) Notes:
|
|
Specify if you want to see a prompt for printing a receipt when you commit payments. Press [TAB] to accept the default for this Batch Sequence Number, or click one of the following options in the drop-down list.
|
|
|
|
To complete the Batch entries, close the Batch Window, and open the Work Window, click OK. |
|
|
To close the Batch Entry Window, click Cancel. You may exit Payment Entry or return to the Work Window, depending on your last action. |
|
|
To apply the changes made to the Batch and leave the Batch Entry Window open, click Apply. |
![]()