Create Customer Location Step 3 Window
Use the Customer Location Step 3 Window to enter the billing and book information for the location including the book number, sequence number, cycle number, and the Map/Lot description for the location. In addition, you can specify whether the location is vacant or occupied.
Tip: For general information about using wizards, see the Wizard - Introduction.
To display the Create Customer Location Step 3 window in the Data Entry Panel:
1. From the Inquiry, click Tools and then, click Wizards.
2. In the Create section, click Customer.
3. To navigate
to the step that you want to maintain click Next
![]() or click Back
or click Back ![]() until
the data that you want to maintain displays in the Data Entry Panel.
until
the data that you want to maintain displays in the Data Entry Panel.
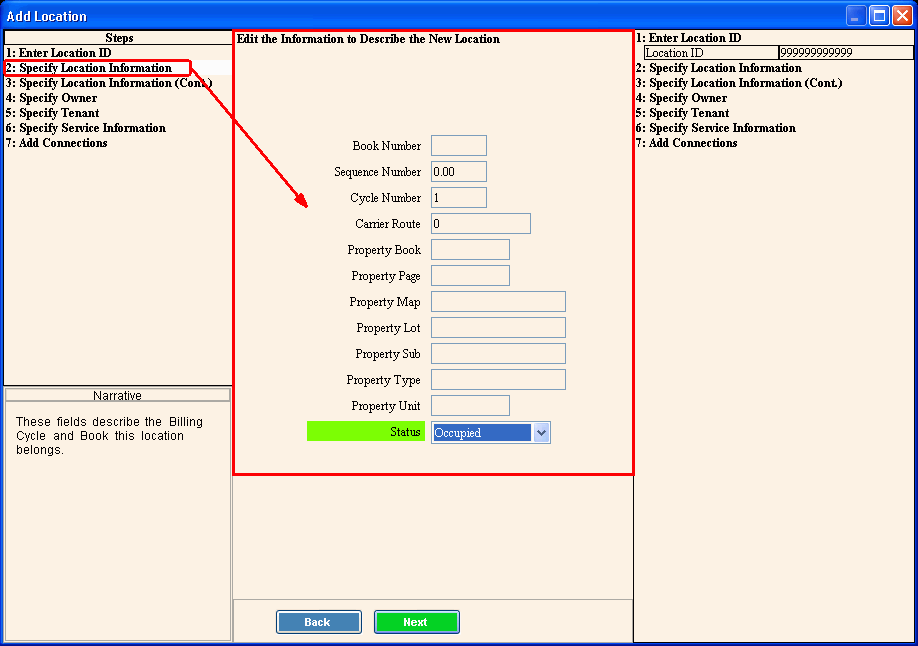
Create Customer Location Step 3 Data Entry Panel Example:
Data Entry Panel - Create Customer Location Step 3 Prompts
|
|
Enter the Book Number for the location. (4.0 numeric) Required |
|
Enter the Sequence Number for the location. (4.2 numeric) |
|
Enter the Cycle Number for the location, if your company is set up for cycle billing. (4.0 numeric) Note: You must assign a Cycle Number to every customer. If you do not use cycles, set all customers to cycle 1. |
|
Enter the U.S. Postal Service Carrier Route Number for the location, if applicable. (2.0 numeric) |
|
Enter the Registry of Deeds Property Book number, which contains the location information. (up to 6 characters) |
|
Enter the page number in the Registry of Deeds Book which contains the location information. (up to 6 characters) |
|
Enter the Map portion of the Property ID for the location. (up to 10 characters) |
|
Enter the Lot portion of the Property ID for the location. (up to 10 characters) |
|
Enter the Sub portion of the Property ID for the location. (up to 10 characters) |
|
Enter the Type portion of the Property ID for the location. (up to 10 characters) |
|
Enter the Unit portion of the Property ID for the location. (up to 10 characters) |
|
To
specify the location has an occupied status, click Occupied
in the drop-down list. |
|
|
To complete the entries and continue to the next window, click Next. Keyboard shortcut: [ALT + n] For directions to the next step, click here. |
|
To return to the previous window, click Back. Keyboard shortcut: [ALT + b] For directions to the previous window, click here. |
![]()