EDIFICE Inquiry - Lien Processing
Use Lien Processing to print the 30-day notices and the lien letters for customers with delinquent balances that qualify to be liened. You have the option of assessing customers for the cost of preparing and sending the 30-day notices, printing customer lien letters, creating customer lien transactions and then transferring their outstanding balances to liens if they do not make a payment by the due date specified. You can have multiple workfiles being processed at the same time. There are options that allow you to determine which accounts qualify to be liened.
Notes:
Lien Parameter Maintenance contains the transaction codes, letter cost amounts, Current Lien Year and Current Lien Month for the 30-day notices and lien letters. Lien Parameters also specifies how payments impact accounts in the lien process.
Before processing liens for the first time, please contact NDS Support at 800-649-7754 to have templates for a lien notice and lien letter set up.
If a customer pays off their delinquent balance after the 30-day notice has been sent, the lien remains in the workfile with a 0 balance so that you can see that it was paid off.
You can change costs between running notices and running letters.
When the lien workfile has been completely processed, you can delete the workfile if you want or leave it for history.
Lien processing uses the following tables: lien_workfile, lien_workfile_param and lien_workfile_service_param.
From the EDIFICE Inquiry, click Tools and then click Liens Processing.
EDIFICE Inquiry - Liens Processing View Example:
Liens Processing Prompts |
|
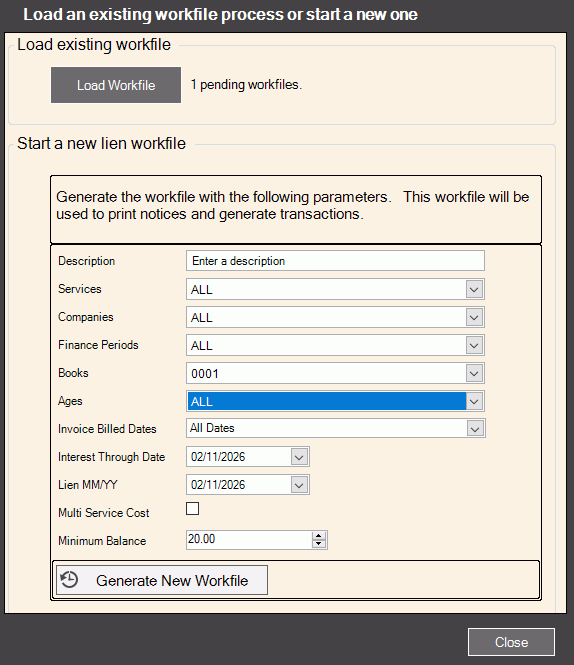
Create a New Workfile or Load Existing Workfile
|
You can load a workfile that is already in process or start another lien process. To load a workfile that is already
in process, click Load Workfile
To create a new workfile, enter or select the following options:
To begin generating a workfile,click
Generate New Workfile
|
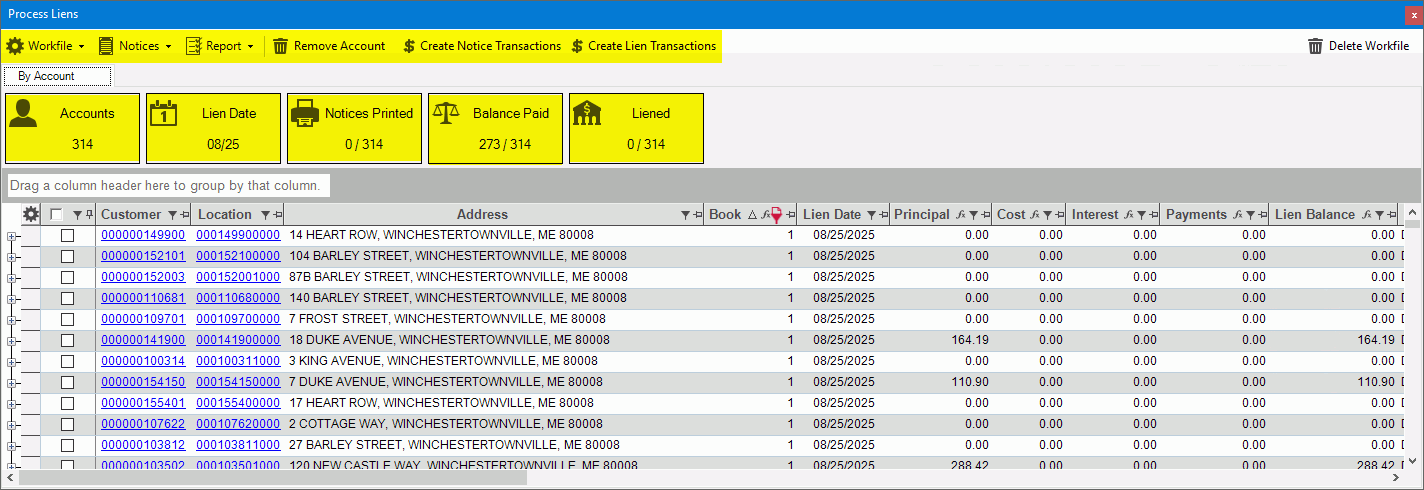
Organize Lien WorkfileWhen the workfile is created, a small dashboard with statistics displays at the top with the number of accounts in the workfile and a list that shows all the accounts in this workfile that are eligible to be liened. You can click any of the tiles and the list will only show those accounts applicable to the tile. For example, to see the list of accounts with notices printed, click the notices printed tile. You can also see account and location details by clicking the link for the account. You can review the list and remove accounts if needed. The list can be sorted, filtered and grouped so that you only see the desired accounts. Tip:
Use settings
|
|
Sort List |
To sort the list, click the desired column heading. To sort in reverse order, click the column heading a second time. For example, you can sort the list by customer ID or lien balance. |
Grouping |
To organize items by a specific column like book, drag the desired column heading to the box above the list. For example to group the accounts by book or finance period drag that column heading to the box. Grouping Box:
|
Filters |
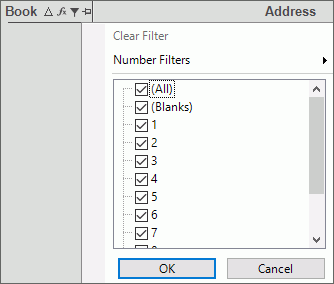
To
limit the accounts to those that meet certain criteria, click
Filter Note: Advanced filtering options are available by clicking Text Filters.
|
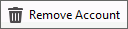
Remove Account
|
To
remove a customer from being liened, click to check the select
box for the desired account and then click Remove
Account
|
30-day Notices ProcessingUse the Notices function to print 30-day notices for the selected customers. The customer's lien notice tracking is updated each time a notice is printed for them. You can view the notice in the Documents View of the Inquiry. To
generate notices, first select the accounts to receive a notice
by clicking to highlight the desired lines of the list or click
to check the check all box in the Select column. Then click
Notices.
|
|
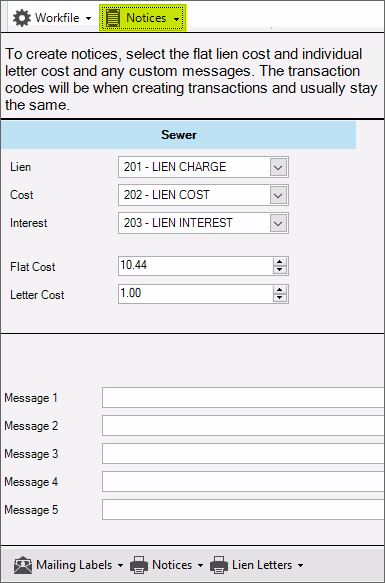
Lien Lien Cost Lien Interest |
The transaction codes for generating the liens, the lien costs if applicable and lien interest display. You can select a different transaction code from the list if needed. If the transaction code is changed, the new transaction code will stay with the list. |
Flat Cost Letter Cost |
The flat cost and the letter cost display the dollar amount to assess customers for the cost of processing their lien. You can change the amount, if needed. This amount will be included in the notices.
|
Messages 1-5 |
Enter up to 5 lines for an optional message to include on the notices, if needed. |
|
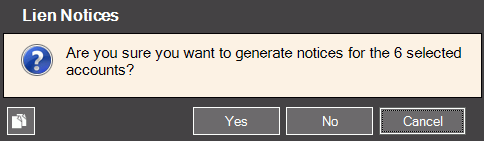
To generate the 30-day notices, click Notices and then click View to print to the screen or Print to generate paper notices. A confirmation displays.
Click Yes to continue. Then select the job if applicable. |
Create Notice Transactions for Notice CostsIf you want to assess the accounts for the cost of sending the notices, use the Create Notice Transactions function. The cost transactions include the costs associated with processing and sending the 30-day notices including the cost of certified mailers and postage. The notice cost amounts are generally included on each 30-day notice. |
|
Create Notice Transactions
|
Select the accounts to assess notice costs by clicking to highlight the desired lines or click to check the check all box in the Select column. Then click Create Notice Transactions. The following screen displays. To begin click Yes. Or to stop click No. When the transactions are created and the routine is finished, Complete displays. You can close the window.
|
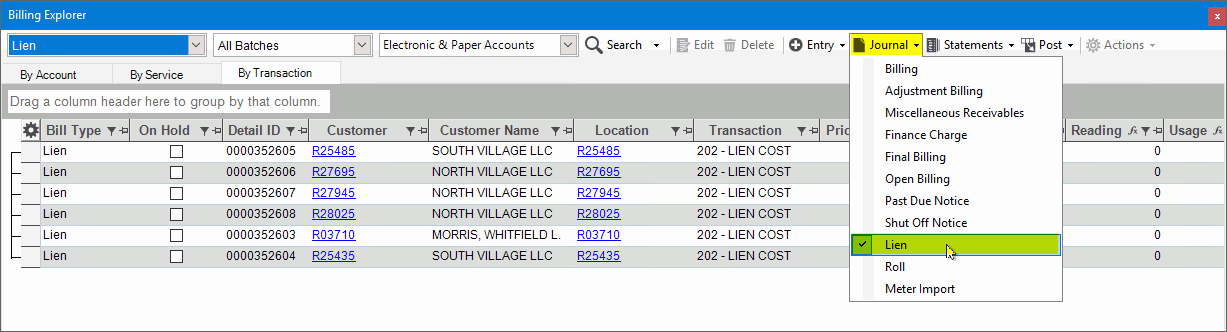
After the notice cost transactions are created, open the Billing Explorer to run a lien journal. Use the journal to confirm the notice costs are correct. Note: If there are errors on the journal, use Lien Entry in the Billing Explorer to remove the costs from the account.
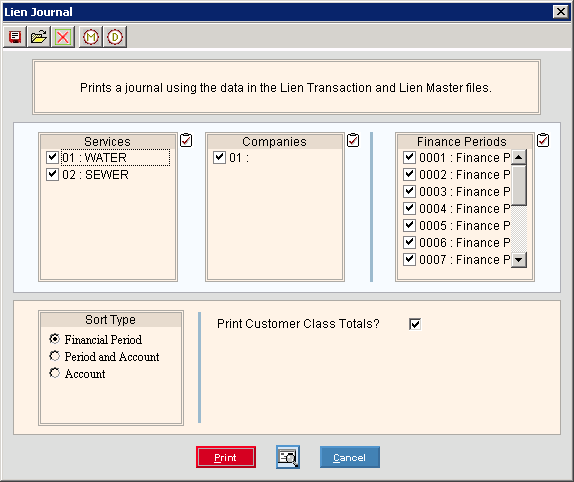
The journal options display.
Select the services, companies, and finance periods to include on the journal. Select how the journal should be sorted. Then select Print View or Print. To see a sample of the journal, click here. |
|
To update the accounts with the costs, run the Lien Post. From the Billing Explorer, select Post and then select Lien. The following screen displays.
Select the services, companies, books and batches for posting. The update date displays today's date but can be changed to another date, if needed. Click Proceed to begin. When complete confirm the Lien Post Summary totals are correct for the notice costs. |
|
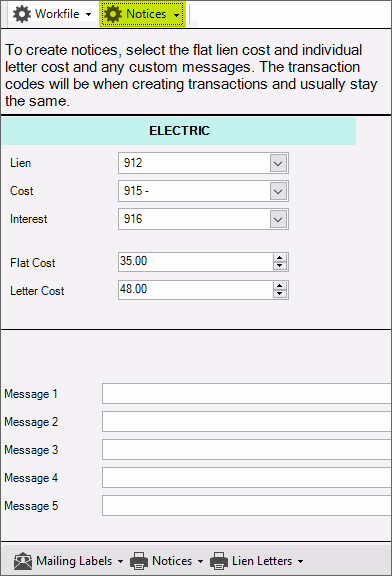
Generate Lien LettersNote: Be sure to send the letters at the appropriate time. Use the Generate Lien Letters function to generate lien letters for the selected customers in the workfile. The customer's lien notice tracking is updated each time a lien letter is printed for them. For more information, see the Documents View of the Inquiry. To generate letters, first select the accounts to receive a letter by clicking to highlight the desired lines or click to check the check all box in the Select column. Then click Notices. The following screen displays. The transaction codes and the cost amounts come from Lien Parameter Maintenance.
|
|
Lien Lien Cost Lien Interest |
The transaction codes for generating the liens, the lien costs if applicable and lien interest display. You can select a different transaction code from the list if applicable. |
Flat Cost Letter Cost |
The flat cost and the letter cost display. This will be included in the notices. |
|
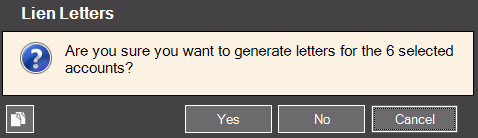
To generate the lien letters, click Lien Letters and then click View to print to the screen or Print to generate paper lien letters. The customer's status is updated to letter printed for all customers that had a lien letter generated for them. A confirmation displays.
Click Yes to continue. Then select the job if applicable. |
Generating Lien Transactions and Updating Accounts with LiensUse Create Lien Transactions to create the lien transactions for the selected customers. This routine will create transactions for the lien amounts and lien cost transactions if there is a letter cost included. The lien transactions do not update the customers until you run the Liens Post Transactions.
|
|
Create Lien Transactions
|
Use Create Lien Transactions to create the lien transactions for the selected customers. This routine will create transactions for the lien amounts and lien cost transactions if there is a letter cost included. The lien transactions do not update the customers until you run the Liens Post Transactions. Note: If you assess a separate cost for liens and lien notices go back to Lien Parameter Maintenance before you create lien transactions and change the letter cost or flat cost amount. If you charge for the 30-day notice, but not the lien letter, change the amount to $0.00. If you do not charge for 30-day notices, but charge for lien letters, enter the cost in at this time. To create lien transactions, select the accounts to receive a notice by clicking to highlight the desired lines or click to check the check all box in the Select column. Then click Create
Notice Transactions To begin click Yes. Or to stop click No.
When the transactions are created, processing complete displays. You can close the window.
|
Run Liens Journal |
After creating the lien transactions run a lien journal to review the accounts and the lien amounts. For directions, see the Lien Journal step above. |
Run Liens Post |
When the journal approved, run the lien post. This will complete the lien process by updating the eligible customer lien amounts from their regular age buckets to the lien balances. It will also apply the lien costs to the customers' at this time, if applicable. For directions, see the Lien Post step above. |
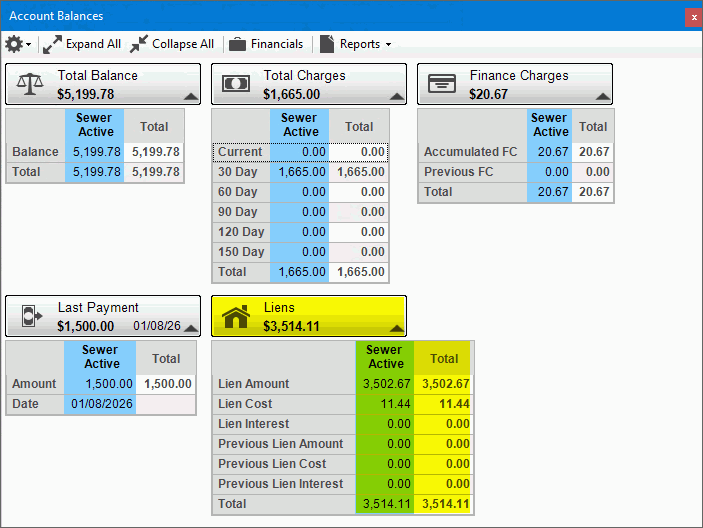
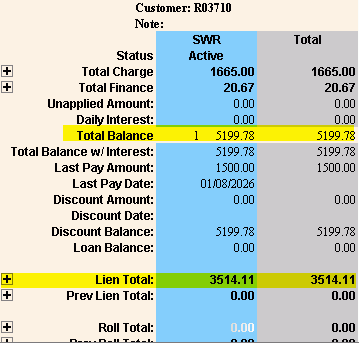
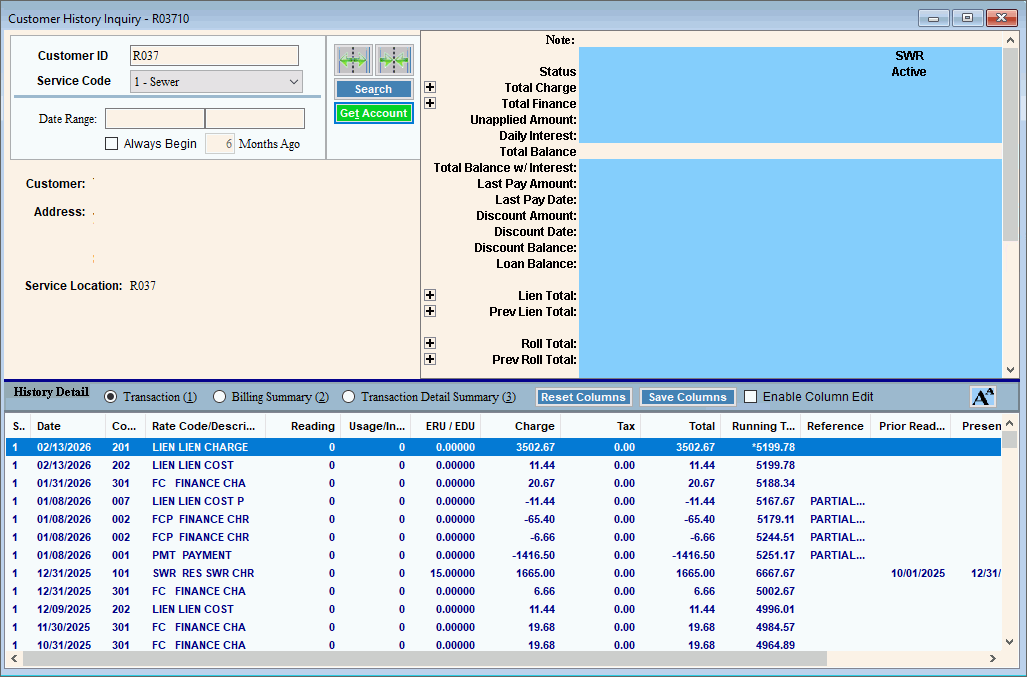
Viewing Customer Lien Information After the Post Lien Transactions routine completes, you can see the lien amounts in the lien buckets, from the Account Balances screen or in the balances area of Bill Entry or Cash Receipts Entry. The details can be seen in the Transaction view of the Inquiry and in the Customer History.
Lien History in Transaction View or Customer History
|
|
 .
. 
 in the list

 next to the desired column heading. Any column can be filtered.
The available filter choices display. Here is an example
of books filters. To select the choices to use as criteria,
click to check the desired box or boxes and then, click
next to the desired column heading. Any column can be filtered.
The available filter choices display. Here is an example
of books filters. To select the choices to use as criteria,
click to check the desired box or boxes and then, click