Opening the Aged Trial Balance Report, click More.
1. Click Reports from the Menu Bar.
2. Click Operating Reports.
3. Click Aged Trial Balance.
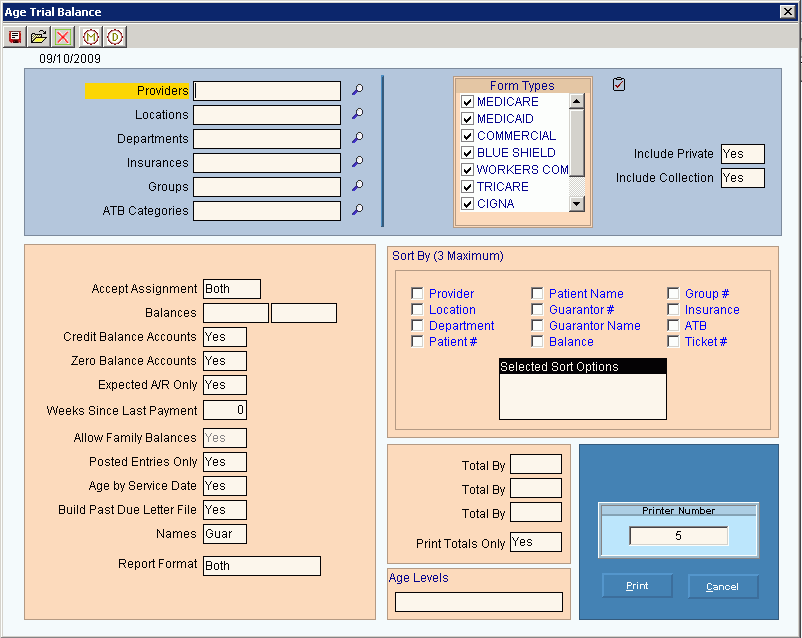
Aged Trial Balance Report Window Example:

Choosing the Selections at the Prompt Window, click More.
Aged Trial Balance Report Prompts Tip: To see more information about a field, click the hyperlink for the field name. |
|
Enter the Provider Codes to report. (up to 4 characters) Tips:
|
|
Enter the Location Codes to report. (up to 2 characters) Tips:
|
|
Enter the Department Codes to report. (up to 2 characters) Tips:
|
|
Enter the patient Insurances to report. (up to 9 characters) Tips:
|
|
Enter the Group Codes to report. (up to 4 characters) Tips:
|
|
Enter the ATB Categories to report. (up to 4 characters) Tips:
|
|
To select the insurance Form Types to report, click to select the appropriate names listed. Tip:
To quickly select or de-select all
Form Types, click Check
All |
|
Include Private |
To include patient private balances on the report, click Yes in the drop-down list. Or, to omit patient private balances on the report, click No in the drop-down list. |
Include Collection |
To tickets sent to collections on the report, click Yes in the drop-down list. Or, to omit tickets out to collections, click No in the drop-down list. |
To include only patient responsible balances and exclude balances for insurances, set Accept Assignment to No Only. To include only insurance balances and exclude patient balances, set Accept Assignment to Yes Only. To include both patient and insurance balances, set Accept Assignment to Both. |
|
Credit Balance Accounts |
To include patient accounts with credit balances, click Yes in the drop-down list. To omit patient accounts with credit balances, click No in the drop-down list. |
Zero Balance Accounts |
To include patient accounts with zero balances, click Yes in the drop-down list. To omit patient accounts with zero balances, click No in the drop-down list. |
Expected A/R Only |
To report expected A/R only, click Yes in the drop-down list. To report all A/R, click No in the drop-down list. |
Weeks Since Last Payment |
To limit the patient accounts to ones that have not made a payment in a specific number of weeks, enter the number of weeks. (3.0 numeric) Tip: Generally, this prompt pertains to collections reporting. Please leave blank, if you are not reporting collections information. |
Allow Family Balances |
To report family balances, click Yes in the drop-down list. Or, to omit family balances, click No in the drop-down list. |
Posted Entries Only |
To omit charges and payments that have not been posted, click Yes in the drop-down list. To include all charges and payments, click No in the drop-down list. Tip: Generally, you will choose Yes if you have not performed the Charge/Payment Post Initialize. |
Age By Service Date |
To age by service date, click Yes in the drop-down list. To omit aging by service date, click No in the drop-down list. |
Build Past Due Letter File |
To build the past due letter file while generating this report, click Yes in the drop-down list. To omit building the past due letter file, click No in the drop-down list. Note: For more information about printing past due letters, see Scheduled Appointments Print Letters Instructions. |
Names |
To specify the names to print on the report, click a choice. Entry Options: |
Report Format |
To specify the report format, click a choice in the drop-down list. Entry Options:
|
Sort By |
To specify the sort criteria for the report, click up to three choices. Sort Options: |
Selected Sort Options |
Displays the selected sort options for your reference. |
Totals By |
To print totals by the sort criteria selected, click to select this box. To omit printing totals, de-select this box. Note: There are 3 totals available. Totals are based on sort criteria selected. For example, if you select to sort by providers, insurances and , the totals will reflect that. |
Print Totals Only |
To print only totals on the report, click Yes in the drop-down list. To include details as well as totals on the report, click No in the drop-down list. |
Age Levels |
Enter the aging days to report. (i.e. 0-30, 31-60, 61-90, etc.) |
|
Displays the default printer number. For more information, see Printing Options. |
|
To run the routine, click Print or press [ENTER]. Keyboard shortcut: [ALT + p] |
|
To escape from the routine:
|
Report Sample(s), click More.
