Advanced Budgeting - Managing Account Views
Use the Account Views panel displayed on the left side of the window to view your General Ledger chart of accounts in a defined, organized and easy to view format. The Account Views allows you to limit the GL accounts that you see at a specific time. For example, you can use the Account Views to view the GL accounts within specific departments or funds that are in your current General Ledger chart of accounts. The Account Views is set up to start at a particular level and allows you to drill-down to the department or subaccount by clicking the + to the left of the view name. The Account Views are handy when building or editing management reports.
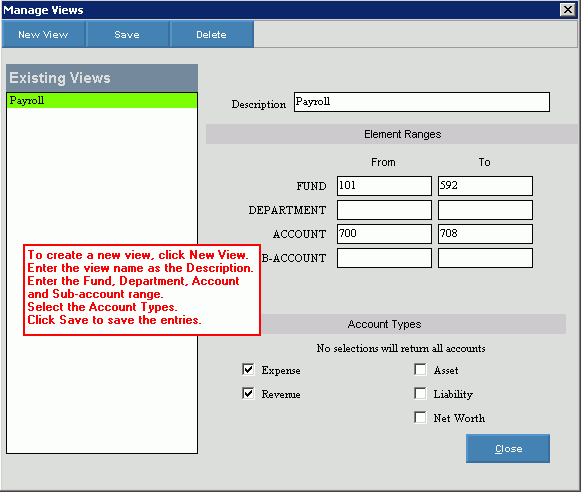
Use the Manage Views function to create and maintain additional views of the General Ledger accounts in addition to the existing default views. The table following the window example describes the Manage Views Area for Advanced Budgeting.
Tip: For more information about working with data in fields, see the Data Entry Guidelines.
Directions:
To display the Manage Views Area:
1. Click Advanced
Budgeting ![]() on the Toolbar.
on the Toolbar.
2. Then, click Manage
Views  .
.
Advanced Budgeting - Manage Views Window Example:

To create a new Account View:
Manage View Prompts |
|
|
To define a new Account View, click New View. |
Description |
Enter a description of the view you are creating. This description will display in the Account View list and is used to select the view. |
Element
Ranges |
Enter the range of fund numbers to
include in this view. |
Account Types |
Click the box to select the account type that should be included in the view. Note: More than one account type can be marked in a view and at least one account type must be marked in a view. |
|
Click Save
when the description, ranges and account type(s) have all been
specified.
|
|
To delete a view, click to highlight the desired Account View description and then, click Delete. After clicking Delete, the following
dialog window displays: |
|
To close the Manage View window, click Close. |