Management Reports Designer - Account Views
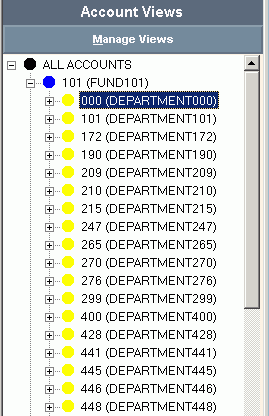
Use the Account Views Area to view your General Ledger chart of accounts in a predefined, organized and easy to view format. The Account Views allows you to limit the GL accounts that you see at a time. You can use the Account Views to view the GL accounts within specific departments or funds that are in your current General Ledger chart of accounts. The Account Views is set up to start at a particular level and allows you to drill-down to a department or sub-account by clicking the + to the left of the view name. You can use the Manage Views function to create new Account Views to suit your needs. You may find the Account Views are handy when building or editing management reports. The table following the window example describes the Account Views Area for Management Reports Designer, Account Master Explorer and the Journal Explorer.
Tip: For more information about working with data in fields, see the Data Entry Guidelines.
Directions:
To display the Account Views from the program you are in, click Account Views.
Account Views Area of Management Reports Designer Window Example:

Account Views Area Prompts
|
|
Views |
To view an Account View, double-click the appropriate name in the list. Or, to drill down to a sub-view within a view, click plus + to the left of the view name. |
Manage Views Use the Manage Views to create and maintain additional views of the General Ledger accounts in addition to the existing default views. Manage Views allows you to limit the General Ledger accounts you see at a specific time to only the ones that you need. For example, to create a view for a specific department, so that it can be used again, use Manage Views. Note: Because the elements that you can range on are user-definable, the field names in the software may not match the documentation. The elements are set during the installation and setup. |
|
|
To open, click Manage Views. The following window is an example of a managed view. |
|
|
To create a new Account View: |
|
|
To create a new Account View, click New View. And, enter the following information. |
Description |
Enter a description for the view you are creating. The description will display in the Account View list and is used to select the view. |
Element Ranges To/From |
Enter the range of Fund numbers to include in this view. Enter the range of department numbers to include in this view. Enter the range of account numbers to include in this view. Enter the range of sub-accounts to include in this view. Note: If all of the funds, departments, accounts or sub-accounts need to be included, leave the From / To fields blank for that line. Example: For example, if only funds 101 to 592 deal with payroll, then enter that range. Since all of the departments and sub-accounts should be included, nothing was entered on those two lines. The labor accounts fall between 700 and 708 so that range was also entered. |
Account Types |
Click the box to select the account types that should be included in the view. Note: More than one account type can be marked in a view and at least one account type must be marked on a view. |
|
Click Save when the description, ranges and account type(s) have all been specified. Notes:
|
|
To close the Manage View window, click Close. |
Delete a View Step |
|
|
To delete a view: Click to highlight the desired Account View description from the list and then, click Delete. After clicking Delete, the following window displays:
Click OK
to complete the delete. |