Journal Explorer
The Journal Explorer provides an efficient way to view the details of General Ledger journal entries for a specific period. You can filter journal entries by year, period, and by Account View, which organizes accounts into predefined, structured groups for easy analysis. With just a few clicks, you can access underlying details of an entry and trace back to the original source transactions. This includes lists of paid invoices, vendor payment information, and more. You can also print the journal details or export them as Microsoft Excel, Word, or tab-delimited files. Journal Explorer settings can be saved for future use, making recurring tasks even faster.
While like the Journal Inquiry, the Journal Explorer stands out by offering the ability to view historical years, providing deeper insights into past transactions.
Tip: To see an example of the report, click Journal Explorer Report Sample.
Directions:
To open the Journal Explorer click Daily Work from the Menu and then click Journal Explorer.
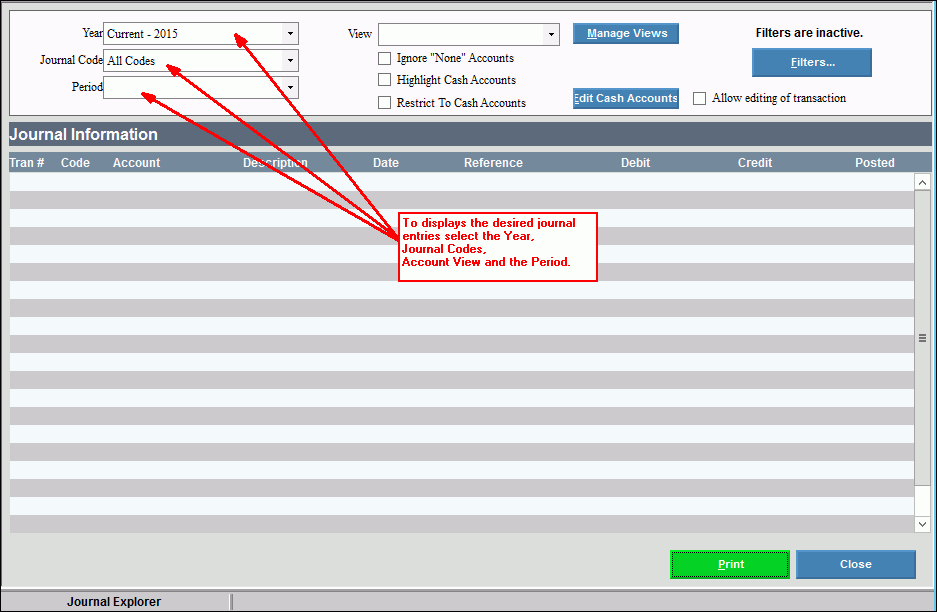
Journal Explorer Window Example:

Journal Explorer Prompts
|
|
Year |
To specify the year, click a choice from the drop-down list. |
To select the GL period to display, click a choice in the drop-down menu. The GL journal entries for the period will display as shown above. |
|
Journal Explorer Options |
|
To limit the journal to entries for the GL Accounts listed in the selected Account View, click a choice in the list. Or leave blank to include all accounts. Or To create a new GL Account View to
add to the list, click Manage
Views A view is a set of selected GL accounts that are saved in a view making it easy to view in an organized format. For example, you can use the Account Views to view the all of your income or expense GL accounts or accounts for specific departments or funds that are in your current General Ledger chart of accounts. |
|
Ignore "None" Accounts |
To exclude None accounts from the journal, click to check the Ignore None Accounts box. To include None accounts on the journal, leave this box unchecked. |
Accounts Elements |
To report a range of GL accounts, funds, or sub-accounts to include on the Journal Explorer click Account or Element. To specify
the GL accounts, enter the beginning account number and the ending
account number or click Search
to find it. Or leave blank to include all accounts.
Then click Search To report a range of elements, click Elements and the following displays:
Enter the
Element ranges that you want to view. If you want all of
the elements in a range, leave the From/To fields blank. Then click Search
|
|
To manage your bank accounts and associated cash accounts, click Manage Cash Accounts. This is reserved for future use. |
Organize Journal Explorer Grid The Journal Entries list shows entries for you to review. The list can be sorted and filtered so that you only see the desired entries. To sort the list, click the desired column heading. To sort in reverse order, click the column heading a second time. For example, you can sort the list by account or date. You can click date links to see details that make up the entry or click an account link to see invoice details. Right-click to see functions for printing and exporting information. Tip:
Use the grid
setting
|
|
Filters |
To
limit the entries to those that meet certain criteria, click Filter Note: Advanced filtering options are available by clicking Text Filters.
|
Grouping |
To organize items by a specific column heading such as date or account, drag the desired column heading to the box above the grid. Grouping Box and Grouping by date example:
|
Expense or Cash Receipts Detail |
To drill down to view the Expense or Cash Receipt detail associated with a journal entry, click a date with link to view receipts or an account with link to view invoices paid.
|
Printing and Exporting Journal InformationTo see printing and exporting functions, right-click in the grid/list. The following options display.
|
|
|
|
Save As Steps After clicking the desired save as format, the following window displays:
The Windows Save As steps:
|
|