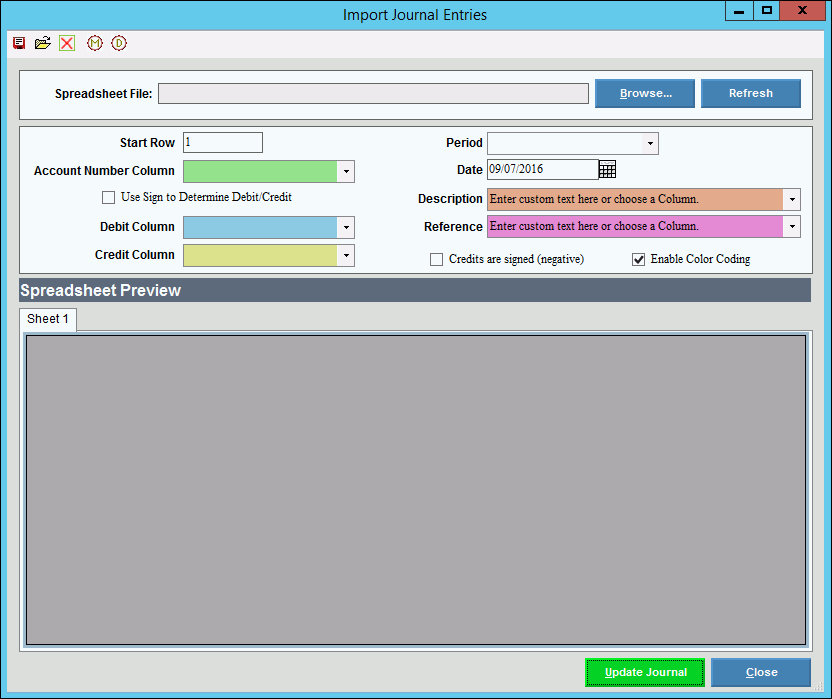
Journal Import
Use the Journal Import routine to import journal entry transactions from a spreadsheet into the selected Period of the general journal. You can use this routine to import journal entries from third-party software or from a manually entered spreadsheet. You can maintain a description, a reference and a journal posting date to help identify the imported entries.
Tip: To see the timing for the import process, refer to the Daily Checklist in the General Ledger Runbook.
Directions:
To open:
1. Click Utilities from the menu.
2. Click Excel
Journal Import.
Tip: Or, use the keyboard
shortcut: [ALT] [t] [Enter].
Note: You may be able to access the General Ledger menu while in another INVISION application. To activate the General Ledger menu in another application, the G/L Application Control must be set up for the application during installation.
Excel Journal Import Window Example:

Journal Import Prompts |
|
Spreadsheet File |
Enter the location and name of the
spreadsheet or, click Browse
|
|
Click Refresh after you enter the options for the import. The information to import will display in the Preview panel below. This allows you to verify that this is the correct information to import. |
Start Row |
Enter the number of the row where the import should begin reading the first line of data. |
Account Number Column |
To specify the column in the spreadsheet that contains the GL account number, click a choice in the drop-down list. |
Use Sign to Determine Debit/Credit |
To specify a sign to use to determine the debits and credits being imported, click to check Use Sign to Determine Debit/Credit box. If the debits to be imported do not have a negative sign, leave this box unchecked.
|
Important: If Use Sign to Determine Debit/Credit is checked, the Amount Column field displays, replacing the Debit and Credit columns. If Use Sign to Determine Debit/Credit is not checked, then the Amount Column field does not display and the Debit column and Credit Column fields display. |
|
Amount Column |
To specify the column in the spreadsheet that contains the journal entry amounts, click a choice in the drop-down list. |
Debit Column |
To specify the column that contains the debit amounts, click a choice in the drop-down list. |
Credit Column |
To specify the column that contains the credit amounts, click a choice in the drop-down list. |
To specify the GL Journal period to import the journal entries to, click a choice in the drop-down list. Note: Select period 14 if the entries are year end entries. |
|
Date |
Today's date displays as the date to assign to the GL Journal entries. You can enter another date or click the Date Picker to choose a date. (mmddyy, slashes not necessary) |
Defaults to MA for manual entries if period 1-13 is selected for year end entries. If period 14 is selected, the journal code is assigned as YE for year end. |
|
To assign a description for the GL Journal entries, enter a description or select a column to assign as the Description. |
|
To assign a reference for the GL Journal entries, enter a reference or select a column to assign as the reference. |
|
Credits are signed (negative) |
To indicate that the credit amounts being imported have a negative sign, click to check the Credits are Signed box. To indicate that the credit amounts being imported do not have a negative sign, leave this box unchecked. |
Enable Color Coding |
To display each column in a highlight color, click to check the Enable Color Coding box. To omit color coding of columns, leave this box unchecked. |
|
If the selections are correct, click Update Journal to import the data. Or to stop the import process and return
to the Import window, click Cancel
|
Import Messages The following are messages that may display to alert you on the status of the Import: |
|
Process Complete |
After clicking Update Journal and
when the process is finished, the Import Complete window displays
to alert you.
To return to the Import window, click OK. |
Debits/Credits Not Balancing |
If the debits and credits being imported do not balance the Import routine will not continue and the following message displays to alert you:
Add the missing information and then try to import the file again. |
Journal Entries Already Imported |
If the journal entries have been imported already, the following message alerts you to prevent duplications.
|