Create Customer Step 6 Window
Use the Create Customer Step 6 window to enter the customer codes and the general service information that controls how the customer charges are created and how they are billed.
To display the Create Customer Step 6 window:
1. From the Inquiry, click Tools and then, click Wizards.
2. In the Create section, click Customer.
3. To navigate
to the step that you want to maintain, click Next
![]() or click Back
or click Back ![]() until
the data that you want to maintain displays in the Data Entry Panel.
until
the data that you want to maintain displays in the Data Entry Panel.
Create Customer Step 6 Data Entry Panel Example:
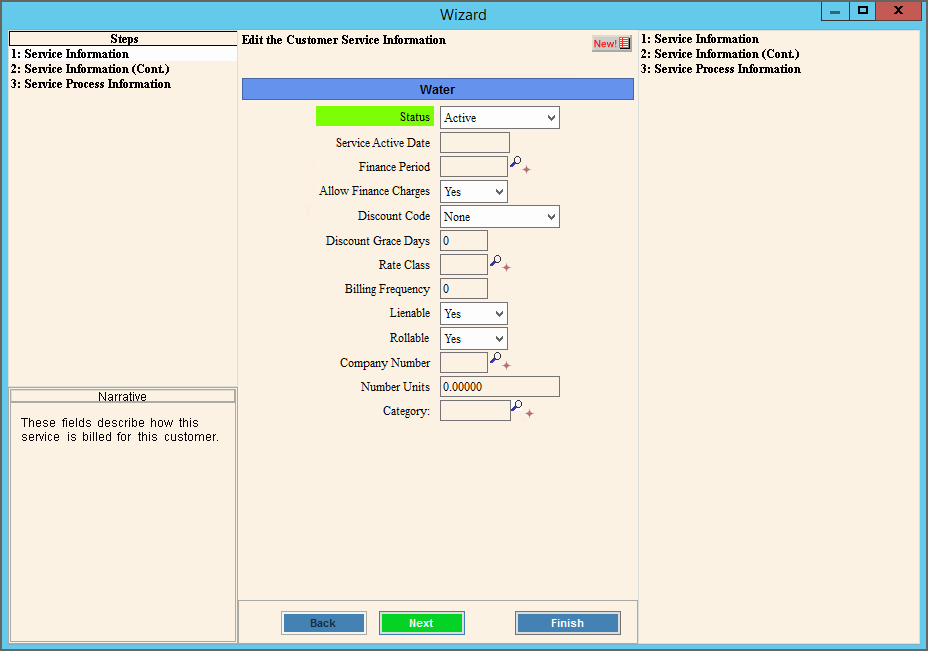
Data Entry Panel - Create Customer Step 6 Prompts
|
|
To assign a status to the customer, click a choice in the drop-down list. |
|
Enter the date the services are activated for the customer. (mmddyyyy, Slashes and century not necessary) |
|
Enter the Financial Period ID to assign an aging group to the customer. (4.0 numeric) Required Tips:
|
|
If finance charges should be calculated and assessed when the account is past due, click Yes in the drop-down list. If finance charges should not be calculated and charged when the account is past due, click No in the drop-down list. Note: When determining whether or not a finance charge should be assessed, the Finance Charge routines only consider accounts set to yes. |
|
To assign a discount code to the customer, if they should receive a discount, click a choice in the drop-down list. |
|
Enter the number of days beyond the Discount Date that a discount is allowed for the customer, if applicable. (2.0 numeric) |
|
Enter the defined Class ID as the rate class for the customer. Rate classes allow customers to be grouped into similar types of customers. (2.0 numeric) Required Tips:
|
|
Enter the number of times the customer is billed during the year. (2.0 numeric) Entry Options:
Note: NDS recommends that you maintain a Billing Frequency for each customer. |
|
To analyze the customer during the lien process, click Yes in the drop-down list. To omit the customer from the lien process, click No in the drop-down list. |
|
To analyze the customer's account during the rolls process, click Yes in the drop-down list. To omit the customer's account from the rolls process, click No in the drop-down list. Tip: This field is sometimes referred to as the Customer Allow Roll setting. |
|
Enter the Company ID (frequently known as the Company Number) assigned to the customer's service. The Company Number is used to group customers together for reporting purposes. (2.0 numeric) Tips:
|
|
Enter the number of units for the account, if applicable. (4.0 numeric) Note: The number of units field can be used in two different ways. |
|
If you use categories for billing, enter the correct Category ID for the customer. (up to 5 characters) Tips:
|
|
|
To complete the entries and continue to the next window, click Next. Keyboard shortcut: [ALT + n] To continue to the next step, click here. |