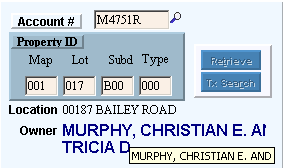
Tax Receipt Entry - Account Number Area
The table following the window example describes how to start a new Tax Receipt in Tax Receipt Entry and how to retrieve an existing (unposted) Tax Receipt for maintenance.
Entry-Mode Navigation Tip: After you click Retrieve and the Account Number, Property ID, and owner names are filled-in, focus automatically moves to the Auto Action Area.
Example:
|
Account Number Area Prompts Tip: To see more information about a field, click the hyperlink for the field name. |
|
|
For a new Tax Receipt, enter the Tax Account Number and click Retrieve. (1-6 characters) Keyboard shortcut: [ALT + t] Notes:
| |
|
Example:
| |
|
For a new Tax Receipt, enter the Map/Lot/Sub/Type portions of the Property ID and click Retrieve. (1-3 characters for each sub-field). Note:
| |
|
|
For a new Tax Receipt, click the magnifying glass to Search for a Tax Account Number. Keyboard shortcut: [CTRL + f] Note: Do not confuse the magnifying glass icon with the Tx Search button. Tx Search finds existing (unposted) Tax Receipt transactions. |
|
|
To start a new Tax Receipt, enter either the Account # or Property ID and click Retrieve or press [ENTER] if the button is in focus. Keyboard shortcut: [ALT + t] |
|
|
You can use Transaction Search to view all of the existing Tax Receipt transactions that have not yet been posted. From the Search List you can select a Tax Receipt to maintain. Keyboard shortcut: [ALT + r] Note: Do not confuse the Tx Search button with the magnifying glass icon. The magnifying glass finds Tax Accounts for entering new Tax Receipts. |
|
Automatically displays the names of the primary owner (Owner Name 1) and the co-owner (Owner Name 2) for the Tax Account. Tip: If either of the owner names is cut-off, you can hover the pointer over the name to see a Tool Tip with the full name in smaller text. | |
![]()
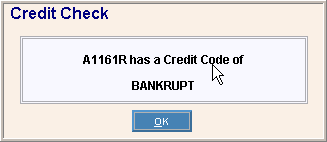
 Warning: If
a
Warning: If
a