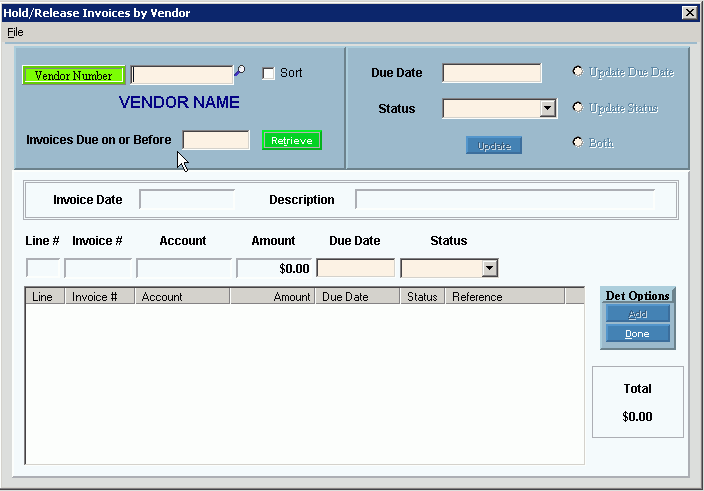
Opening Hold/Release Invoices By Vendor Maintenance, click More.
1. Click Fund Accounting from the Menu Bar.
2. Click Daily Work.
3. Click Accounts Payable.
4. Click
Hold/Release Invoices By Vendor.
Tip: Or,
use the keyboard shortcut:
[ALT]
[u] [d] [a] [i].
A/P Hold/Release Invoice By Vendor Window Example:

Changing the status or due date of all invoices for a vendor, click More.
To change the status or due date of all invoices for a vendor:
|
Hold/Release Invoices By Vendor Prompts Tip: To see more information about a field, click the hyperlink for the field name. | |
|
Enter the Vendor Number for the vendor with the invoices. (6.0 numeric) Notes:
| |
|
Sort |
To sort the vendor invoices in ascending Due Date order, click to select the box. To omit sorting the vendor invoices and to display them in random Due Date order, de-select the box. |
|
Invoices Due on or Before |
Enter the date the invoices are due on or before. Or, to display all invoices for the vendor, leave blank. (mmddccyy) |
|
|
To display the invoices for the vendor that fall on or before the specified invoice due date, click Retrieve, or press [ENTER]. Keyboard shortcut: [ALT + t] |
|
Update Actions Panel | |
|
Due Date |
To change the Due Date for all invoices for the vendor, enter the new Due Date. (mmddccyy) |
|
Status |
To specify the new Status for all invoices for the vendor, click to select the appropriate status in the drop-down list. |
|
Update Actions |
Action Options:
|
|
|
To update the invoices with the specified Update Action, click Update. Keyboard shortcut: [ALT + u] |
|
|
To complete the update for the invoices, click Done. Keyboard shortcut: [ALT + d] |
|
Invoice Inquiry Panel Tip: Use the Invoice Inquiry Panel to view the details of the invoices for the vendor. | |
|
Line |
Displays the number of the line assigned to the invoice item. Tip: You can use the Line number to identify the invoice item. |
|
Displays the invoice number assigned to the vendor invoice. | |
|
Account |
Displays the G/L Account Number or the Appropriations Account Number the invoice item is paid from. |
|
Displays the dollar amount of the invoice item. | |
|
Displays the date the invoice dollar amount is due. To edit, enter the new due date for the invoice. (mmddccyy) | |
|
Displays the status of the invoice. To edit, click a new status in the drop-down list. Note: When you update the status of an invoice during this routine, you can view the updated status here. | |
|
Displays the date the highlighted invoice was generated. Tip: To display the invoice date, click to highlight the appropriate invoice line. | |
|
Displays the reference for the highlighted invoice. Tip: To display the description, click to highlight the appropriate invoice line. | |
|
Detail Options | |
|
|
To add the updated invoice line, click Add. Keyboard shortcut: [ALT + a] |
|
|
To complete the update for the invoice or invoices, click Done. Keyboard shortcut: [ALT + d] |
|
Total |
Displays the total invoice amount for your reference. |
Changing the status or due date for a single vendor invoice or part of an invoice, click More.
 CAUTION: To
avoid losing data, you must click Add
  to save the changes
to the data.
1. Enter the Vendor Number.
2. Click Sort.
3. Enter the date the invoices are due by.
4. Click
Retrieve  .
.
5. Double-click to select the appropriate invoice line in the Invoice Inquiry Panel.
6. To
update the date the invoice item is due, enter the new Due Date.
Or, to update the invoice item Status,
click the appropriate choice in the drop-down list.
7. Click
Add .
.
8. When
all changes are completed, click Done to clear the window and prepare for another entry.
