 at the
Main Window.
 IMPORTANT: You
must click Save for the changes
to update the control record.
IMPORTANT: You
must click Save for the changes
to update the control record.Company Control Options
Use the Company Control Options to set up the environment for the Invision Application. Typically, these settings are maintained when your software is installed.
Tip: For more information, contact NDS Technical Support.
Directions:
General Procedure:
1. Make the changes to the applicable Company Control Options.
2. Click
Save  at the
Main Window.
 IMPORTANT: You
must click Save for the changes
to update the control record.
3. Exit
the module.
Tip: Although
some settings take effect immediately, most of the settings will not be
applied until the next time you open the module.
Additional Information: To see additional information about...
Opening Company Control Options, click More.
1. Open the Invision Setup Utilities menu.
2. Click File Maintenance from the Menu Bar.
3. Click
Company Control Options.
Tip: Or,
use the keyboard shortcut: [ALT] [f] [c].
Note: For some options to become effective, you must exit the module.
The Main Window, click More.
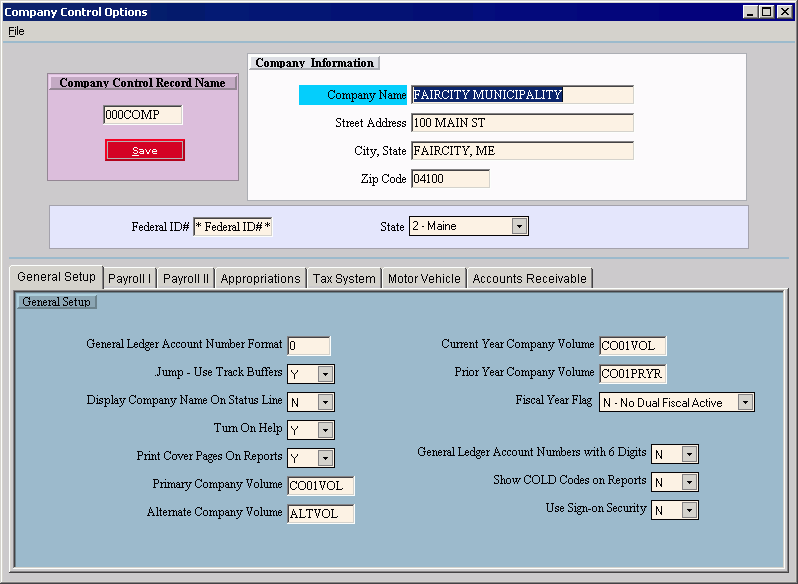
Main Window Example:
|
Main Window Prompts | |
|
Company Control Record Name |
Displays the Company Control Record Name, which is always 000COMP. Tip: You can not edit this field. |
|
|
To save changes to the Company Control Record, click Save or press [ENTER]. |
|
Company Name |
Enter the company name to appear on report headings. (up to 30 characters) Tip: The company name for the Title Bars in the GUI windows is controlled by the datacomp record. |
|
Street Address |
Enter the street address for the company. (up to 20 characters) |
|
City, State |
Enter the city and state for the company. (up to 20 characters) |
|
Zip Code |
Enter the Zip Code for the company. (up to 12 characters) |
|
Federal ID# |
Enter the Tax ID to print on W-2 forms. (up to 15 characters) |
|
State Code |
To specify one of the following State Codes for the company location, click the State Code in the drop-down list. Examples:
|
The General Setup Tab, click More.
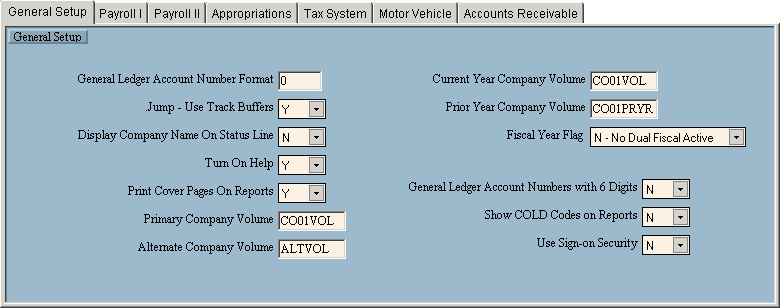
General Setup Tab Example:
|
General Setup Tab Prompts | |
|
General Ledger Account Number Format |
For character-based applications, enter the format for the General Ledger Account Number. (X.Y - where X = number of digits before delimiter and Y = number of digits following delimiter) Examples:
Notes:
|
|
Jump - Use Track Buffers |
For character-based programs, to specify if you want to use track buffers to improved efficiency for .jump commands, click one of the following options in the drop-down list:
Tip: This option does not apply to GUI modules. |
|
Display Company Name on Status Line |
For character-based programs, to specify if the company name should display on the status line, click one of the following options in the drop-down list:
Tip: This option does not apply to GUI modules. |
|
Turn on Help |
For the character-based programs, to specify if you want help comments on the file maintenance screens for each data field, click one of the following options in the drop-down list:
Tip: This option does not apply to GUI modules. |
|
Print Cover Pages on Reports |
To specify if a cover page containing the selection options should print at the beginning of each report, click one of the following options in the drop-down list.
|
|
Primary Company Volume |
Enter the name of the primary data volume for the company. |
|
Alternate Company Volume |
Enter the name of the alternate data volume for the company. Tip: Leave blank if there is no alternate. |
|
Note: The following fields pertain only to sites using the Interactive Fiscal Years feature. This deals with the ability to copy a current volume to a prior year volume, where the user has access to the data. | |
|
Current Year Company Volume |
Enter the name of the current year volume. Note: If there are no interactive years on the system, enter the Primary Volume Name. |
|
Prior Year Company Volume |
Enter the name of the prior year volume. Note: If there are no interactive years on the system, leave blank. |
|
To specify the fiscal year processing, click one of the following options in the drop-down list:
| |
|
General Ledger Account Numbers with 6 Digits |
For character-based programs, to specify if the six-digit option is active, click one of the following options in the drop-down list:
Tip: This option does not apply to GUI modules. |
|
Show COLD Codes on Reports |
This option is obsolete. Note: Always click N(o) in the drop-down list. |
|
Use Sign On Security |
To specify if the user wants to implement Sign On Security, click one of the following options in the drop-down list:
Tip: For more information, refer to the Security WebHelp. |
The Payroll 1 Tab, click More.
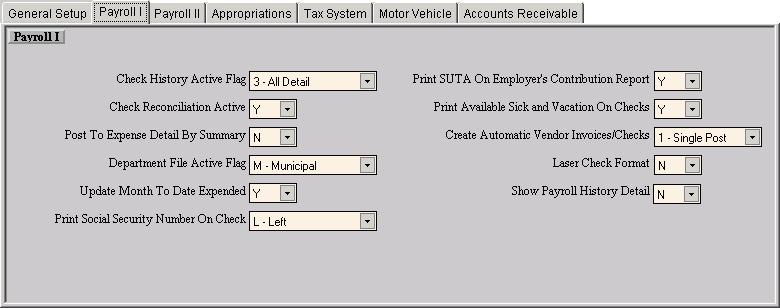
Payroll 1 Tab Example:
|
Payroll 1 Tab Prompts | |
|
Check History Active Flag |
To control the updating of the Check History File during the Payroll Post, click one of the following options in the drop-down list.
|
|
Check Reconciliation Active |
To specify if check reconciliation is active, click one of the following options in the drop-down list:
|
|
Post to Expense Detail by Summary |
To specify if posting to the Expense Detail file is by summary or detail, click one of the following options in the drop-down list:
|
|
Department File Active Flag |
To describe department file activity, click one of the following options in the drop-down list:
Tip: For more information about this setting, refer to Understanding Municipal vs. Commercial Department Numbers in the Payroll WebHelp. |
|
Update Month To Date Expended |
To specify if there is an update to Month-to-Date Expended, click one of the following options in the drop-down list:
|
|
Print Social Security Number on Check |
To control printing the Social Security Number (SSN) on the employees' checks, click one of the following options in the drop-down list:
|
|
Print SUTA on Employer's Contribution Report |
To control printing State Unemployment Tax Authority (SUTA) amounts, click one of the following options in the drop-down list:
|
|
Print Available Sick and Vacation on Checks |
To control printing available sick time and vacation time on checks, click one of the following options in the drop-down list:
|
|
Create Automatic Vendor Invoices/Checks |
To control updating the Vendor Invoices/Checks file, click one of the following options in the drop-down list:
|
|
Vendor/Invoices/Checks Notes:
| |
|
Laser Check Format |
To specify if using a laser check format, click one of the following options in the drop-down list:
|
|
Show Payroll History Detail |
To specify if detail history displays in the inquiries and prints on the reports, click one of the following options in the drop-down list:
|
The Payroll II Tab, click More.
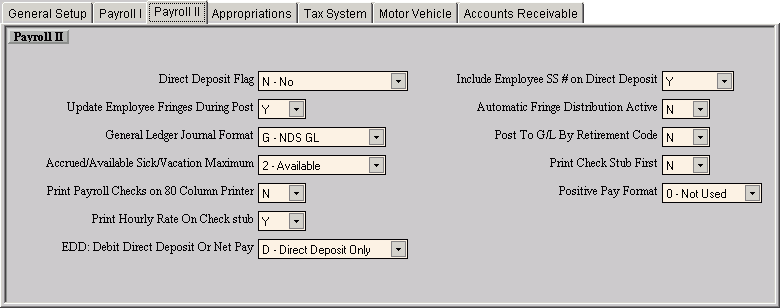
Payroll II Tab Example:
|
Payroll II Tab Prompts | |
|
Direct Deposit Flag |
To control direct deposit, click one of the following options in the drop-down list:
|
|
Update Employee Fringes During Post |
To control employee fringe updates, click one of the following options in the drop-down list.
Tip: For more information, see Understanding Fringe Benefits in the Payroll WebHelp. |
|
General Ledger Journal Format |
To specify the type of General Ledger interface, click one of the following options in the drop-down list.
|
|
Accrued/ Available Sick/ Vacation Maximum |
To control the displayed fields in the Employee Totals Master Maintenance - Vacation/Sick Detail Area, click one of the following options in the drop-down list:
|
|
Print Payroll Checks on 80 Column Printer |
To control the printer width for checks, click one of the following options in the drop-down list:
Note: To print checks and check stubs that are properly aligned, they should be printed on a 132 column printer. When using dot-matrix printers, this option, if set to Y(es), will allow the checks to be printed on an 80 column printer, but the data and values may not align properly within the boxes because of the printer's compression setting. |
|
Print Hourly Rate on Check stub |
To control printing the hourly rate on check stubs, click one of the following options in the drop-down list:
|
|
EDD: Debit Direct Deposit or Net Pay |
To control EDD, click one of the following options in the drop-down list:
|
|
Include Employee SS # on Direct Deposit |
To control the inclusion of the Social Security Number in direct deposit, click one of the following options in the drop-down list:
|
|
Automatic Fringe Distribution Active |
To specify the Fringe Distribution option, click one of the following options in the drop-down list:
Tip: For more information, see Understanding Fringe Benefits in the Payroll WebHelp. |
|
Post to General Ledger by Retirement Code |
To specify if you want to post to G/L by Retirement Code, specify one of the following options in the drop-down list:
|
|
Print Check Stub First |
To specify if you want to print the check stub first for laser checks:
Tip: This option only applies to laser checks. |
|
Positive Pay Format |
Positive pay is a method of fraud deterrence for checks. The process entails a daily reconcilement of your company's issued checks with the checks presented for payment to the bank. To specify the formats used by the Positive Pay Control Record Maintenance program, click one of the following options in the drop-down list:
Tip: Additional options may be added for customers new to the Positive Pay feature. |
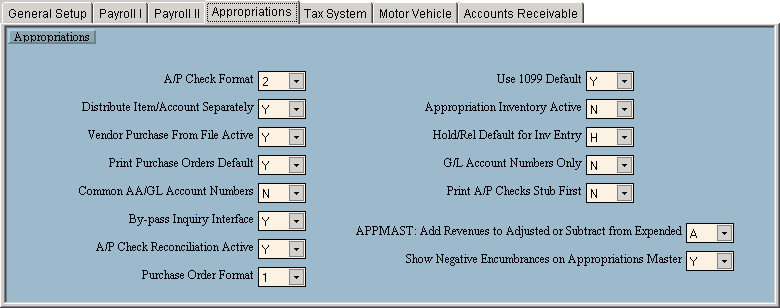
The Appropriations Tab (for Fund Accounting), click More.
Appropriations Tab Example:
|
Appropriations Tab Prompts (Fund Accounting) | |
|
A/P Check Format |
To specify the A/P check format, click one of the following codes in the drop-down list:
Tip: "L" indicates laser. |
|
Distribute Item/Account Separately |
To specify the type of purchase order distribution system, click one of the following options in the drop-down list:
|
|
Vendor Purchase From File Active |
To specify if you want to activate the Purchase From File, click one of the following options in the drop-down list:
|
|
Print Purchase Orders Default |
To specify if you want the Print PO? prompt during Purchase Order Entry, click one of the following options in the drop-down list:
|
|
Common AA/GL Account Numbers |
To specify the option for Common AA/GL Account Numbers, click one of the following options in the drop-down list:
|
|
By-pass Inquiry Interface |
To control the By-pass Inquiry Interface, click one of the following options in the drop-down list:
|
|
A/P Check Reconciliation Active |
To control if A/P Check Reconciliation is active, click one of the following options in the drop-down list:
|
|
Purchase Order Format |
To specify the Purchase Order format, click one of the following options in the drop-down list:
|
|
Use 1099 Default |
To control the display of the 1099 code, click one of the following options in the drop-down list:
|
|
Appropriation Inventory Active |
To specify if Appropriation Inventory is active, click one of the following options in the drop-down list:
|
|
Hold/Rel Default for Inv Entry |
To specify the Hold/Release default for Inventory Entry, click one of the following options in the drop-down list:
|
|
G/L Account Numbers Only |
To specify if both Appropriation and G/L Account Numbers are used, click one of the following options in the drop-down list:
|
|
Print A/P Checks Stub First |
To specify if check stubs print before or after the checks, click one of the following options in the drop-down list:
|
|
APPMAST: Add Revenues to Adjusted or Subtract from Expended |
Click either of the following options in the drop-down list:
Note: This setting is obsolete. Either option is acceptable. |
|
Show Negative Encumbrances on Appropriations Master |
To specify if negative encumbrances are allowed, click one of the following options in the drop-down list:
|
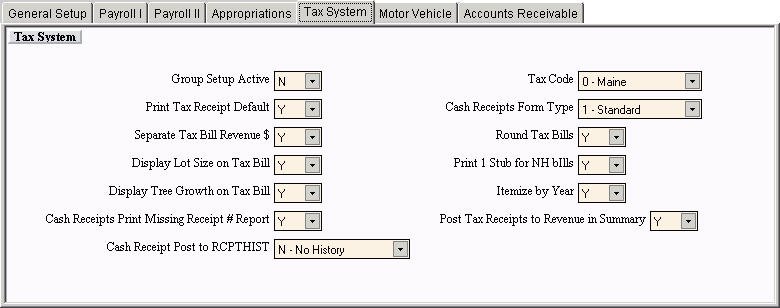
The Tax System Tab (for Tax Billing & Cash Receipts), click More.
Tax System Tab Example:
|
Tax System Tab Prompts Note: The following options apply to the Cash Receipts and Tax Billing modules. | |
|
Group Setup Active (Cash Receipts) |
You can set up the Cash Receipts module to use different groups within the municipality for segregating the transactions when entering and posting cash receipts. For example, you can set up groups relating to offices, units, or individuals. The concept is similar to the batching feature available in other NDS applications, and includes extensive security and separation of data. To specify if you want groups, click one of the following options in the drop-down list:
Tips:
|
|
Print Tax Receipt Default (Cash Receipts) |
To specify if you want to activate the Printer Area for printing the Tax Receipt during Tax Receipt Entry, click one of the following options in the drop-down list.
|
|
Separate Tax Bill Revenue $ (Tax Billing) |
To specify if you want to print the taxable value detail for General, School, and County on the Tax Bill, click one of the following options in the drop-down list.
|
|
Display Lot Size on Tax Bill (Tax Billing) |
To specify if you want to print the Lot Size on the Tax Bill, click one of the following options:
|
|
Display Tree Growth on Tax Bill (Tax Billing) |
To specify if you want to print the Tree Growth on the Tax Bill, click one of the following options:
|
|
Cash Receipts Print Missing Receipt # Report (Cash Receipts) |
To specify if you want to print the Missing Receipt Number Report after the Tax and Treasurer's Receipt Journals, click one of the following options in the drop-down list.
|
|
Cash Receipt Post to RCPTHIST (Cash Receipts) |
To specify if you want to retain history on the system, click one of the following options in the drop-down list:
|
|
Tax Code (Tax Billing & Cash Receipts) |
To specify the appropriate state tax code, click one of the following options in the drop-down list:
Tip: Each state has various requirements where the logic is specific to only that state. |
|
Cash Receipts Form Type (Cash Receipts) |
To specify which type of Tax Receipt to print, click one of the following options in the drop-down list:
|
|
Round Tax Bills (Tax Billing) |
To specify the rounding instructions for tax bills, click one of the following options in the drop-down list:
|
|
Print 1 Stub for NH Bills (Tax Billing) |
To specify whether to print one or two stubs for New Hampshire tax bills, click one of the following options in the drop-down list:
|
|
Itemize by Year (Tax Billing & Cash Receipts) |
To specify if the Tax System uses the year (YY) for the General Ledger Account Number suffix, click one of the following options in the drop-down list:
Tip: This option is used by the following programs:
|
|
Post Tax Receipts to Revenue in Summary (Cash Receipts) |
To specify whether to post tax receipt transactions as detail entries or as a summary transaction, click one of the following options in the drop-down list:
|
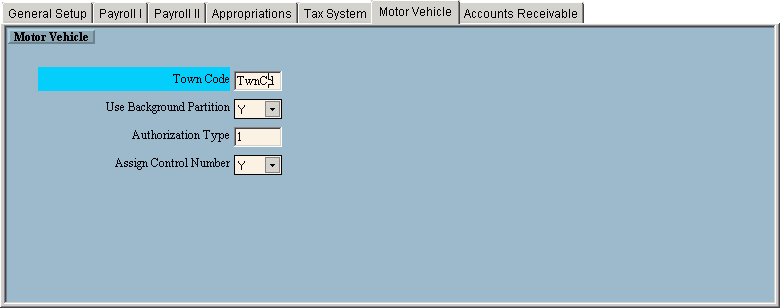
The Motor Vehicle Tab, click More.
Motor Vehicle Tab Example:
|
Motor Vehicle Tab Prompts | |
|
Town Code |
Enter a valid Town GEO Code for the municipality. (up to 5 characters) Notes:
|
|
Use Background Partition |
To specify if some programs such as the Search can use the operating system's background partition, click one of the following options in the drop-down list:
|
|
Authorization Type |
To specify the state's authorization level for the municipality, enter the single-digit authorization number. This restricts the municipality to performing only certain functions within MVR. Notes:
|
|
Assign Control Number |
To specify if the Control Number (the registration form number) is assigned by the user or the program, click one of the following options in the drop-down list.
|
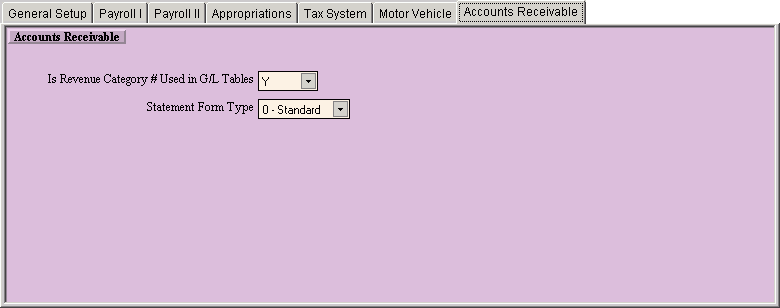
The Accounts Receivable Tab, click More.
Accounts Receivable Tab Example:
|
Accounts Receivable Tab Prompts | |
|
Is Revenue Category # Used in G/L Tables |
Note: This posting option is obsolete. Either setting (Y/N) is okay. |
|
Statement Form Type |
To specify the type of statement, click one of the following options in the drop-down list.
|