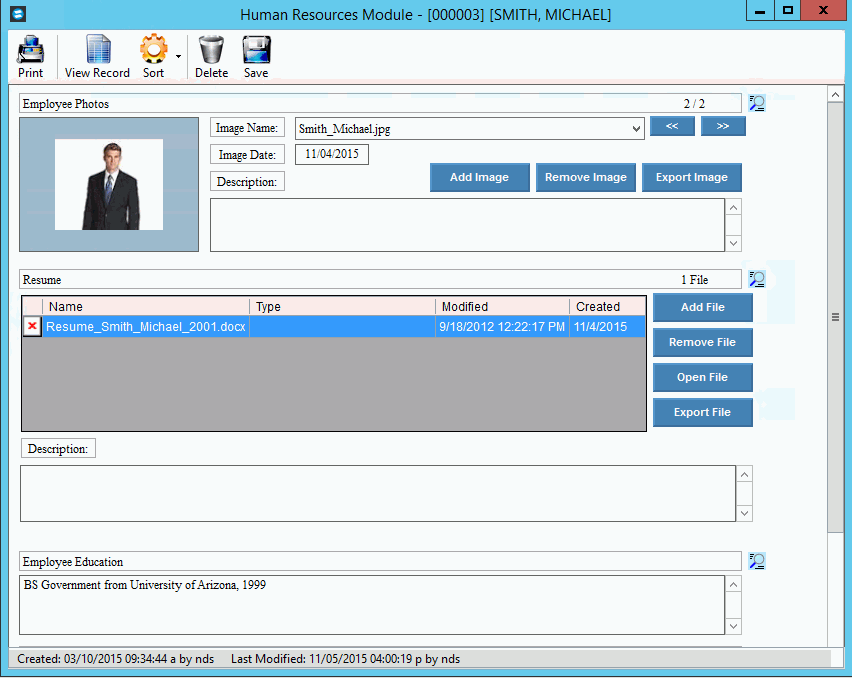
Employee Master Maintenance - Human Resources Window
Use the Human Resources Window to enter HR notes about the employee or to attach files and images to the employee record. The HR information can be printed as well. The table following the window example describes the Human Resources Window.
Tips:
The displayed fields are user-defined and are specific to your facility. This means that the information on your screen may not match the documentation. To define new note fields to display in the HR Window, refer to Employee HR Field Maintenance.
For more information about working with data in fields, see the Data Entry Guidelines.
Directions:
To display the Human Resources Window:
1. Open Employee Master Maintenance.
2. Click HR
![]() in the Menu
Tree.
in the Menu
Tree.
Employee Master Maintenance - Human Resources Window Example:

Employee Human Resources Window Prompts Tip: To see more information about a field, click the hyperlink for the field name. |
|
Created Date, Time & User |
Displays the date and time that the HR record was created and User ID of the person who created the HR. |
Modified Date, Time & User |
Displays the date and time the HR record was last modified as well as the User ID of the person who last modified the HR record. |
Displays the name of the user-defined note field. |
|
Enter the information for each applicable field. There are 3 formats for fields. (format varies)
|
|
The File field allows you to view files attached to the HR record for the employee, as well as, add new files, remove files and export a file.
To open the file so you can see the
contents, click Open File
To add a new file to the employee's record: 1. Click Add
File 2. Navigate to the file. 3. Click Open
To remove an existing file from the employee's record: 1. Click Remove
File 2. At the prompt, click
Y(es) to remove the file.
To export an employee HR file: 1. Click Export
File 2. At the Save As window, navigate to the save as location and edit the file name, if applicable. 3. Click Save
|
|
The Image field allows you to view images attached to the HR record for the employee, as well as, add new images, remove images and export an image.
To add a new image to the employee's record: 1. Click Add
Image 2. Navigate to the image. 3. Click Open
To remove an existing image from the employee's record: 1. Click Remove
Image 2. At the prompt, click
Y(es) to remove the file. To export an HR image: 1. Click Export
Image 2. At the Save As window, navigate to the save as location and edit the file name, if applicable. 3. Click Save
|
|
You can enter text to describe an attached file or image. (up to 9999 characters) |
|
|
To update the new or changed information, click Save or press [ENTER]. Keyboard shortcut: [ALT + s] Note: At the Confirm Save prompt, click Yes to save the changes. |
To avoid losing data, you must save new or changed records. |
|
|
To print the Payroll HR Record Report: 1. Click Print. 2. The following prompts display:
3. Enter the number of copies to print, if applicable. 4. To print to the Windows® default printer, click
Print or press [ENTER]. |
|
Sort Options:
|
|
To view the entire HR notes record for the employee, click Record Contents. |
|
To delete all of the HR notes for an employee: 1. Click File from the Menu Bar. 2. Click Delete. 3. The following prompt
displays:
|