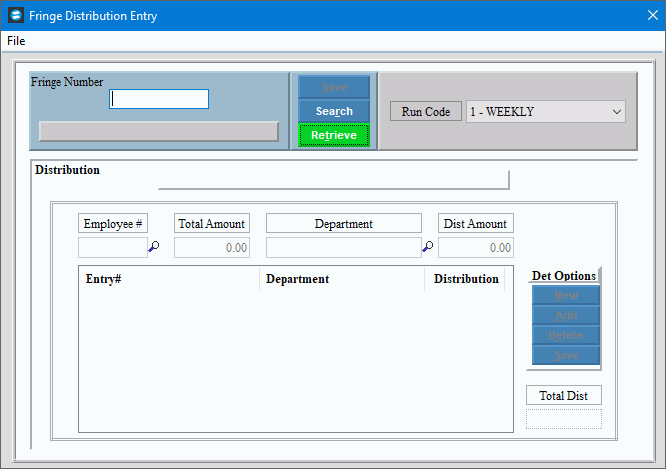
Fringe Distribution Entry
Use Fringe Distribution Entry to distribute the employer's payroll expenses by employee and department. You can use Fringe Distribution for benefits such as matched annuities and also for taxes.
Notes:
This program is appropriate if you use the manual method for processing fringes. An alternative program that provides more visibility into the data is Employee Fringe Maintenance.
For more information, refer to Understanding Fringe Benefits and Understanding Vendor Invoices and Checks.
Directions:
To open Fringe Distribution Entry from the Menu., click Payroll, Other Payroll Work, Fringe Distribution and Fringe Distribution Entry.
Or, use the keyboard shortcut: [ALT] [p] [o] [f] [f].
Fringe Distribution Window Example:
Fringe Distribution Entry Prompts |
|
Creating a Fringe Distribution |
To create a Fringe Distribution for an employee: 1. Enter an existing Fringe Number and click Retrieve 2. Click the appropriate Run Code in the drop-down list. 3. Enter the Employee Number and press [TAB]. The employee name appears. 4. Enter the Total Amount. 5. For each distribution amount, enter the Department Number and Distribution Amount and click Add. Each time you click Add, a new line appears in the detail list at the bottom of the window. 6. When the sum of the
Distribution Amounts in the detail list equals the Total Amount,
click Save to complete
the distribution for the employee. |
Enter
an existing Fringe Number and click Retrieve
To view all of the Fringe Numbers,
click Search
Keyboard shortcut: [ALT + r] Tip:
If you are adding a distribution, |
|
|
|
Click the Run Code in the drop-down list before entering employees. Notes:
|
|
Enter the Employee Number. (7 digits) To Search for a valid Employee Number,
click the magnifying glass
Keyboard shortcut: [CTRL + f] Notes:
|
|
Total Amount |
Enter the Total Dollar Amount for all of the detail distributions. The sum of the Detail Amounts must equal this Total Amount to complete the distribution. Note: If you are adding to a previously completed distribution, the previous Total Amount appears. |
Note: Enter the following fields for each distribution detail line. |
|
Enter the employee's primary Department Number. (8.0 numeric) Required. Notes:
|
|
Distribution Amount |
Enter the dollar amount to distribute to this Department Number. (5.2 numeric) Note: As you add detail lines, the program automatically displays the remaining amount available (the Total Amount minus the Detail Amounts). You can accept this amount or reduce it if you have more distributions to enter. |
Notes: The following fields display in the detail list for each Distribution Amount. Although you can not edit a detail line, to change the information you can delete the line and then add a new line with the correct information. |
|
Entry # |
Displays the detail line number for reference only. |
Department |
Displays the Department Number for the Distribution Amount. |
Distribution Amount |
Displays the Distribution Amount. |
Detail Buttons |
|
|
To add the distribution information to the detail list, click Add, or press [ENTER]. Keyboard shortcut: [ALT + a] |
|
To delete a detail distribution line from the list, click Delete, or press [ENTER]. Keyboard shortcut: [ALT + e] |
|
To save the entire distribution (after the sum of the Detail Amounts equals the Total Amount), click Save, or press [ENTER]. Keyboard shortcut: [ALT + s] Important Note: After you click Save, you cannot use this program to change or delete the entries. However, by re-entering the distributions for the employee/fringe combination, the old entries are replaced. For more visibility, you can use the Employee Fringe Maintenance program. |
Editing Fringe Entries |
Note: You can see existing distributions on the Fringe Distribution Edit List. 1. Enter the Fringe
Number for a distribution and click Retrieve
2. Click the appropriate Run Code in the drop-down list. 3. Enter the Employee Number and press [TAB]. The employee name appears. 4. Change the displayed Total Amount, if required. 5. Re-enter all of the distribution detail information. For each distribution amount, enter the Department Number and Distribution Amount, and then click Add. Each time you click Add, a new line appears in the detail list at the bottom of the window. 6. When the sum of the Distribution Amounts in the detail list equals the Total Amount, click Save to complete the distribution for the employee.
|
Deleting Fringe Entries |
After you click Save, you cannot use this program to change or delete the entries. However, by re-entering the distributions for the employee/fringe combination, the old entries are replaced. For more visibility, we recommend you use the Employee Fringe Maintenance program to remove existing distributions. |


 . From the Search
list you can select a Fringe Number for the distributions.
. From the Search
list you can select a Fringe Number for the distributions. displays above the Detail Options buttons. Default entries
display and the first field is highlighted to let you know you
can begin entering information.
displays above the Detail Options buttons. Default entries
display and the first field is highlighted to let you know you
can begin entering information. and you will see
all of the existing employees. From the Search list you
can select an employee to display.
and you will see
all of the existing employees. From the Search list you
can select an employee to display. .
You can either enter a new employee or change the Run
Code.
.
You can either enter a new employee or change the Run
Code.


 CAUTION: To avoid losing data,
you must save new or changed distributions.
CAUTION: To avoid losing data,
you must save new or changed distributions.