PR Check Maintenance
Use PR Check Maintenance to add, edit, void or change the status of Payroll checks. You can change the status of a group of payroll checks. Checks whose status is changed to voided will be removed from the check reconciliation file when the PR Check Purge is run.
Directions
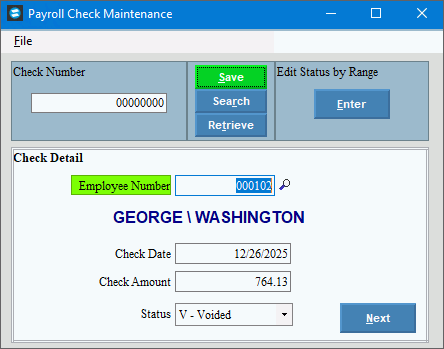
To open click Utilities on the menu. Then click PR Check Reconciliation and click PR Check Maintenance.
Payroll Check Maintenance Window Example:
Payroll Check maintenance Window Prompts
|
|
Adding a PR Check |
To add a PR Check: 1. Enter the Check number to be added and press [Enter]. 3. Enter the employee number, enter the Check Date, and Check Amount. 4. Select the proper Check Status. The system defaults to Outstanding but can be changed to either Deleted or Voided. 5. Press [ENTER] or click Save 6. When finished entering
all checks, click Close
|
Deleting a Check |
Note: Use these steps to mark outstanding checks that have cleared as deleted. 1. In the Check # box, enter the Check Number to change. 2. Press [ENTER] or
click Retrieve 3. In the Status box, enter D or select Deleted in the drop-down list. 4. To complete the
changes, press [ENTER] or
click Save 5. When finished with
all Check Reconciliation work, click Close |
Voiding or Changing the Status of a Check |
Note: Checks marked as Voided will be cleared from the system the next time the PR Check Purge is run. 1. In the Check # box, enter the Check Number to change. 2. Press [ENTER] or
click Retrieve 3. In the Status box, enter V or select Voided in the drop-down list. 4. To complete the
changes, press [ENTER] or
click Save 5. When finished with all Check Reconciliation work, click Close . |
Changing the Status of a Group of Checks |
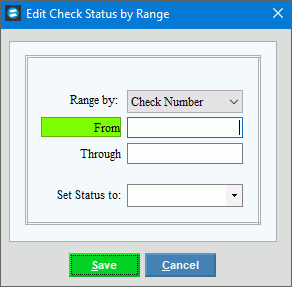
Note: You can quickly change the Check Status for a group of checks to be Voided, Deleted or Outstanding. 1. Click Enter
2. To select a group
of checks select the appropriate Range
By, in the drop-down list. 3. Enter the From and To for the range of checks for which you wish to change the Status. 4. To see the PR checks
in the range, click Retrieve 5. To identify the appropriate Status, click to select the appropriate Check Status in the drop-down list. 6. To complete the
changes, press [ENTER] or
click Save 7. When finished with
all A/P Check Reconciliation work, click Close |
 .
. .
.

 to
identify that you want to change the Status for a group of checks.
The following screen is displayed.
to
identify that you want to change the Status for a group of checks.
The following screen is displayed.