Enter
the Provider IDs and Location IDS.
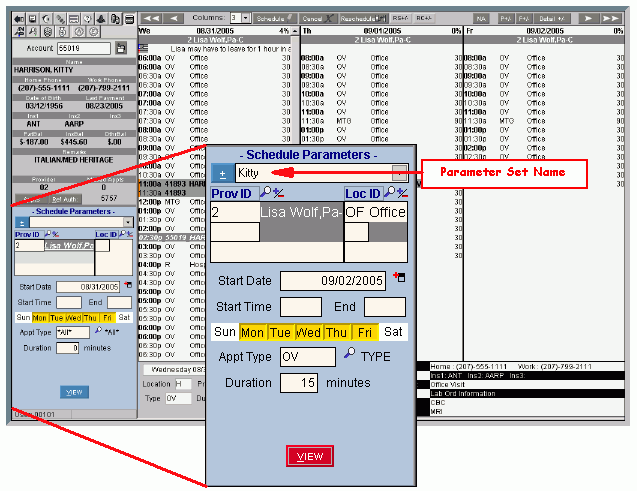
Or, select a Parameter Set Name
in the drop-down list.
Change the remaining parameters, if applicable.
Click
View  .
.
Scheduling Parameters Area
This topic last opened by author on October 6, 2005 at 4:38 PM.
Use the Scheduling Parameters Area in Scheduling to limit the Appointment Book Area to the desired time slots. Using the Scheduling Parameters you can highlight the time slots mutually agreeable to patients, providers, and the locations. Based on the parameters you enter, the appointment book displays for the days, providers and locations specified. Times that are not available are grayed out for the dates and locations specified. The table following the window example describes the Scheduling Parameters Area in the Scheduling Side Panel (the left pane).
Scheduling Parameters Examples:
If a patient wants to make an appointment for a Monday, Wednesday or Friday between 9 am and noon, you can enter the scheduling parameters to display the qualified times. To do this highlight Monday, Wednesday, Friday in the Days of the Week area, maintain a Start Time of 9:00 and an End Time of 12:00.
If a patient wants to make an appointment on a Tuesday afternoon from 3 -5 pm, you highlight Tuesday in the Day of the Week area, and maintain a Start Time of 15:00 and an End Time of 17:00.
Directions:
To display the Scheduling Parameters Area, open Scheduling.
To apply the parameters to the Appointment Book Area in the Scheduling Window:
Enter
the Provider IDs and Location IDS.
Or, select a Parameter Set Name
in the drop-down list.
Change the remaining parameters, if applicable.
Click
View  .
.
Tip: To
hide the Scheduling Parameters Area (and the rest of the Side Panel),
click Shrink Menu  on the INSight Toolbar.
Scheduling Parameters Area Example:

|
Scheduling Parameters Area Prompts Tip: To see more information about a field, click the hyperlink for the field name. |
|
|
|
The Parameter Set Name identifies a pre-defined set of parameters that you can maintain for your convenience. Entry Options:
Tip: You can manually maintain the parameters without using a predefined Parameter Set. |
|
To specify the provider or providers to include
in the Appointment Book, enter the Scheduling Provider ID and click Plus/Minus Notes:
| |
|
To specify the locations to include in the Appointment
Book, enter the Scheduling Location Code and Plus/Minus
Notes:
| |
|
To specify the Starting Date to display in the Appointment Book Area, enter the date. (mmddccyy - slashes and century optional) Or, to choose a specific date from the Calendar
Pop-Up, click the Calendar | |
|
To specify the beginning time the patient is available for an appointment, enter the Start Time, if applicable. (hh:mm, military time) Example: Enter 9:00 for 9:00 am Tips:
| |
|
To specify the ending time the patient is available for an appointment, enter the ending time, if applicable. (hh:mm, military time) Example End Time: Enter 13:00 for 1:00 pm Tips:
| |
|
|
To specify a day or days of the week that an appointment can be scheduled for the patient, click to de-select the undesirable days. Tips:
Example: If the patient wants an appointment on a Wednesday, you will click Sun - Tuesday and then Thursday - Saturday to de-select those days. |
|
To limit the display of Appointment Types in the schedule, enter the Appointment Type ID, Category ID, or Set ID. (up to 6 characters) Note: To include all Appointment Types leave this field blank. (* All * displays in place of the blank.) Tips:
| |
|
To limit the display of time slots in the Appointment Book, enter the minimum duration, if applicable. (3.0 numeric, in whole minutes) Message to Josh 9/5. This does not seem to work as described. | |
|
|
To update the Appointment Book with the parameters entered, click View. Keyboard shortcut: [ALT + v] |