Opening the Patient Statements Print Instructions, click More.
1. Click Billing Functions from the Menu Bar.
2. Click Patient Statements.
3. Click Patient
Statements.
Or, use the keyboard
shortcut: [ALT] [b]
[c].
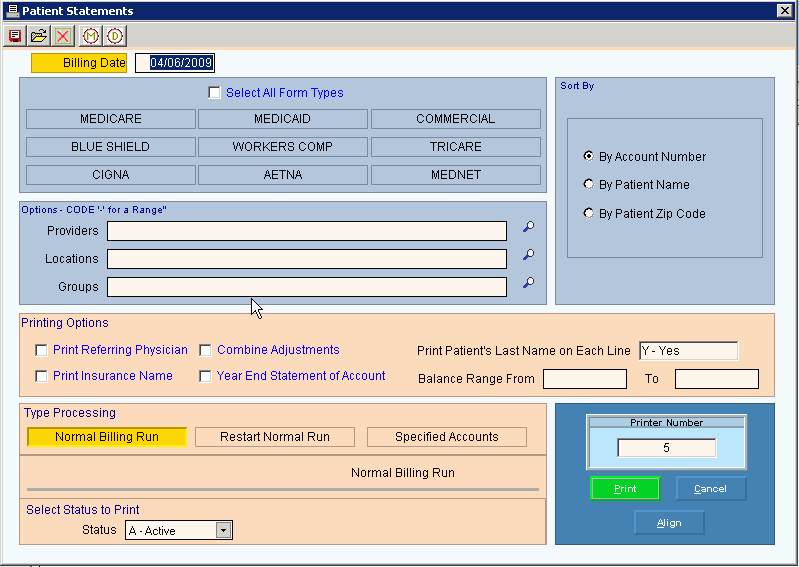
Patient Statements Print Window Example:

Choosing the Selections at the Prompt Window, click More.
Patient Statements Print Prompts Tip: To see more information about a field, click the hyperlink for the field name. |
|
To accept the Workfile Build Date as the Statement Billing Date, press [TAB] or enter another date as the statement date. (mmddccyy - slashes and century optional) Tip: You can back-date the billing date if needed. For example, if you normally run statements on Monday, but a particular Monday is a holiday, you can run the statements on Tuesday instead but enter Monday's date as the billing date. |
|
Statements Parameters |
|
To select All Forms Types to print for patient statements, click to select the box. To select specific Form Types to print for patient statements, click the appropriate Form Type name in the list. |
|
To limit printing statements for specified providers, enter the beginning Provider ID in the range, followed by a dash (-), and then the ending Provider ID in the range. Tip: Generally leave Providers blank, to include all providers. |
|
To limit printing statements for specified locations, enter the beginning Location ID in the range, followed by a dash (-), and then the ending Location ID in the range. Tip: Generally leave Locations blank, to include all locations. |
|
To limit printing statements for specified groups, enter the beginning Group ID in the range, followed by a dash (-), and then the ending Group ID in the range. Tip: Generally leave groups blank, to include all groups. |
|
Sort By |
To specify the method for sorting the patient statements, click a choice. Sort By options:
|
Printing Options |
|
Print Referring Physician |
To print the Referring Physician ID on the statements, click to select the box. To omit printing the Referring Physician ID on the statements, make sure the box is de-selected. |
Print Insurance Name |
To print the Insurance Company Name at the top of the statements, click to select the box. To omit printing the Insurance Company Name on the statements, make sure the box is de-selected. |
Combine Adjustments |
To accumulate all adjustment amounts for the patient and print one total adjustment amount for the patient, click to select the box. To print each adjustment amount for the patient, make sure this box is de-selected. Note: Generally, NDS does not recommend selecting this option as it is difficult for patients to reconcile their statements if adjustments are combined. |
Year End Statements of Account |
To print a Year End Statement for patients, click to select the box. To omit printing a Year End Statements for patients, make sure the box is de-selected. Notes:
|
Print Patient's Last Name on Each Line |
To print the patient's last name on each transaction line, click to select the box. To omit printing the patient's last name on each transaction line, make sure the box is de-selected. |
Balance Range From |
To specify a minimum dollar amount the patient's balance must be in order to print a statement, enter the dollar amount. Tip: To print statements for all patients regardless of their balance leave this field blank. |
To |
To specify the maximum dollar amount the patients' balance must be in order to print a statement, enter the maximum dollar amount. Tip: To print statements for all patients regardless of their balance leave this field blank. |
Type Processing |
To specify the type of statement processing, select one of the following:
|
Select Status to Print |
To print statements for a specific patient status, click a choice in the drop-down list. Note: This field is only available if you select Normal Billing Run as the Type Processing. |
|
Note: The following field is only available if you choose Restart Normal Billing Run as the Type Processing. |
|
Enter Last Account # That Printed |
If this is a restart statement run, enter the patient account number of the last good statement that printed. (up to 6 characters) Notes:
|
|
Note: The following field is only available if you choose Specified Accounts for Type Processing. |
|
Enter Accounts |
Entry Options: To print a single patient statement, enter the desired patient account number and press [ENTER]. To print a group of patient statements, build a list of patient account numbers by entering the first patient account number followed by a "," (comma) then the next patient account number in your list. Continue entering in this fashion until your list is built. To complete the list, press [ENTER]. Note:
To search for the appropriate patient account number,
click Search
|
|
Displays the default printer number. For more information, see Printing Options. |
|
To print a test pattern to check the alignment of the statements in the printer, click Align. Notes:
|
|
To generate the report, click Print or press [ENTER]. Keyboard shortcut: [ALT + p] |
|
To escape from the print routine, click Cancel. Keyboard shortcut: [ALT + c] |
Edit Statement Header Step
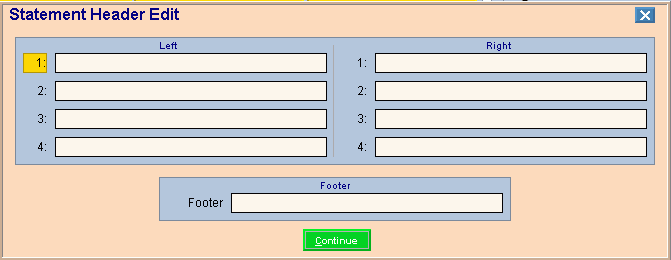
After clicking Print, the following window displays:

Patient Statements Print - Edit Header Step Prompts Tip: To see more information about a field, click the hyperlink for the field name. |
|
Left Header Line 1 - 4 |
To print up to four lines of text on the top left portion of each statement enter the text for line 1, 2, 3 and 4, if applicable. (up to 30 characters per line) Notes:
|
Right Header Line 1 - 4 |
To print up to four lines of text on the top right side of each statement enter the text for line 1, 2, 3, and 4, if applicable. (up to 30 characters per line) Notes:
|
Footer |
To print a footer at the bottom of each statement, enter the text for the footer, if applicable. (up to 30 characters) |
|
To continue to the next step, click Continue or press [ENTER]. Keyboard shortcut: [ALT + c] |
Edit Statement Messages Step
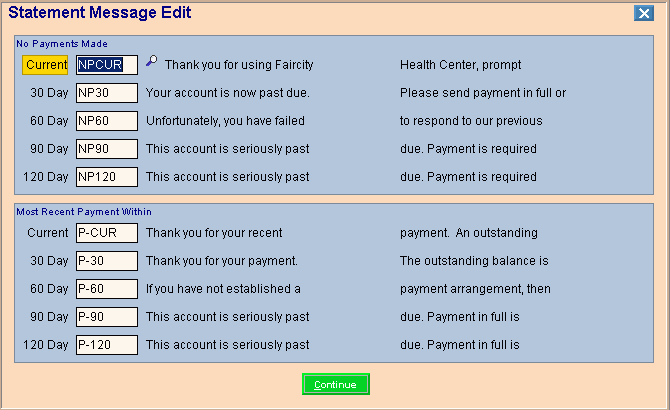
After clicking Continue, the following window displays:

Patient Statements Print - Edit Statement Messages Step Prompts Tip: To see more information about a field, click the hyperlink for the field name. |
|
No Payments Made Note: You have eight different messages available to print on statements. The appropriate message will print on the patient's statement based on their patient balance and the date of their last payment. |
|
Current |
To specify the Remarks Code to print as a message on a statement if the patient's oldest patient balance is current, enter the appropriate Remarks Code. Note:
To search for the appropriate Remarks Code, click
Search
|
30 Day |
To specify the Remarks Code to print as a message on a statement if the patient's oldest patient balance is 30 days old, enter the appropriate Remarks Code. Note:
To search for the appropriate Remarks Code, click
Search |
60 Day |
To specify the Remarks Code to print as a message on a statement if the patient's oldest patient balance is 60 days old, enter the appropriate Remarks Code. Note:
To search for the appropriate Remarks Code, click
Search |
90 Day |
To specify the Remarks Code to print as a message on a statement if the patient's oldest patient balance is 90 days old, enter the appropriate Remarks Code. Note:
To search for the appropriate Remarks Code, click
Search |
120 Day |
To specify the Remarks Code to print as a message on a statement if the patient's oldest patient balance is 120 days old, enter the appropriate Remarks Code. Note:
To search for the appropriate Remarks Code, click
Search |
Most Recent Payment Within |
|
30 Day |
To specify the Remarks Code to print as a message on the statements for patients who have made a payment within the past 30 days, enter the appropriate Remarks Code. Note:
To search for the appropriate Remarks Code, click
Search |
60 Day |
To specify the Remarks Code to print as a message on the statements for patients who have made a payment within the past 60 days, enter the appropriate Remarks Code. Note:
To search for the appropriate Remarks Code, click
Search |
90 Day |
To specify the Remarks Code to print as a message on the statements for patients who have made a payment within the past 90 days, enter the appropriate Remarks Code. Note:
To search for the appropriate Remarks Code, click
Search |
120 Day |
To specify the Remarks Code to print as a message on the statements for patients who have made a payment within the past 120 days, enter the appropriate Remarks Code. Note:
To search for the appropriate Remarks Code, click
Search |
|
Note: The following fields only display if you chose the printing option - Year End Statement of Account. |
|
Account Number Range |
To limit the year end statements to a range of patients, enter the beginning Patient Account Number in the range. (up to 6 characters) Tip: To include all patients, leave blank. Or, to print a statement for an individual patient enter the patient account number as the From and To fields. |
To |
To limit the year end statements to a range of patients, enter the ending Patient Account Number in the range. (up to 6 characters) Tip: To include all patients, leave blank. Or, to print a statement for an individual patient enter the patient account number as the From and To fields. |
Date of Service Range |
To limit the services to include on the year end statements to a range of service dates, enter the beginning Service Date in the range. (mmddyy, no slashes) Tip: Often you will enter a service date range for a calendar year with the beginning date of service as of January 1. Or, to include all service dates, leave this field blank. |
To |
To limit the services to include on the year end statements to a range of service dates, enter the ending Service Date in the range. (mmddyy, no slashes) Tip: Often, you will enter a service date range for a calendar year with the ending date of service as of December 31. Or, to include all service dates, leave this field blank. |
Self Pay Only? |
To limit the year end statements to patients who are responsible for paying for their services themselves, click Yes. To print year end statements for all patients regardless of who is responsible for payment of services, click No. |
|
To proceed with printing the patient statements, click continue or press [ENTER]. |
Printing Individual or Year End Patient Statements, click More.
1. Maintain the appropriate Billing Date to print on the statement.
2. Select the Printing Option - Year End Statement of Account, if this is a year end statement.
3. Select Specified Accounts as the Printing Option.
4. Enter the patient account number for the patient statement.
5. Enter or accept the displayed Printer Number.
6. Click Alignment to align the statement form in the printer.
7. Click Print.
8. Maintain the appropriate statement messages.
9. Maintain the beginning and ending service dates to print on the statement.
10. Click Continue to print the statement.
Report Sample(s), click More.
