Scheduling - Check In Status Window Overview
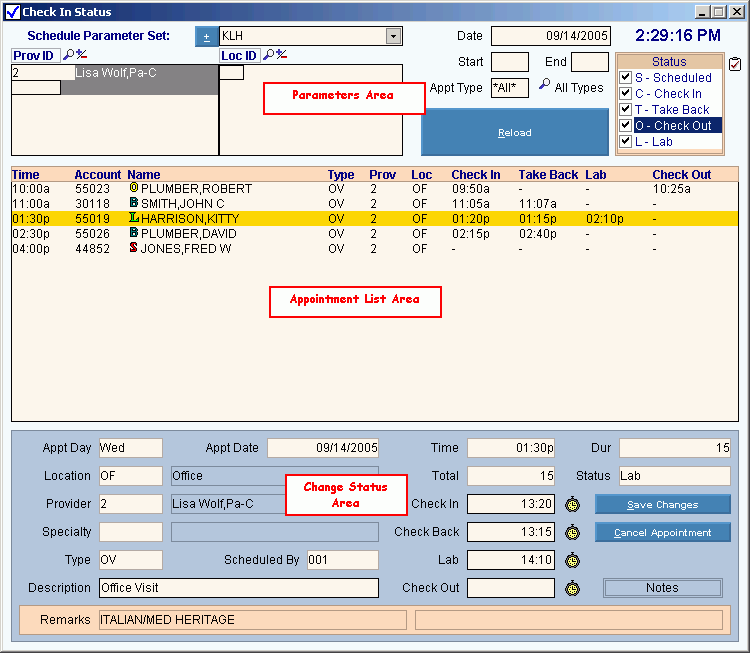
Use the Check In Status Window in Scheduling to check in patients for their appointments, and once they are checked in to maintain the status or phase of their appointment. The table following the window example describes the three major areas within the Check In Status Window: Parameters Area, Appointment List Area, and Change Status Area.
Tips:
-
You may find it handy to the Check In Status Window when you are not using it. Whenever needed again, you can click the Check In Status  button on the Windows Task Bar to maximize the window.
-
The Check In Status Window automatically refreshes according to the refresh rate setting maintained during . Or, you can press [CTRL + x] to refresh now.
-
Another method for checking in the patient is to use the Scheduling - Check In Wizard, which allows you to make changes to the patient information such as address, insurance coverage. You can also print patient documents, such as the superbill from the wizard.
Tip: The Check In Wizard only changes the status to Check In. You can not set the other statuses using the wizard.
-
For more information about working with data in fields, see Data Entry Guidelines.
Directions:
To see directions for...
-
Opening the Check In Status Window, click More.
-
Changing the status for a patient appointment, click More.
Check In Status Window Example:
Tip: To see detailed information, the cursor becomes a  hand when you position the cursor over a field or section. Click once to display the associated topic.

|
Check In Status Window - Area Prompts
Tip: To see more information about an area, click the hyperlink for the area name.
|
|
Parameters Area
|
Contains the parameters for determining which appointments appear in the Appointment List Area.
|
|
Appointment List Area
|
Displays a list of appointments that match the parameters specified.
|
|
Change Status Area
|
Contains the fields for changing the status of an appointment selected from the list.
|

![]() button on the Windows Task Bar to maximize the window.
button on the Windows Task Bar to maximize the window.