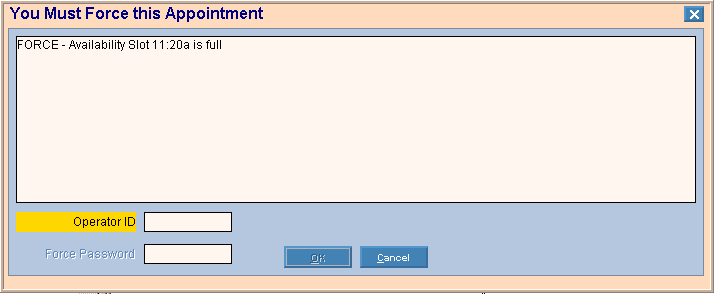
Scheduling - Force Appointment Window
Use the Force Appointment Window in Scheduling to schedule an appointment in a already reserved with an appointment. This is also called double-booking. The table following the window example describes the Force Appointment Window for Scheduling.
Tips:
-
If User Scheduling Preferences are set, the Force  icon displays in the Appointment Book Area next to the forced appointment.
-
You will not have to force an appointment when double-booking if...
-
The time slot's is set to allow double or triple booking.
-
Or, the is set to display multiple slices of time for a time slot.
-
For more information about working with data in fields, see Data Entry Guidelines.
Directions:
To display the Force Appointment Window:
-
Open Scheduling.
-
Highlight a reserved in the Appointment Book Area that already has an appointment scheduled.
-
Double-click the time slot to schedule the appointment in the Scheduling - Appointment Scheduler Window.
-
Fill in the Scheduler Window, and then click Schedule  . The Force Appointment Window displays.
Scheduling - Force Appointment Window Example:

|
Scheduling - Force Appointment Window Prompts
Tip: To see more information about a field, click the hyperlink for the field name.
|
|
|
Enter the valid defined Operator ID assigned to the person maintaining the forced appointment. (up to 4 characters)
|
|
|
Enter the operator's password to allow an appointment to be forced into the time slot scheduled. (up to 8 characters)
Note: The Force Password field is only active if the Forcing Password is maintained during .
|
|

|
To force the appointment into the schedule, click OK.
: [ALT + o]
Note: You may have to tab beyond the Force Password field to activate the OK button.
|
|

|
To cancel the appointment entry without forcing it into the schedule, click Cancel.
Keyboard shortcut: [ALT +c]
|

![]() icon displays in the Appointment Book Area next to the forced appointment.
icon displays in the Appointment Book Area next to the forced appointment.