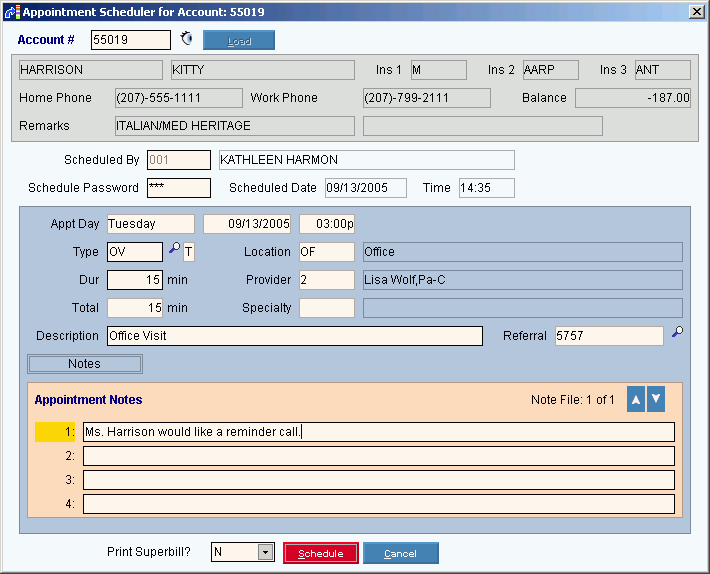
Opening the Appointment Scheduler, click More.
1. Open Scheduling to display the Appointment Book Area.
2. Open the Appointment Scheduler Window.
3. Double-click to select an
appointment time
slot.
Or, click to highlight the desired time slot, and next right-click
to open the Scheduling Shortcut Menu. From
the shortcut menu, click Schedule
New.
Scheduling - Appointment Scheduler Window Example:

New Patient Information Example:

Creating a new Appointment, click More.
Scheduling - Appointment Scheduler Window Prompts Tip: To see more information about a field, click the hyperlink for the field name. |
|
Displays the current Patient Account Number if a patient is loaded in the Patient Reference Panel. Required Entry Options: To change the currently displayed patient: Note: If the Account Number is not already blank, first press [CTRL +x] to clear the loaded patient.
Tip: Account Number might
be blank if you launched Scheduling using the Scheduling
|
|
|
To view all of the existing patients, click Search. From the Search list you can select the record to schedule. Tip: Search is active only if Account Number is blank. |
|
To load a new patient, enter the Account Number and click Load or press [ENTER]. Keyboard shortcut: [ALT + l] Tip: Load is active only if Account Number started out blank. |
For an existing patient, displays the patient's last name. For a new patient, enter the patient's last name. (up to 20 characters) |
|
For an existing patient, displays the patient's first name and middle initial. For a new patient, enter the patient's first name and initial. (up to 18 characters) |
|
For a new patient, enter the patient's Date of Birth. (mmddccyy - slashes and century optional) |
|
For a new patient, click the patient's Sex Code in the drop-down list. (M,F)
|
|
For an existing patient, displays the first three Insurance Codes. For a new patient, enter Insurance Codes 1, 2, and/or 3. (up to 5 characters) Tip:
To search for an Insurance Code, click Search
|
|
For an existing patient, displays the patient's home phone number. For a new patient, enter the home phone number. (up to 10 characters, dashes optional) |
|
For an existing patient, displays the patient's work phone number. For a new patient, enter the work phone number. (up to 10 characters, dashes optional) |
|
For an existing patient, displays the patient's current balance amount. (7.2 numeric) |
|
For an existing patient, displays the associated remarks. (2 lines, up to 20 characters each line) |
|
Enter
the Operator ID of the person entering the appointment.
(up to 4 characters) Tips:
|
|
Enter your operator's password to allow you to schedule an appointment, if applicable. (up to 8 characters) Tips:
|
|
Displays the system date as the date the appointment is entered into INSight. |
|
Displays the system time as the time the appointment is entered into INSight. |
|
Displays the day of the week you highlighted in the schedule for the appointment. |
|
Displays the date you highlighted in the schedule for the appointment. |
|
Displays the time you highlighted in the schedule for the appointment. |
|
Defaults to the Appointment Type ID for the time slot. You can enter a different Appointment Type ID for the appointment. (up to 4 characters) Required. Tips:
|
|
Displays the Scheduling Location Code for the time slot. Tip: Also displays the Scheduling Location Name. |
|
Defaults to the time slot's duration. You can enter another duration - in minutes. (3.0 numeric) |
|
Displays the Scheduling Provider Code for the time slot. Tip: Also displays the Scheduling Provider Name. |
|
Total |
Displays the Total amount of time scheduled for the appointment. |
Displays the Specialty Code for the provider. Tip: Also displays the Specialty Description. |
|
Appointment Type Description |
Default's to the Appointment Description associated with the time slot's Appointment Type ID. You can enter another description. (up to 40 characters) |
Displays the patient's Referral Authorization Number, if previously selected during the Referral Authorization Search window. Tip:
To search for another Referral Authorization Number
to attach to the appointment, click Search
|
|
|
To maintain optional appointment notes, click Notes. Tips:
|
Print Superbill? |
To print a superbill for the appointment, click Y(es) in the drop-down list. To omit printing a superbill for the scheduled appointment, click N(o) in the drop-down list. Tips:
|
|
To commit the appointment to the schedule, click Schedule or press [ENTER]. Keyboard shortcut: [ALT + s] Notes:
|
|
To close the window without scheduling the appointment, click Cancel. Keyboard shortcut: [ALT + c] |
Editing an existing Appointment, click More.
Deleting an existing Appointment, click More.