|
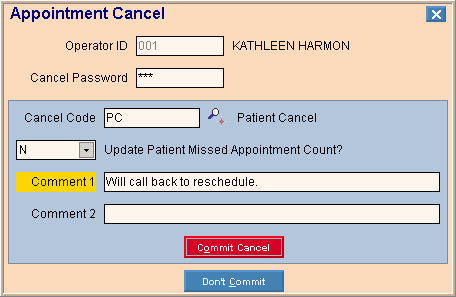
Scheduling - Appointment Cancel Window Prompts
Tip: To see more information about a field, click the hyperlink for the field name.
|
|
|
Enter your Operator ID. (up to 4 characters)
Tips:
-
The displays for your reference.
-
The Operator ID may already be entered for you, depending on your profile settings.
|
|
|
Enter the operator's password to allow the appointment to be canceled, if applicable. (up to 8 characters)
Note: The Cancel Password is only active if it is defined during .
|
|
|
Enter a valid defined Scheduling Cancel Code ID to indicate the reason for cancelling the appointment. (up to 8 characters)
Tips:
|
|
|
Displays the default value assigned to the Update Patient Missed Appointment option during .
Entry Options:
-
To accept, press [TAB].
-
Or, to maintain a record of the canceled appointment, click Y(es) in the drop-down list.
-
To omit a record of the canceled appointment, click N(o) in the drop-down list.
|
|
|
Enter the first line of a comment pertaining to the canceled appointment, if applicable. (up to 55 characters)
|
|
|
Enter the second line of a comment pertaining to the canceled appointment, if applicable. (up to 55 characters)
|
|

|
To commit the canceled appointment to the schedule, click Commit or press [ENTER].
: [ALT + o]
|
|

|
To omit canceling the appointment, click Cancel.
Keyboard shortcut: [ALT + c]
|
![]() on the Scheduling Toolbar.
on the Scheduling Toolbar.