![]() CAUTION
CAUTION
After making changes to a Fiscal Year, you must completely exit from the General Ledger module before the changes will become available to other General Ledger programs.
Fiscal Year Table Maintenance
Use Fiscal Year Table Maintenance to assign each calendar month of the Fiscal Year to a specific Period. If your Fiscal Year coincides with your Calendar Year, then the month coincides with the Period Number. However, if your Fiscal Year begins in a month other than January, then each fiscal period reflects the appropriate month by displaying the Period Description maintained during Period Descriptions Maintenance.
For additional information, click More.
Notes:
There is only 1 Fiscal Year table, which is for the current Fiscal Year. Generally, the Fiscal Year table is set up during the installation process and the year is automatically incremented by 1 during the Year End process when you run the Update Master Accounts routine so you do not need to edit it under normal conditions.
The General Ledger provides fourteen periods for each year - one for each month, a 13th period for facilities that use thirteen four-week periods, and a 14th period for closing.
You can not add a period to a year.
You can not delete a period from a year.
To set a Closing Date or Open Option for a period, use Period Descriptions Maintenance.
For more information about working with data in fields, see the Data Entry Guidelines.
After making changes to a Fiscal Year, you must completely exit from the General Ledger module before the changes will become available to other General Ledger programs.
|
Directions:
To see directions for...
Opening Fiscal Year Table Maintenance , click More.
1. Click File Maintenance from the Menu Bar.
2. Click Fiscal
Year Table Maintenance.
Tip: Or, use the keyboard
shortcut: [ALT] [m]
[f].
Note: You may also be able to access the General Ledger
menu while in another INVISION module. To activate the General Ledger
menu in another module, the G/L
Application Control must be set up for the module during installation.
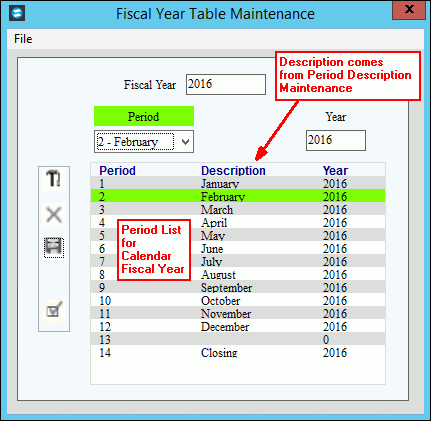
Fiscal Year Table Maintenance - Calendar Year Window Example:

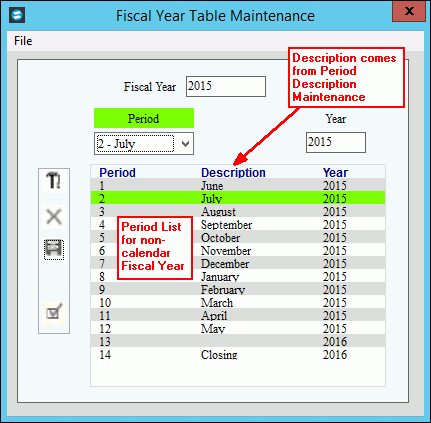
Fiscal Year Table Maintenance - Non-Calendar Year Window Example:

Creating the new Fiscal Year, click More.
Important: Generally, you do not need to create a new Fiscal Year table. The new Fiscal Year table is created during the Year End process when you run the Update Master Accounts routine. The instructions below mostly pertain to setting up the Fiscal Year during the installation.
To create a new Fiscal Year:
1. Enter the new Fiscal Year.
2. Click Save
![]() , or press [ENTER].
, or press [ENTER].
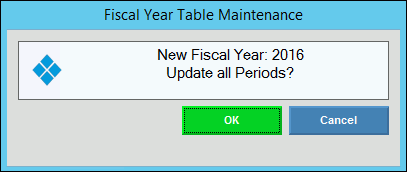
3. You will see the following
prompt where you can specify if you want to update the year for
each Period in the new Fiscal Year:

4. To increment the Year
by 1 for each Period in the new Fiscal Year, click Yes.
Tip: This automatically sets up the new Fiscal Year,
so that no maintenance is required.
To copy the Year for each Period from the previous Fiscal Year,
click No or Cancel.
Tip: Do not worry if you click the wrong button. You
can manually maintain the Year for each Period after the table
record is created.
Tip: Fiscal Year Table Maintenance creates a set of Periods for the new Fiscal Year and displays the appropriate month for the periods.
Editing the existing Fiscal Year, click More.
![]() CAUTION: To
avoid losing data, you must save changed records.
CAUTION: To
avoid losing data, you must save changed records.
1. To display the record to be changed, enter the Fiscal Year, or press [ENTER].
2. To position the pointer to the information that you want to change, press [TAB] or click the field using the mouse.
3. Enter the data changes
and click Save ![]() ,
or press [ENTER].
,
or press [ENTER].
4. To complete the edit
process and close the window, click Completed
![]() .
.
Fiscal Year Table Maintenance Window Prompts Tip: To see more information about a field, click the hyperlink for the field name. |
|
Enter the Fiscal Year that you want to maintain. (CCYY - century required) Required Tip: If the Fiscal Year is not the same as the calendar year, most facilities use the last Period's year as the Fiscal Year. For example, if the Fiscal Year encompasses June 2016 through May 2017, then the Fiscal Year is 2017. |
|
The displayed period includes the Period Number and the Period Description. To select the Period that you want to maintain:
Tip: You can not add or delete a Period. |
|
Displays the Period Description maintained during Period Description Maintenance. Usually this contains the name of the month. Examples:
|
|
Enter the Calendar Year for the Month Number. Examples:
|
|
Period List |
The Period List displays the following fields in each row:
|
|
To clear the window and reload the current year, click New. |
|
To delete the Fiscal Year record, click Delete. |
The Fiscal Year Table record must exist for the current year. If you delete the Fiscal Year record, you must recreate it. |
|
|
To save the changed values for the highlighted Period, click Save or press [ENTER]. |
|
To close the Fiscal Year Table Maintenance window:
|
Deleting the existing Fiscal Year, click More.
![]() WARNING: The
Fiscal Year Table record must exist for the current year. If
you delete the Fiscal Year record, you must
recreate it.
WARNING: The
Fiscal Year Table record must exist for the current year. If
you delete the Fiscal Year record, you must
recreate it.
1. To display the year
to be deleted, enter the Fiscal
Year and click Save
![]() , or press [ENTER].
, or press [ENTER].
2. Click Delete
![]() .
.
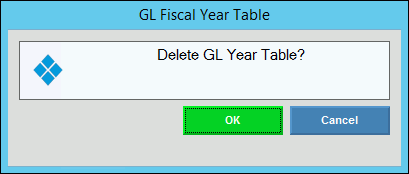
3. You will see the following
warning informing you that you are about to delete a G/L Year
Table record.

4. Click OK
to acknowledge that you want to delete the Fiscal Year record.
Tip: After you click OK,
you will see the following message on the Status
Bar.
![]()
Or, click Cancel to return
to the window without deleting the record.