Management Reports Viewer Instructions
Use the Management Reports to print or view financial reports such as income statements, balance sheets and other financial reports. The reports are specifically tailored to your facility during the installation of the General Ledger. Any report generated during the Management Reports Viewer can be saved as a Microsoft® Excel, Microsoft Word or text file for further manipulation. You can build additional reports at any time using the Management Reports Designer.
Tips:
These reports are also known as the G/L Management Reports, Financial Statements, Income Statements, and Balance Sheets.
For information about designing management reports, see Management Reports Designer or contact NDS Technical Support.
For more information about running reports, see Print View.
For more information about the buttons on the toolbar, see the Reporting Toolbar.
To see an example of the report, click Management Reports Samples.
Directions:
To open click Reporting from
the menu and then click Management Reports Viewer.
Note: You may also be able to access the General Ledger menu
while in another INVISION application. To activate the General
Ledger menu in another module, the G/L
Application Control must be set up for the module during installation.
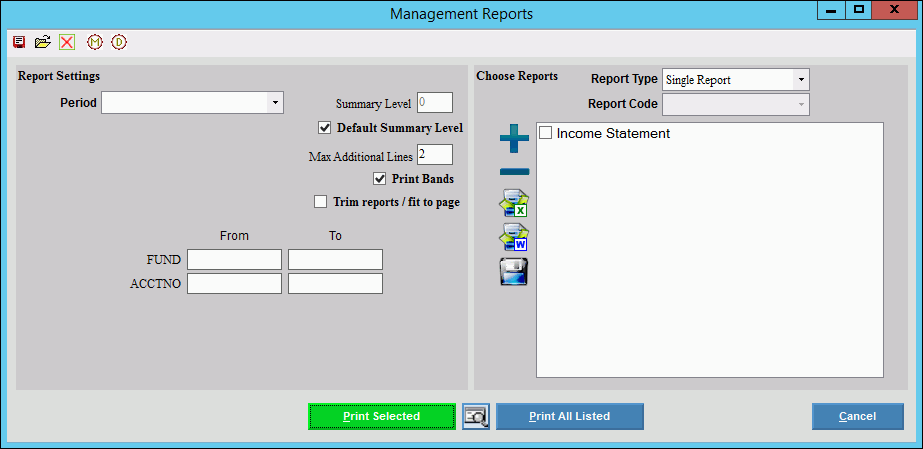
Management Reports Window Example:

Management Reports Prompt Options
|
|
Report Settings |
|
To specify the period for the report, click the period in the drop-down list. (predefined) |
|
|
Default Summary Level |
Enter the summary level for the detail lines in the report, or to print the level that was designed for the report, click to check the Default Summary Level box. (2.0 numeric) Tip: You can construct financial statements so that totals and subtotals have a higher summary level than the regular detail lines. This allows you to print a summary version of a report, which excludes the detail lines from printing but provides the totals of those detail lines. Example: Assume that the detail lines for a report are defined as summary level 1, the subtotals are summary level 2, and the totals are summary level 3.
|
Max Additional Lines |
To include additional blank lines
between subtotals and totals, enter the maximum number of lines
to include. |
Print Bands |
To print a colored band on every other line as well as on the heading of the report (similar to green bar printer paper), click to select the check box. Or, to omit color bands on the pages, leave this box unchecked. |
Trim reports / fit to page |
Trim reports will print the reports in 1 of 3 fixed widths that are 78, 132, or 224 characters regardless of how many characters are actually used, which may result in blank space on the right side of the page. Fit to Page finds the maximum column width of the report and uses that as the full width, fitting it to the page. To trim reports, click to select the box. Or, to fit the report to the width of the page, leave this box unchecked. |
Element Ranges |
To limit the report to a range of account number elements, enter the from and to values (inclusive). (format varies) Tip: The list of elements varies among facilities. |
Choose Reports |
|
To specify the report type, click one of the following options in the drop-down list:
|
|
The report code groups reports together that you frequently print at the same time. To specify that you want to print a group of reports for a report code, select Use Report Code as the report type and then enter the defined report code here. (up to 6 characters) |
|
Report List |
If you specified that you want to print a Single Report in the report type field, click to highlight the desired report in the report list. Or, to add or remove reports from the report list, click to select or de-select the desired check boxes. To add all reports to the report list,
click Add To remove all reports from the report
list, click Remove Tips:
|
|
Choose a printing option:
|
|
To create an Microsoft Excel spreadsheet from the report. This can be handy if you want to further manipulate the report data. 1. From the menu, click
Save Excel 2. Follow the normal Windows® save procedure:
|
|
To create a Microsoft Word document from the report. This can be handy if you want to change the heading or print a financial report on letterhead. 1. From the menu, click
Save Word 2. Follow the normal Windows® save procedure:
Tip: If you have selected multiple reports and you select to Save as Word file, you will have the option to include a page break between reports. |
|
You can freeze the data on a report by saving it to a file. This function is useful when archiving important data or when exporting the data to another program. 1. Click Save As Text. 2. Follow the normal Windows™ save procedure:
|