Trial Balance Report Instructions
Use the Trial Balance Report to review the account balances for a selected period, including current year-to-date balances, historical balances, and beginning balances. The balances reflect only posted credit and debit transactions. You can tailor the report using a variety of criteria including headings, sort options, subtotal options, and selection by account number range, account element range, and fund range.
Tips:
A copy of the report is saved to report history for a complete audit trail.
This report is available in a Working Format, which is set at the report prompt.
For more information about running reports, see Print View.
For more information about the buttons on the toolbar, see the Reporting Toolbar.
To see an example of the report, click Trial Balance Report Sample.
Directions:
To open click Reporting
from the Menu and then click
Trial Balance Report.
Tip: Or, use the keyboard
shortcut: [ALT] [r] [t].
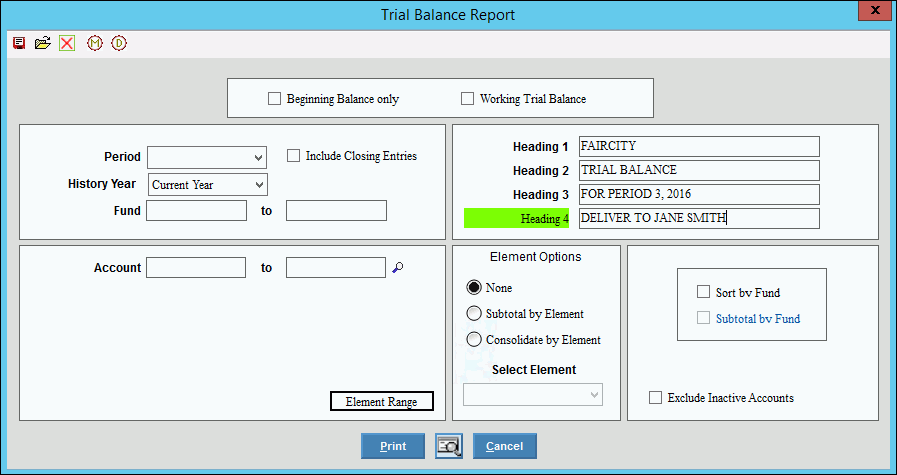
Trial Balance Report - Header Information Window Example:

Trial Balance Report Prompt Options
|
|
Beginning Balance Only |
To print only beginning balances
for each GL Account, click to select
the box. To print the period balances and current or historical Year-to-Date Balances, de-select the box. |
Working Trial Balance |
To print the working version of the trial balance, click to select the box. The working version prints lines for you to manually write in adjustments on the hard copy of the report. To print the regular version without the lines, de-select the box. |
Fiscal Year |
To specify the year for which to report the period, click a choice in the drop-down list. |
To specify the period to be included in the report, click one of the options in the drop-down list. (predefined) Note: This option is not available if you print only beginning balances. However, the period is required if you do not print beginning balances. |
|
To limit the report to a range of GL Account Funds, select the funds from the list of funds. (4.0 numeric) Tip: To include all funds select All Funds. |
|
Enter the first line of optional text that you want to appear at the top of the report. You can enter up to 4 lines for the heading, as desired. Unused heading lines please leave blank. Tip: The report automatically centers the text for you. |
|
Account or Element Range |
|
Account Element |
To limit the report to a range of GL Accounts, select the Account option. Or limit the report to a range of Account Elements, click Element. You will see the Element Range Prompt, as shown here. You can select accounts to print on the report by entering ranges of Elements. Note: The list of elements varies according to the settings for each facility. Single Period Activity Report - Element Range Example:
|
Account Range |
To limit the report to a range of Account Numbers, enter the from and to Account Numbers (inclusive). (format varies) Tip: To select all accounts, leave blank. |
Element Ranges |
To select accounts by Element to be included in the report, enter the from and to values for each applicable Element. (format varies) |
Subtotal by |
To include subtotals by Fund, click to select the Subtotal by Element box. To omit the subtotals from the report, check the box Do not Subtotal. Tip: The Subtotal option is available only if you sort by Fund. |
Select Element |
If you specified to sort or consolidate by Element (above), click one of the Element Names in the drop-down list. (predefined) |
Sort by Fund |
To sort by Fund, click to select the box. To sort by Account Number, select the box. |
Exclude Inactive Accounts |
To omit from the report accounts with an Inactive Account Status, click to check the box. To include accounts with an Inactive Account Status on the report, leave the box unchecked. |
Export Only |
To export the report information, check the Export Only box. To omit exporting the report information, leave the Export Only box unchecked. |
Account # Export Format |
If you are exporting the report information, select if the GL Account numbers should be exported as a formatted number or unformatted number. |
|
To begin generating the report, press
[ENTER] or click Print. To
print to the Print
View screen, click Print View To escape from the print routine, click
Cancel |