Rate Modeling Usage Analysis Report Instructions
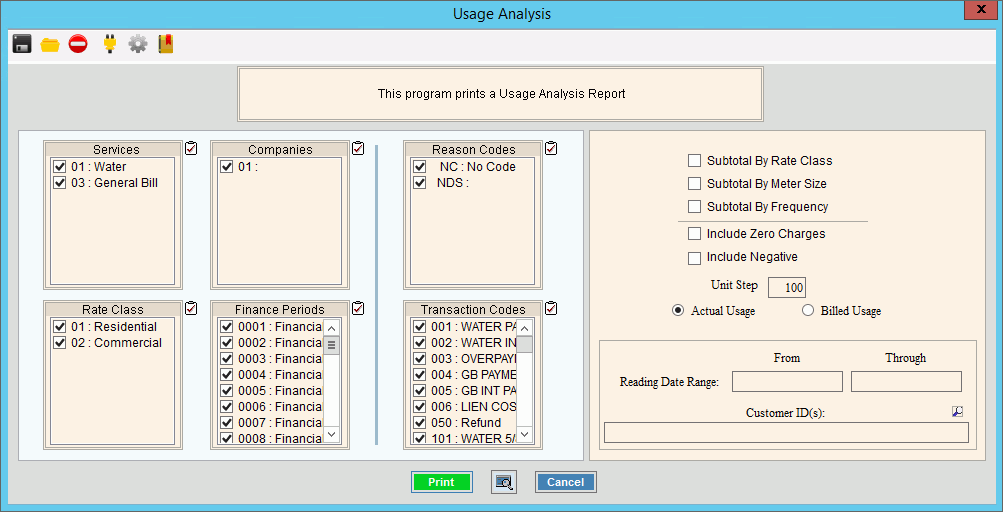
Use the Rate Modeling Usage Analysis Report to analyze customer usage history and report the effects of proposed rate changes. The Usage Analysis Report uses the entered Unit Step to break the customer bills into groups. This allows you to evaluate how rate changes would be best served. For example, if 90% of your customer bills fall into the 100 unit sector (100 to 199) then rate increases at that level would have the most effect. The report has various options for sub totaling. In addition, you can specify to report specific services, companies, reason codes, rate classes, finance periods, transaction codes, a range of transaction reading dates and customers, if applicable.
Tips:
For more information about running reports, see Print View.
For more information about the buttons on the toolbar, see the Reporting Toolbar.
To see an example of the report, click Rate Modeling Usage Analysis Report Sample.
To open click Analysis from
the menu. Then click
Rate Modeling and lick Usage
Analysis.
Tip: Or, use the keyboard
shortcut: [ALT] [s] [m] [a].
Rate Modeling Usage Analysis Report Window Example:

Rate Modeling Usage Analysis Report Prompts
|
|
To select the Services to print, click to check the appropriate Services listed. Tip:
To quickly select or de-select
all Services listed,
click Check All |
|
To select the Companies to print, click to check the appropriate Companies listed. Tip:
To quickly select or de-select
all Companies listed,
click Check All |
|
To select the Reason Codes to print, click to check the appropriate Reason Codes listed. Tip:
To quickly select or de-select
all Reason Codes listed,
click Check All |
|
To select the Rate Classes to print, click to check the appropriate Rate Classes listed. Tip:
To quickly select or de-select
all Rate Classes listed,
click Check All |
|
To select the Finance Periods to print, click to check the appropriate Finance Periods listed. Tip:
To quickly select or de-select
all Finance Periods listed,
click Check All |
|
To select the Transaction Codes to print, click to check the appropriate Transaction Codes listed. Tip:
To quickly select or de-select
all Transaction Codes
listed, click Check All
|
|
SubTotals |
|
Subtotal By Rate Class |
To report subtotals by Rate Class, click to select the box. To omit subtotals by Rate Class from the report, de-select the box. |
Subtotal By Meter Size |
To report subtotals by Meter Size, click to select the box. To omit subtotals by Meter Size from the report, de-select the box. |
Subtotal By Frequency |
To report subtotals by Customer Billing Frequency, click to select the box. To omit subtotals by Customer Billing Frequency from the report, de-select the box. |
Unit Step |
To group customers by Unit Step,enter the Unit Step value. (4.0 numeric) |
Reading Date Range |
To limit the report to a range of customer transaction Reading Dates, enter the appropriate beginning Reading Date in the range. Note: A Reading Date range is required for the report. |
Through |
To limit the report to a range of customer transaction Reading Dates, enter the appropriate ending Reading Date in the range. Note: You must maintain a Reading Date range. |
Entry Options:
|
|
|
To begin printing to the Windows® default printer, click Print, or press [ENTER]. Keyboard shortcut: [ALT + p] Or, to print to the Print
View window, click Print
View Or, to escape from the print routine,
click Cancel Keyboard shortcut: [ALT + c] |