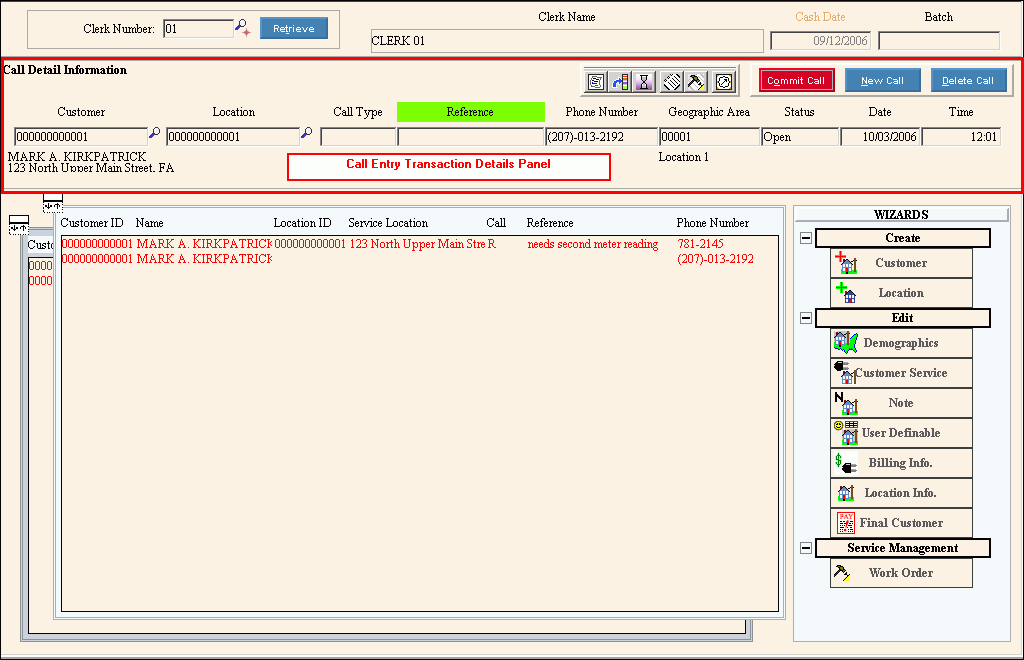
Call Center - Call Entry Transaction Details Panel
Use the Call Entry Transaction Details Panel to enter the details for the customer call. The table following the window example describes the Call Entry Transaction Details for Call Center - Call Entry.
Tips:
For information about the Call Center Toolbar, see the Call Center - Call Entry Toolbar topic.
For more information about working with data in fields, see the Data Entry Guidelines.
To display the Call Center Call Entry - Transaction Details Panel, click Call Center ![]() on the Toolbar.
on the Toolbar.
Call Center - Call Entry Transaction Details Panel Example:

|
Call Center - Call Entry Transaction Details Panel Prompts Tip: To see more information about a field, click the hyperlink for the field name. |
|
|
Enter the identifier for the customer who called. Or, press [TAB] to enter the Location ID. (up to 12 characters) Tip: To search for a Customer ID, click Search |
|
|
|
Displays the First Name, Middle Initial and Last/Business Name of the customer. |
|
|
Displays the House Number, Street Name and abbreviated Town Name for the customer's location. |
|
To accept the default Location ID for the customer, press [TAB]. Otherwise, enter the Location ID for the customer call. Tip: To search for a Location ID, click |
|
|
Enter a defined Call Type ID for the customer call. (up to 3 characters) Tips:
|
|
|
Enter a Reference to associate with the customer call. (up to 40 characters) |
|
|
To accept the customer's Phone Number as the contact number, press [TAB]. Or, you can enter another Phone Number to contact the customer. (xxx-xxx-xxxx) |
|
|
Enter a defined Geographic Area ID to represent the area where the customer is located. (up to 5 characters) Tips:
|
|
|
To assign a Status to the customer call, click a choice in the drop-down list. Entry Options:
|
|
|
To accept the system date as the date of the customer call, press [TAB]. Otherwise, enter the date of the customer call. (mm/dd/ccyy, slashes and century optional.) |
|
|
To accept the system time as the time of the customer call, press [TAB]. Otherwise, enter the time of the customer call. (hh:mm, 24 hour military time, colon optional) |
|
|
|
To complete the call transaction detail line, click Commit Call or press [ENTER]. Keyboard shortcut: [ALT + o] Tip: The completed call information displays in the Call List Panel. The cursor returns to the Customer field. You are ready to add another call. |
|
|
To begin a new customer call transaction, click New Call. Keyboard shortcut: [ALT + o] |
|
|
To remove a customer call transaction from the Call List, click to highlight the desired customer call line and next click Delete Call. Keyboard shortcut: [ALT + d] |