Customer Lien Report Instructions
Use the Customer Lien Report to review outstanding customer liens for each service, as well as, the associated lien details. You can specify the services, companies, finance periods and a specific time period to include on the report.
Tips:
This report is also known as the Lien Report.
For more information about running reports, see Print View.
For more information about the buttons on the toolbar, see the Reporting Toolbar.
To see an example of the report, click Customer Lien Report Sample.
To open click Reports from the Menu; then Customer and Customer Lien Report.
Or, use the keyboard shortcut: [ALT] [e] [c] [o].
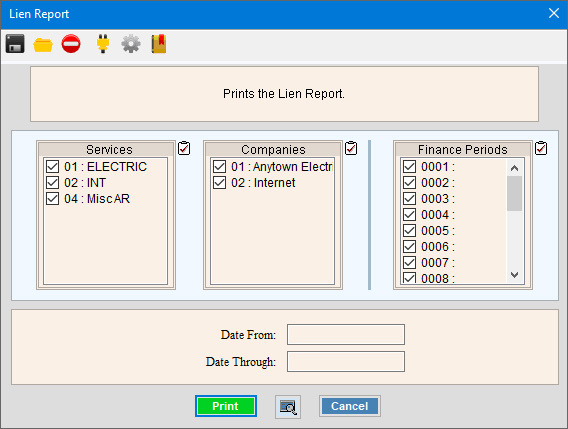
Customer Lien Report Window Example:

Customer Lien Report Prompt Options
|
|
To select the Services to print, click to check the appropriate Services listed. Tip:
To quickly select or de-select
all Services listed,
click the |
|
To select the Companies to print, click to check the appropriate Companies listed. Tip:
To quickly select or de-select all
Companies listed, click the |
|
To select the Finance Periods to print, click to check the appropriate Finance Periods listed. Tip:
To quickly select or de-select all
Finance Periods listed, click the |
|
Date From Through |
To limit the report to a range of lien dates, enter the appropriate beginning Lien Date in the From range and enter the desired ending Lien Date in the Through range. Tip: To include all dates, leave From and Through blank. |
|
To begin printing, click Print, or press [ENTER]. Keyboard shortcut: [ALT + p] To print
to the Print View window,
click Print View Or to escape from the print routine,
click Cancel Keyboard shortcut: [ALT + c] |
Server Process Status |
|
Status |
Displays information pertaining to the various phases of the reporting process to guide you. Note: The status displays Complete when the process is ended. In addition, the Message window displays Time Started and Time Ended to alert you when the routine is complete. To close the window when the report
is complete, click Close
|