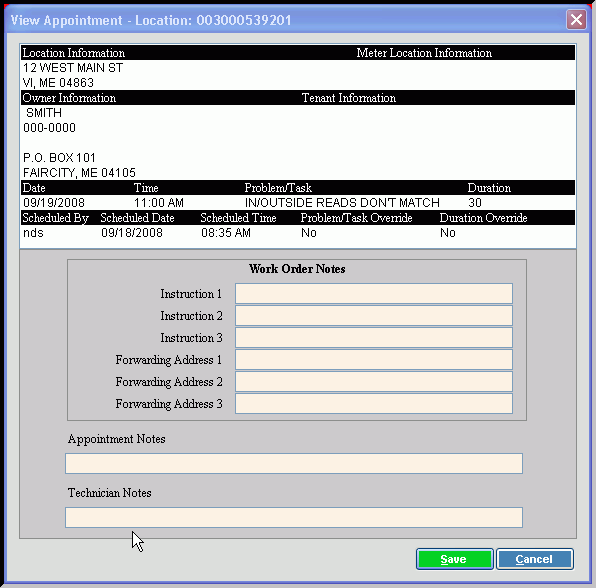
Scheduling - View Appointment Detail Window
This topic last opened by author on October 3, 2008 at 3:39 PM.
Use the View Appointment Detail Window to see details for a specific appointment. Details include the problem or task, date, time slot, and duration. The table following the window example describes the View Appointment Detail window for Scheduling.
Tip: For more information about working with data in fields, see the Data Entry Guidelines.
To display the View Appointment Detail Window:
1. Open Scheduling:
a. Click Service Management from the Menu Bar.
b. Click Daily Work.
c. Click Schedule.
2. Enter the Schedule Start Date in the Scheduling Parameters Panel.
3. Click View.
4. Double-click the desired appointment displayed in the Appointment Book.
Scheduling - View Appointment Detail Window Example:

|
Scheduling - View Appointment Detail Window Prompts Tip: To see more information about a field, click the hyperlink for the field name. |
|
|
Displays the Location ID that identifies the location for the appointment. |
|
|
Location Information |
Displays the following location information for your reference:
|
|
Meter Location Information |
Displays the location information for the meter, if applicable. |
|
Owner Information |
Displays the following owner customer information for your reference:
|
|
Tenant Information |
Displays the following tenant customer information for your reference:
Tip: The tenant information only applies if there is a tenant assigned to the location. |
|
Appointment Information Area |
|
|
Displays the date of the scheduled appointment. |
|
|
Displays the time of the scheduled appointment. |
|
|
Displays the description of the Problem/Task Code for your reference. |
|
|
Displays the Problem/Task duration as the estimated length of time scheduled for the appointment. |
|
|
Displays the initials of the user who scheduled the appointment. |
|
|
Displays the time of day that the appointment was entered into the schedule. |
|
|
Displays the Problem-Task Override.
|
|
|
Displays the Duration Override. Tips:
|
|
|
To accept the displayed work order notes, press [TAB]. Or, maintain optional work order notes pertaining to the appointment. (up to 6 lines of text) Tip: Because the Work Order Notes field labels can be tailored to suit your needs, the field labels in your software may not match the documentation. You can maintain the field labels during Work Order Notes Labels Maintenance. |
|
|
To accept the appointment notes displayed, press [TAB]. Or, maintain optional notes pertaining to the appointment. (up to 255 characters) |
|
|
To accept the technician notes displayed, press [TAB]. Or, maintain technician notes pertaining to the appointment. (up to 255 characters) |
|
|
|
To save the changes to the scheduled appointment, click Save or press [ENTER]. |
|
|
To close the window without saving the changes to the appointment, click Cancel. |