Opening Operator Signon Security Settings Maintenance, click More.
1. Press [ALT + s] to launch the Application Supervisor Menu.
2. Click Security.
3. Click
Operator Signon Security Settings.
Tip: Or,
use the keyboard shortcut:
[ALT
+ s] [s] [ALT] [s] [s] [ENTER].
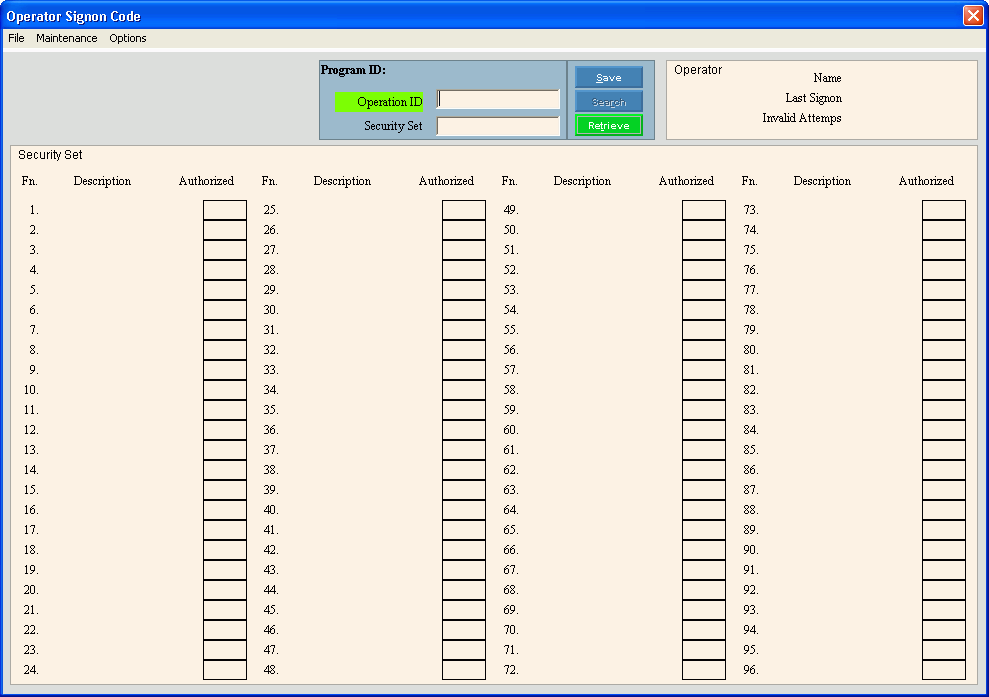
Operator Signon Security Settings Maintenance Window Example:
Creating a New Operator Signon Security Settings, click More.
To create a new record choose one of these methods:
-
Enter the defined Operator ID and the defined Security Set, then click Retrieve
 ,
or press [ENTER].
,
or press [ENTER].
Keyboard shortcut: [ALT + t] -
Or, enter the defined Operator ID and the defined Security Set, then click File from the Menu Bar; next click New.
Keyboard shortcut: [ALT] [f] [n]
Tip: To
indicate that you are building a new Operator Signon Security Setting,
New  displays
near the Operator ID. Default
entries display and the first field is highlighted
to let you know you can begin entering information.
displays
near the Operator ID. Default
entries display and the first field is highlighted
to let you know you can begin entering information.
|
Operator Signon Security Settings Maintenance Prompts Tip: To see more information about a field, click the hyperlink for the field name. | |
|
Enter the defined Operator ID for the Security Setting. (3.0 numeric) REQUIRED | |
|
Enter the defined Security Set ID for the operator. (up to 5 characters) REQUIRED | |
|
|
To update the new or changed information, click Save or press [ENTER]. Keyboard shortcut: [ALT + s] |
|
To avoid losing data, you must save new or changed records. | |
|
|
Note: Search is not available during this routine. |
|
|
To display an existing Operator Security Set, enter the Operator ID and the Security Set, then click Retrieve, or press [ENTER]. Keyboard shortcut: [ALT + t] |
|
Tip: For each function within the security set, you must specify the authorization the operator is allowed. | |
|
Displays the number place of the function for the security set. | |
|
Displays the Program Record ID assigned to the function for the security set. | |
|
To allow the operator to access the function,
click Yes in the drop-down list. | |
Editing an Existing Operator Signon Security Settings, click More.
![]() CAUTION: To
avoid losing data, you must save new or changed records.
CAUTION: To
avoid losing data, you must save new or changed records.
1. To
display the record to be changed, enter the defined
Operator ID and the defined Security
Set, then click Retrieve , or press [ENTER].
Keyboard shortcut: [ALT
+ t]
Tip: If
you do not know the Operator ID and the Security Setting, you can click
Search  to see a list of Operator Signon Security Settings.
2. To position the pointer to the information that you want to change, press [TAB] or click the field using the mouse.
3. Enter the data changes.
4. To
complete the edit process, click Save  , or press [ENTER].
Keyboard shortcut: [ALT
+ s]
Deleting an Existing Operator Signon Security Settings, click More.
1. To
display the record to be deleted, enter the defined
Operator ID and the defined Security
Set, then click Retrieve , or press [ENTER].
Keyboard shortcut: [ALT
+ t]
Tip: If
you do not know the Operator ID and the Security Setting, you can click
Search to see a list of Operator Signon Security Settings.
2. Click
File from the Menu
Bar, and next click Delete.
Keyboard shortcut: [ALT]
[f] [d]
3. At the Delete Records prompt, click Proceed to delete the record, or click Cancel to escape from the delete routine.
Example:
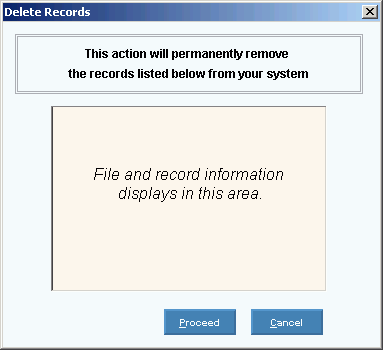
Note: After
you click Proceed, you will see
the following message on the Status Bar.