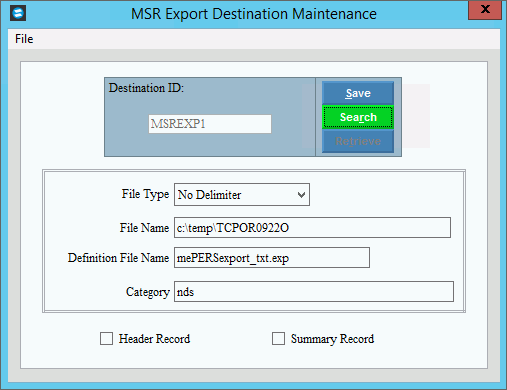
MSR Export Destination Maintenance
Use Export Destination Maintenance to maintain information for creating the MainePERS transmission file name and location.
Notes:
NDS Support generally will set up the export destination.
For information on the timing and sequence of MSR Magnetic Filing tasks, see MSR Magnetic Filing Process.
Directions:
To open:
1. Click Reporting from the Menu.
2. Click Government.
3. Click MSR Magnetic Filing.
4. Click Export
Destination Maintenance.
Tip: Or, use the keyboard
shortcut: [ALT] [e] [g] [m]
[m].
Export Destination Maintenance Window Example:

MSR Export Destination Maintenance Prompts
|
|
Destination ID |
Enter the
unique destination ID for this file name and location and click
Retrieve Keyboard shortcut: [ALT + t]. (up to 20 characters) Or, to view all of the destination
IDs, click Search
Keyboard shortcut: [ALT + r] Tip: NDS recommends using MSREXPORT as the ID, although any ID is acceptable. |
|
To update the new or changed information, click Save or press [ENTER]. Keyboard shortcut: [ALT + s] |
To avoid losing data, you must save new or changed records. |
|
File Type |
Always click No Delimiter in the drop-down list. (predefined) |
File Name |
Enter the path and name of the transmission file. (up to 80 characters) Note: The path and file name use the following format: Example: c:\temp\TCPOR0922O
|
Category |
Enter the Category ID that is used to group transactions together for processing purposes, if applicable. |
Header Record |
Leave this option unchecked. The program automatically creates the proper header, regardless of this setting. |
Tail Record |
Leave this option unchecked. The program automatically creates the proper tail, regardless of this setting.
|
Editing a Destination ID |
1. Enter the Destination
ID and click Retrieve
2. Position the pointer to the information that you want to change. 3. Enter the data changes. 4. To complete the edit
process, click Save
|
Deleting a Destination ID |
1. Enter the Destination
ID and click Retrieve
2. Click File
from the Menu, and
next click Delete. 3. At the Delete prompt, click Proceed to delete the record, or click Cancel to escape from the delete routine.
Example:
Note: After you click Proceed, you will see the following message on the Status Bar.
|