MSR Export MSR File Instructions
Use the Export MSR File routine to create the transmission file at the specified location. After the file is exported, you can follow the instructions from the MainePERS agency to transmit the file to the MainePERS.
Tip: For information on the timing and sequence of MSR Magnetic Filing tasks, see MSR Magnetic Filing Process.
Directions:
To open:
1. Click Reporting from the Menu.
2. Click Government.
3. Click MSR Magnetic Filing.
4. Click Export.
Tip: Or, use the keyboard
shortcut: [ALT] [e] [g] [m]
[x].
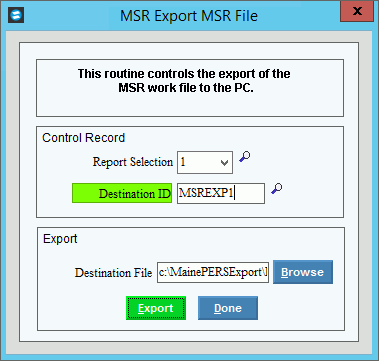
Export MSR File Window Example:

Export MSR File Prompts
|
|
Report Selection |
To specify the Build Monthly Work File to supply the data for the export, click the appropriate report selection in the drop-down list. (1-9) |
Destination ID |
Enter the destination ID that was defined during Export Destination Maintenance. (up to 20 characters) |
Destination File |
Displays the transmission file path and file name that you defined during Export Destination Maintenance. Change the file name using the file name format listed below to include the appropriate reporting month and year. (up to 80 characters) Or, to search for a file path for the
location to store the transmission file (or file), click Browse
Note: The path and file name use the following format: Example: c:\temp\TCPOR0922O
|
|
To run the routine and generate the report, click Export, or press [ENTER]. Keyboard shortcut: [ALT + e] |
Completion |
While the work file is processing, the following messages display.
When Process Complete displays
the export is complete. Click Close
|
|
When
the process is complete, click |