Import Options
Use the Import Options to maintain certain information and controls used by the Payroll Import Hours routine. This information is used to determine how employee hours information is imported to Payroll and how employee paycheck information is generated. Information maintained includes the file type, the file name, and the definition file name.
Notes:
NDS Support will assist you with setting up the Import Options. Once this information is set it should not need to be changed unless you change your process.
For more information about the Payroll Import Hours process, see Payroll Import.
Directions:
To display the Import Options screen:
1. Click Payroll from the Menu.
2. Click Miscellaneous File Maintenance.
3. Click Import Hours.
4. Click Import
Options.
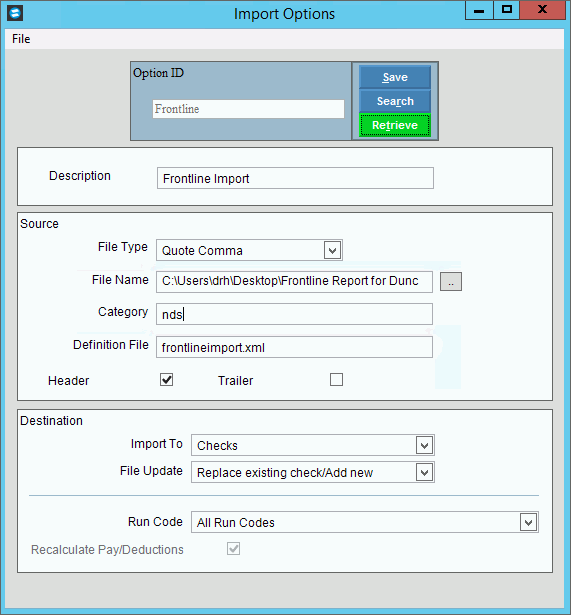
Import Options Window Example:

Import Options Prompts
|
|
Option ID |
To
create a new or to view an existing source ID, enter the unique
ID and click Retrieve Required Notes:
|
|
To update the new or changed information, click Save or press [ENTER]. Keyboard shortcut: [ALT + s] |
To avoid losing data, you must save new or changed records. |
|
Description |
Enter the name or description that will identify the payroll import options. |
Source The information in this section controls where the import data is coming from. |
|
File Type |
To select a file type, click a choice in the drop-down list. File Types:
|
File Name |
Enter the path and the Payroll Import file name. (up to 80 characters) Or,
to search for a file name and path on your system, click Browse Screen Example: c:\Users\drh\Desktop\Frontline Report |
Category |
NDS will set the category ID, which categorizes the payroll import file. |
Definition File |
NDS will set the definition file name for the payroll import file. The definition file name determines the format of the import file. |
Header Trailer |
If the import file contains header information that should not be included with the data to be imported, check the Header box. If the import file contains trailer information that should not be included with the data to be imported, check the Trailer box. |
Destination The information in this section determines how the data updates Payroll and where in Payroll the data is imported to. |
|
Import To |
To specify the destination of the imported information, select a destination. Choices are:
|
File Update |
To indicate how the incoming payroll hour import information should be handled when updating Payroll, select a choice:
|
Run Code |
Choose the run codes for the import. Or, select all run codes. |
Recalculate Pay/Deductions |
Generally this option should always be checked so that employee pay, taxes and deductions are always calculated when paychecks are generated. |