Magnetic Filing
Use the W-2 Magnetic Filing routine to create the employee W-2 file for electronic submission to the Social Security Administration. While all employers are eligible to submit W-2s electronically, employers with more than 100 employees must submit their W-2s electronically.
![]() Important:
Important:
Only run this routine if you are submitting the W-2 file electronically to the government.
For reconciliation purposes, it is important that you print the W-2 Mag File Report that is part of this routine. The totals on the W-2 Magnetic File Report should match the W-2 totals accumulated during the Print W-2 Forms routine.
If the Magnetic file is returned by the government because of errors, you must make the necessary corrections during Edit Forms, run the Magnetic Filing routine again and re-send the file. If you re-submit the file, you must check Resubmit and maintain the Wage File Identifier provided by the Social Security Administration. For more information, please contact NDS Support at 800-649-7754.
The Magnetic file does not include employees with no earnings or withholdings to report.
Employers are required by law to maintain at least the previous four years W-2 Magnetic files. After sending your Magnetic file, it is important that you rename your file to include the year. Make sure to save copies of each applicable year on some type of removable media such as, a tape, disk or save copies at a location that is backed up regularly.
Magnetic Filing is the fifth step in the W-2 Forms process. For more information, see the W-2 Forms Process.
Directions:
To open:
1. Click Utilities from the menu.
2. Click Year End.
3. Click W-2 Forms.
4. Click
Magnetic Filing.
Tip: Or, use the keyboard
shortcut: [ALT] [t] [y] [w]
[m].
Magnetic Filing Window Example:

Magnetic Filing Routine Options
|
|
Enter the defined destination ID that was created during W-2 Export Destination. The destination ID specified the characteristics of the file and the location of the W-2 Export file. Note:
To search for a destination ID, click Search
|
|
The Destination file associated with the destination ID displays. (up to 80 characters) Note: To look for another destination file,
click Browse |
|
|
To run the routine, click Export, or press [ENTER]. Keyboard shortcut: [ALT + e] |
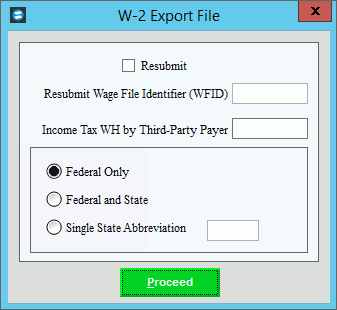
After you click, Export the following window displays:

Magnetic Filing Routine Options
|
|
Resubmit |
Leave this box unchecked if this is the first time the W-2 Magnetic file is being submitted for the year If you are re-submitting the file, check Resubmit and then enter the wage file identifier provided by the Social Security Administration. Note: Generally, if the W-2 Magnetic file was returned because of errors, you must make the necessary corrections using Edit Forms. Then, you can run the Magnetic File routine again and re-send the file. |
Resub Wage File Identifier (WFID) |
If you are re-submitting the Magnetic file and you checked Resubmit,enter the wage file identifier that you received from the SSA when the previous W-2 Magnetic file was returned unprocessed by the SSA. Note: This field is only active, if you selected Resubmit above. |
Income Tax WH by Third Party Payer |
If income tax was withheld for a third party payer, enter the amount. Otherwise, leave blank.(7.2 numeric) Tip: This amount is submitted with the totals. |
Fed |
To specify the information to include in the file, click a choice:
Notes:
|
Single State Abbr |
If you selected Single State Abbreviation, enter the 2-character postal service state abbreviation for the state information to include in the Magnetic file. (2 characters) Note: This field is only active, if Single State Abbreviation is selected. |
|
To run the routine, click Proceed or press [ENTER]. Keyboard shortcut: [ALT + p] |
W-2 Export File Processing Window Displays information pertaining to the Magnetic Filing process to guide you.
|
|
W-2 Mag File Report |
You can print, view to screen or save the W-2 Magnetic file report. To print the report, click Print
To view the report to the screen, click
View Report Or, to save a copy of the report and
messages associated with the report, click Save
as Text File Note: NDS recommends that you print the report and compare the totals with the W-2 totals. If the totals do not match, please contact NDS Support at 1-800-649-7754 for assistance. |
|
To close the routine when the routine is finished, click Done. Keyboard shortcut: [ALT + d] |