Opening the Clinical Recall Analysis Report Instructions, click More.
1. Click Reports from the Menu Bar.
2. Click Operating Reports.
3. Click Clinical Recall Analysis Report.
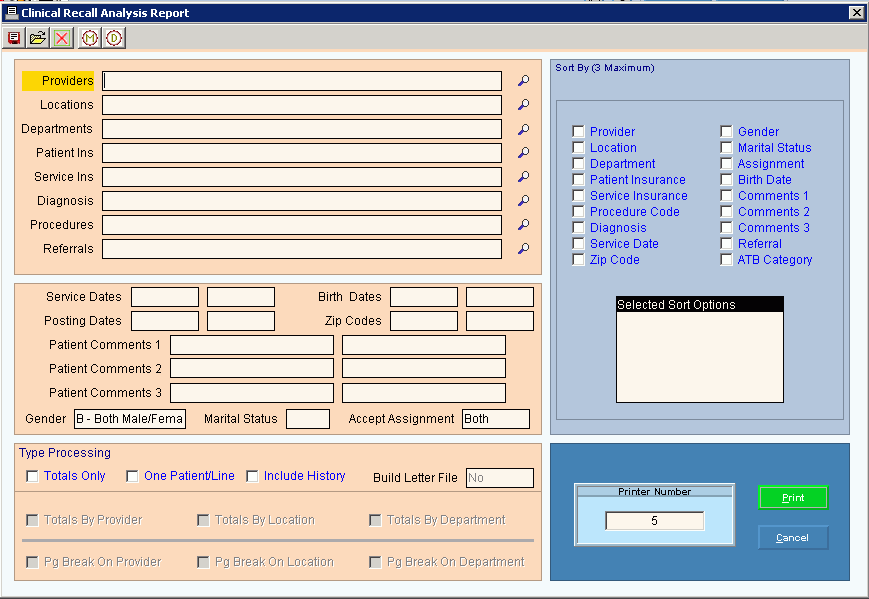
Clinical Recall Analysis Report Window Example:

Choosing the Selections at the Prompt Window, click More.
Clinical Recall Analysis Report Prompts Tip: To see more information about a field, click the hyperlink for the field name. |
|
Enter the Provider Codes to report. (up to 4 characters) Tips:
|
|
Enter the Location Codes to report. (up to 2 characters) Tips:
|
|
Enter the Department Codes to report. (up to 2 characters) Tips:
|
|
Patient Ins |
Enter the patient Insurances to report. (up to 9 characters) Tips:
|
Service Ins |
Enter the service Insurances to report. (up to 9 characters) Tips:
|
Enter the Diagnoses Codes to report. (up to 9 characters) Tips:
|
|
Enter the Procedure Codes for the account balance letters. (up to 9 characters) Tips:
|
|
Enter the Referral Source Codes for the report or letters. (up to 4 characters) Tips:
|
|
Service Dates From |
To limit information to a range of patient service dates, enter the beginning service date. (mmddccyy, slashes and century optional) Tip: To include all, please leave blank. |
Service Dates Through |
To limit the report information to a range of patient service dates, enter the ending service date. (mmddccyy, slashes and century optional) Tip: To include all, please leave blank. |
Posting Dates From |
To limit the report information to a range of patient posting dates, enter the beginning posting date. (mmddccyy, slashes and century optional) Tip: To include all, please leave blank. |
Posting Dates Through |
To limit the report information to a range of patient posting dates, enter the ending posting date. (mmddccyy, slashes and century optional) Tip: To include all, please leave blank. |
Birth Dates From |
To limit patients to a range of patient birth dates, enter the beginning date of birth. (mmddccyy, slashes and century optional) Tip: To include all, please leave blank. |
Birth Dates Through |
To limit patients to a range of patient birth dates, enter the ending date of birth. (mmddccyy, slashes and century optional) Tip: To include all, please leave blank. |
Zip Codes From |
To limit the patient accounts to those within a range of patient zip codes, enter the beginning patient zip code. Tip: To include all patient zip codes, please leave blank. |
Zip Codes Through |
To limit the patient accounts to those within a range of patient zip codes, enter the ending patient zip code. Tip: To include all zip code, please leave blank. |
Note: Patients can have up to three comment fields. Because the Patient Comments 1, 2, and 3 fields are user-defined, the field labels may not match the documentation. |
|
Patient Comments 1 From |
To limit the patients on the report to those within a range of Comments 1, enter the beginning Comments 1 value. (up to 15 characters) Tip: To include all patient comments, leave blank. |
Patient Comments 1 Through |
To limit the patients on the report to those within a range of Comments 1, enter the ending Comments 1 value. (up to 15 characters) Tip: To include all patient comments, leave blank. |
To select a gender to report, click to select a choice in the drop-down list. Entry Options:
|
|
To select the marital status to report, click a choice in the drop-down list. |
|
To include only patient responsible balances and exclude balances for insurances, set Accept Assignment to No Only. To include only insurance balances and exclude patient balances, set Accept Assignment to Yes Only. To include both patient and insurance balances, set Accept Assignment to Both. |
|
Sort By |
To specify the sort criteria for the report, click up to three choices. Sort Options:
|
Selected Sort Options |
Displays the selected sort options for your reference. |
Type Processing |
|
Totals Only |
To print only totals on the report, click to select this box. To print detail as well as totals, de-select this box. |
One Patient/Line |
To print one patient per line, click to select this box. To omit printing one patient per line, leave this box blank. |
Include History |
To include patient history on the report, click to select this box. To omit history on the report, leave this box blank. |
Build Letter File |
To build the Letter file, click to select this box. To omit building the Letter file, leave this box blank. Note: This setting is only active, if you select the One Patient/Line option. |
Note: There are 3 totals and page breaks available. Totals and page breaks are based on sort criteria selected. If you select to sort by procedures, gender and birth dates, the totals will reflect that. |
|
Total By Provider |
To print totals by the sort criteria selected, click to select this box. To omit printing totals, leave this box blank. |
Page Break On Provider |
To print each new provider on a new page, click to select this box. To omit printing on a new page, leave this box blank. |
|
Displays the default printer number. To change, enter another printer number. For more information, see Printing Options. |
|
To run the routine, click Print or press [ENTER]. Keyboard shortcut: [ALT + p] |
|
To escape from the routine:
|
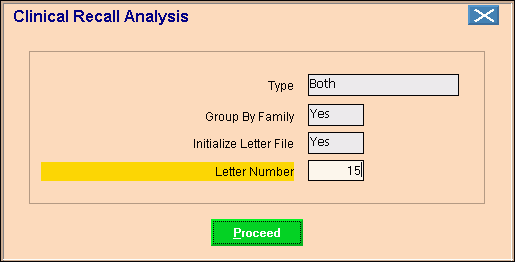
Build Letter File Step If Build Letter File was selected, the following will display after Print is selected:
|
|
Type |
Select Build Letter File to create the clinical letters. Or, select Both to build the clinical letter file and the Clinical Analysis report. Tip: The report will provide management with a summary of the patients to receive a letter. |
Group By Family |
To group patients by family, click Yes. Otherwise, click No. |
Initialize Letter File |
To clear the letter file before beginning, click Yes. |
Enter the number assigned to the clinical letter to print. Note: The letter formats or templates are created using the Add/Change/Delete Letter Formats routine in CURL. For more information, contact NDS Support. |
|
Report Sample(s), click More.

