Opening the GL Categories Listing, click More.
1. Click Listings from the Menu Bar.
2. Click GL Categories Listing.
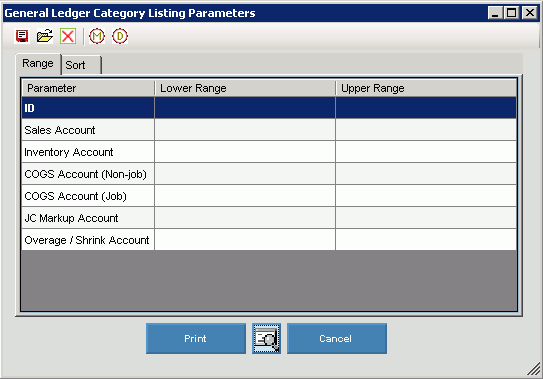
GL Categories Listing Window Example:
Choosing the Selections for the report, click More.
|
GL Categories Listing Prompts Tips: To see more information about a field, click the hyperlink for the field name. GL Category Listing Parameters can saved and then, loaded after being saved. For information, see Reporting Toolbar. |
|
|
To specify a range of GL Category IDs to include in the report, enter the lower range/beginning ID. To specify the ending range, enter the upper range ID. Notes:
|
|
|
To specify a range of sales accounts to include in the report, enter the lower/beginning sales account. To specify the ending range, enter the upper range sales account. Note: To include all sales accounts in the report, leave the lower and upper range blank for All. |
|
|
To specify a range of inventory accounts to include in the report, enter the lower/beginning inventory account. To specify the ending range, enter the upper range of the inventory account. Note: To include all inventory accounts in the report, leave the lower and upper range blank for All. |
|
|
To specify a range of COGS (Non-job) accounts to include in the report, enter the lower/beginning COGS account. To specify the ending range, enter the upper range COGS account. Note: To include all COGS accounts in the report, leave the lower and upper range blank for All. |
|
|
To specify a range of COGS (Job) accounts to include in the report, enter the lower/beginning COGS account. To specify the ending range, enter the upper range COGS account. Note: To include all COGS accounts in the report, leave the lower and upper range blank for All. |
|
|
To specify a range of job cost (JC) Markup Accounts to include in the report, enter the lower/beginning JC Markup Account. To specify the ending range, enter the upper range JC Markup Account. Note: To include all accounts in the report, leave the lower and upper range blank for All. |
|
|
To specify a range of overage/shrink accounts to include in the report, enter the lower/beginning overage/shrink account. To specify the ending range, enter the upper range of the overage/shrink account. Note: To include all accounts in the report, leave the lower and upper range blank for All. |
|
|
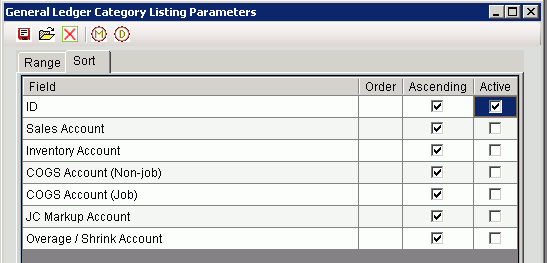
Sort Parameters |
|
|
Sort |
To specify the sort parameters, click Sort |
 |
|
|
Order |
To specify the fields to sort the report by, enter any positive number into the Order field. A value of 1 means sort by this field first, 2 means sort by this field second and so on. The numbers do not need to be sequential but they must be greater than zero. In the example above, GL categories are sorted by ID. Notes:
|
|
Ascending |
To sort in an ascending manner, click to select the Ascending checkbox. Or, leave the Ascending checkbox blank to sort in descending order. |
|
Active |
The Active flag must to set to enable the field to be sorted. To set the Active flag, click to check the corresponding checkbox.
|
|
|
To begin printing to the Windows® default printer, click Print, or press [ENTER]. Or, to print to the Print View window, click Print View Or, to escape from the print routine, click Cancel |

 .
.
Report Sample(s), click More.