General Journal Report Instructions
Use the General Journal Report to print journal entry transactions for a specific Period. You can specify if you want to print current or history transactions.
Tips:
This report is also known as the Journal Report.
This report is very similar to the General Journal Listing. However, the listing provides the option to specify if you want to print posted or unposted journal entries, whereas this report always prints both posted and unposted entries.
For more information about running reports, see Print View.
For more information about the buttons on the toolbar, see the Report Writer Toolbar.
At the Report Writer prompt, you can change the selection and sort options for the report. For more information, see the Report Writer Overview.
To see an example of the report, click General Journal Report Sample.
Directions:
To open click Reporting
from the Menu and then click
General Journal Report.
Tip: Or, use the keyboard
shortcut: [ALT] [r] [j].
Note: You may also be able to access the General Ledger menu
while in another INVISION application. To activate the General
Ledger menu in another application, the G/L
Application Control must be set up for the application during installation.
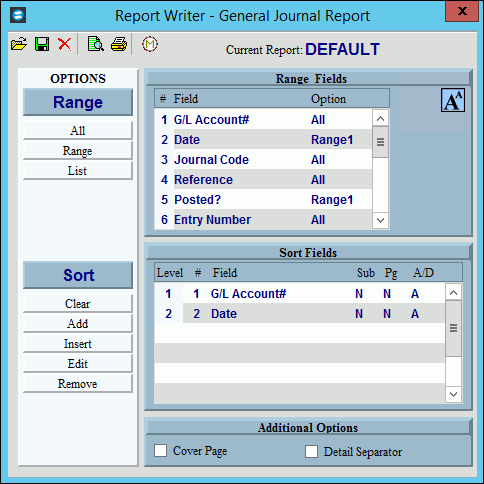
General Journal Report - Report Writer Prompt Example:
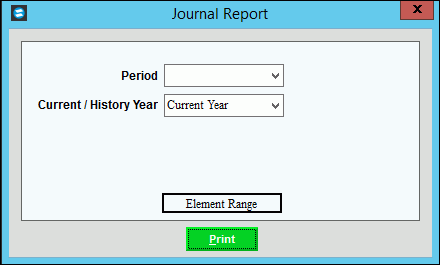
General Journal Report - Report Options Window:
Tip: This appears after the Report Writer prompt.
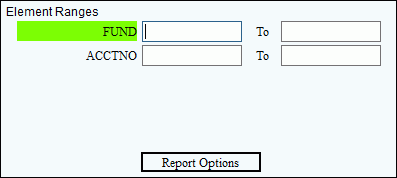
General Journal Report - Element Range Window:
Tip: This appears if you click Element Range at the Report Options window.
General Journal Report Prompt Options
|
|
Report Writer Prompt Window Tip: For more information, refer to the Report Writer - Overview. |
|
Report Writer Directions |
1. If you want to use
existing report settings, click Open
2. If you want to save
the current report settings, click Save
3. To generate the report:
Tip: For more information, refer to the Report Writer - Overview. |
Report Options Prompt Window |
|
To specify the Period for the journal entry transactions that you want to include in the report, click the Period in the drop-down list. (predefined) Required |
|
Current / History Year |
To specify which Fiscal Year for the journal entries to include in the report, click one of the following options in the drop-down list:
|
|
To select ranges of Account Numbers by the Account Element, click Element Range. You will see the Element Range Prompt described below. |
|
To generate the report, click Print or press [ENTER]. Keyboard shortcut: [ALT + p] Tip: The report is sent to either the default Windows printer or the Print View window, depending on the option you selected at the Report Writer prompt. For more information, refer to the Report Writer - Additional Options. |
|
To escape from the print routine, click Close. |
Element Range Prompt Tip: This prompt displays a list of the Elements defined for the Account Number. The list of elements varies according to the settings for each facility. You can select accounts to print on the report by entering ranges of Elements. |
|
From Element & To Element |
To select accounts by Element to be included in the report, enter the from and to values (inclusive) for each applicable Element. (format varies) |
|
To display Report Options prompt, click Report Options. |
|
To generate the report, click Print or press [ENTER]. Keyboard shortcut: [ALT + p] Tip: The report is sent to either the default Windows printer or the Print View window, depending on the option you selected at the Report Writer prompt. For more information, refer to the Report Writer - Additional Options. |
|
To escape from the print routine, click Close. |
![]()