Enhanced Inquiry - Transactions View
Use the Transactions view to see a complete history of transactions on an account, including billing, payments and deposits. The Transactions view shows similar information to the transactions view in the History Inquiry, but with a different format. Links for Location and invoices allow you to drill down to invoice and location details. A link for work orders opens Work Order Entry. A summary total displays at the bottom. The summary totals will change to reflect the group totals if you are grouping the transactions. You can also print a transaction summary report and a merged service history report. Statements associated with billing transactions can be viewed here. The Status column shows whether a transaction was a reversal, was reversed or was marked as removed during the Transfer All function in the Invoices view.
From the EDIFICE Inquiry, click View and then click Transactions.
EDIFICE Inquiry - Transactions View Example:
![]()
EDIFICE Inquiry - Transactions View Prompts |
|
Organize Transactions Customer
transactions display in a grid view. Columns of information
can be added or removed using the grid setting To view details about an invoice or a location, click the desired link. |
|
Sort Information |
To sort, simply click the desired column heading. To sort in reverse order, click the column heading a second time. |
Filter |
To
limit the transactions to those that meet certain criteria, click
Filter
To select the choices to use as criteria, click to check the desired box or boxes and then, click OK. Note: Advanced filtering options are available by clicking Text Filters. |
Group |
To organize items by a specific column heading such as transaction code or reference, drag the column heading to the box above the grid. For example, to group the items, drag the column heading for transaction code to the grouping box above the columns. To ungroup, drag the column heading from the grouping box to the grid. Grouping Box:
|
Reports
|
There are 2 reports that can be generated from the transaction information. To generate a report that shows transaction details for the customer, click Transaction Summary Report. For directions, see below. Note: To see a sample of the report, click here.
To generate a report that shows transaction details for all services for the customer, click Merged Service History Report. For directions, see below. Note: To see a sample of the report, click here. |
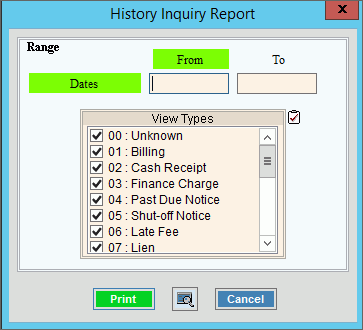
Transaction Summary Report or Merged Service History Report Steps After selecting the Transaction Summary report or the Merger Service History report, the following screen displays.
|
|
Dates |
To limit the report to a range of dates, enter the beginning transaction date in the range. (mm/dd/ccyy) Tip: To include all dates on this report, leave blank. |
From |
To limit the report to a range of dates, enter the ending transaction date in the range. (mm/dd/ccyy) Tip: To include all dates, leave blank. |
View Types |
To choose the types of history transactions to print, click to check the appropriate types of transactions to view. Tip: To quickly select or de-select
all
view types listed, click the
|
|
To begin printing, click Print, or press [ENTER]. Keyboard shortcut: [ALT + p] To print
the report to the screen, click Print
View Or, to
escape from the print routine, click Cancel
Keyboard shortcut: [ALT + c] |
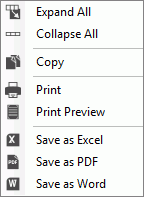
Right-click Menu To see additional functions, right-click within the grid. Below is an example.
|
|
|
To expand all rows in the grid, click Expand All. To collapse all rows in the grid, click Collapse All. |
|
To copy the information highlighted in the selected rows, click Copy. |
Printing & Exporting Functions These functions can be handy for further manipulating or formatting the data or sending copies to coworkers. In addition, Print and Print Preview functions are available. |
|
|
To begin printing the displayed information, click Print. The Print dialog opens. Or, to print to the Print Preview window, click Print Preview. |
|
The Windows Save As steps:
|
 ,
which
,
which next to the desired column heading. The available filter
choices display. Here is an example of transaction code
filters, which you can use to look for a specific type of transaction.
next to the desired column heading. The available filter
choices display. Here is an example of transaction code
filters, which you can use to look for a specific type of transaction.


 .
.